Note
Access to this page requires authorization. You can try signing in or changing directories.
Access to this page requires authorization. You can try changing directories.
Azure Kubernetes Fleet Manager uses a Microsoft Entra identity to access Azure resources like Azure virtual networks or to manage long-running background activities such as multi-cluster auto-upgrade.
You can use a managed identity to authorize access from a Fleet Manager to any service that supports Microsoft Entra authorization, without needing to manage credentials or include them in your code. You assign an Azure role-based access control (Azure RBAC) role to the managed identity to grant it permissions to a particular resource in Azure. For more information about Azure RBAC, see What is Azure role-based access control (Azure RBAC)?.
This article shows how to enable the following types of managed identity on a new or existing Azure Kubernetes Fleet Manager:
- System-assigned managed identity. A system-assigned managed identity is associated with a single Azure resource, such as a Fleet Manager. It exists for the lifecycle of the Fleet Manager only.
- User-assigned managed identity. A user-assigned managed identity is a standalone Azure resource that a Fleet Manager can use to authorize access to other Azure services. It persists separately from the Fleet Manager and can be used by multiple Azure resources.
To learn more about managed identities, see Managed identities for Azure resources.
Before you begin
If you intend to use the Azure CLI, make sure you have Azure CLI version 2.75.0 or later installed. To find the version, run az --version. If you need to install or upgrade, see Install Azure CLI.
Before running the Azure CLI examples in this article, set your subscription as the current active subscription by calling the az account set command and passing in your subscription ID.
az account set --subscription <subscription-id>
Also create an Azure resource group if you don't already have one by calling the az group create command.
az group create \
    --name myResourceGroup \
    --location westus2
Enable a system-assigned managed identity
A system-assigned managed identity is an identity that is associated with a Fleet Manager or another Azure resource. The system-assigned managed identity is tied to the lifecycle of the Fleet Manager. When the Fleet Manager is deleted, the system-assigned managed identity is also deleted.
Fleet Manager can use the system-assigned managed identity to authorize access to other resources running in Azure and execute long-running background processes. You can assign an Azure RBAC role to the system-assigned managed identity to grant the Fleet Manager permissions to access specific resources. For example, if your Fleet Manager needs to manage network resources, you can assign to the system-assigned managed identity an Azure RBAC role that grants those permissions.
Enable a system-assigned managed identity on a new Fleet Manager
When you create a new Fleet Manager in the Azure portal, a system-assigned managed identity is automatically created.
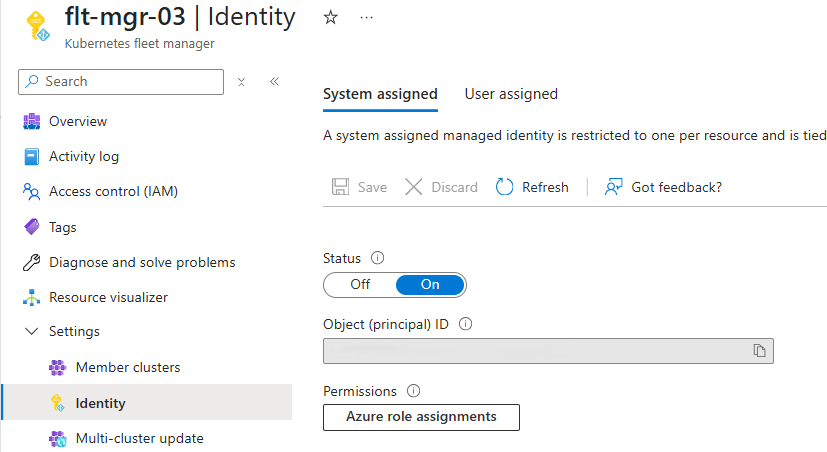
You can verify that the system-assigned managed identity is enabled by checking the Identity blade in the Fleet Manager's Settings section. The Status is On and the Object (principal) ID is populated (not shown in image).

Update an existing Fleet Manager to use a system-assigned managed identity
You can manage the Fleet Manager managed identity using the Identity blade in the Fleet Manager's Settings section.
Enable the system-assigned managed identity by setting the System assigned status to On and selecting Save.
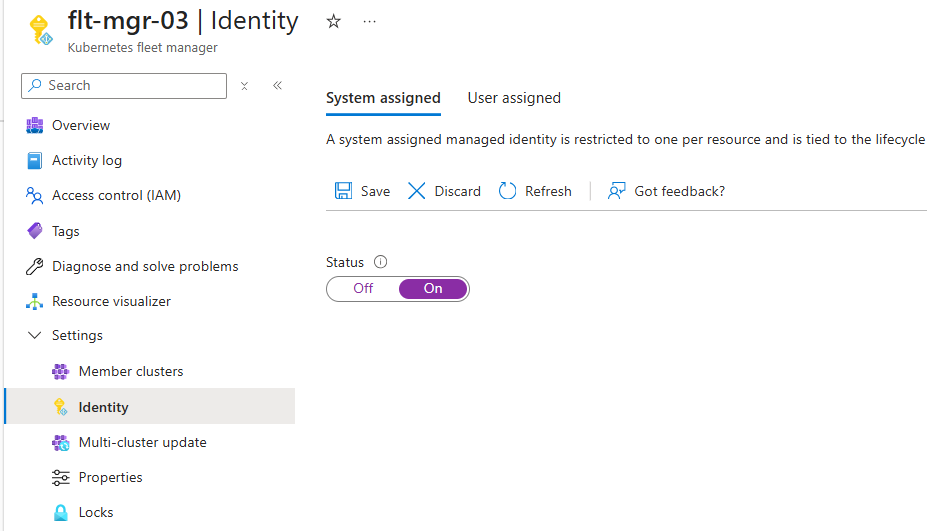
Select Yes on the confirmation dialog.
After a few moments the Status changes to On and the Object (principal) ID is populated (not shown in image).

Add a role assignment for a system-assigned managed identity
You can assign an Azure RBAC role to the system-assigned managed identity to grant the Fleet Manager permissions on another Azure resource. Azure RBAC supports both built-in and custom role definitions that specify levels of permissions. For more information about assigning Azure RBAC roles, see Steps to assign an Azure role.
When you assign an Azure RBAC role to a managed identity, you must define the scope for the role. In general, it's a best practice to limit the scope of a role to the minimum privileges required by the managed identity. For more information on scoping Azure RBAC roles, see Understand scope for Azure RBAC.
Note
It can take up to 60 minutes for the permissions granted to your Fleet Manager's managed identity to propagate.
Select Azure role assignments tab in the Fleet Manager's Identity blade. This opens the Azure role assignments pane.
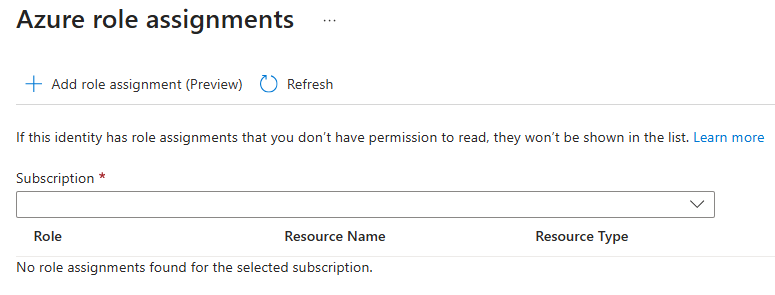
Select Add role assignment to open the Add role assignment pane and enter:
Scope - select Resource group.
Subscription - choose the Azure subscription containing the resource group you want to use.
Resource group - select the resource group.
Role - choose the role you want to assign to the Fleet Manager's system-assigned managed identity (for example, Network Contributor).
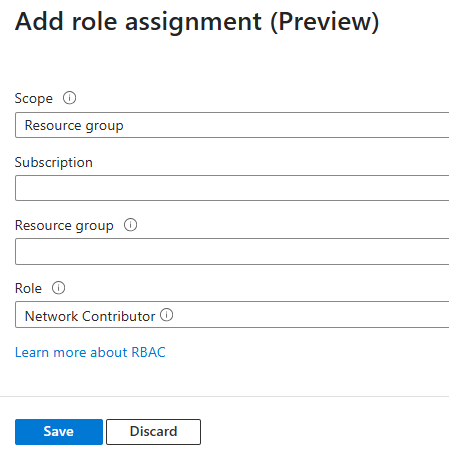
Select Save to assign the role to the Fleet Manager's system-assigned managed identity.


Enable a user-assigned managed identity
A user-assigned managed identity is a standalone Azure resource. When you create a Fleet Manager with a user-assigned managed identity, the user-assigned managed identity resource must exist before Fleet Manager creation.
Create a user-assigned managed identity
If you don't yet have a user-assigned managed identity resource, create one using the Azure portal or Azure CLI.
Follow the steps in the create a user-assigned managed identity documentation.
Assign an Azure RBAC role to the user-assigned managed identity
Before you create the Fleet Manager, add a role assignment for the managed identity.
Note
It may take up to 60 minutes for the permissions granted to your Fleet Manager's managed identity to propagate.
Navigate to the managed identity resource.
Select Azure role assignments tab in the managed identity resource's left navigation. This opens the Azure role assignments pane.
Select Add role assignment to open the Add role assignment pane and enter:
Scope - select Resource group.
Subscription - choose the Azure subscription containing the resource group you want to use.
Resource group - select the resource group.
Role - choose the role you want to assign to the managed identity (for example, Network Contributor).
Select Save to assign the role to the managed identity.
Create a Fleet Manager with the user-assigned managed identity
Note
The USDOD Central, USDOD East, and USGov Iowa regions in Azure US Government cloud don't support creating a Fleet Manager with a user-assigned managed identity.
You can't create a Fleet Manager with a user-assigned managed identity in the Azure portal. You can change the Fleet Manager identity type to user-assigned after the Fleet Manager is created, or use the Azure CLI.
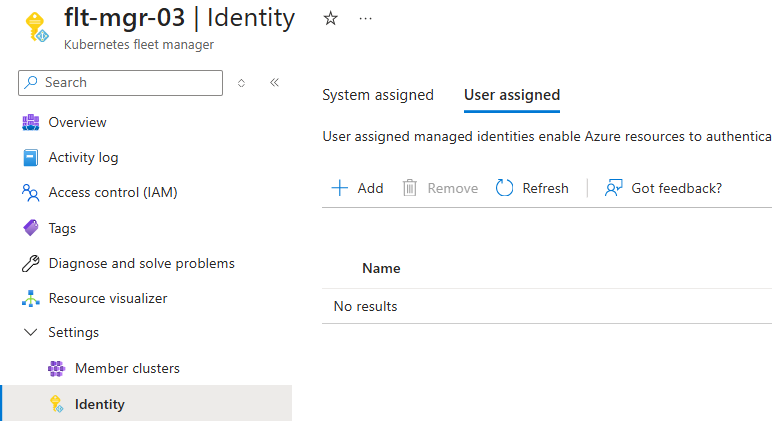
Update an existing Fleet Manager to use a user-assigned managed identity
You can manage the Fleet Manager managed identity using the Identity blade in the Fleet Manager's Settings section.
Switch to the user-assigned managed identity tab by selecting User assigned.
Select + Add to open the Add user assigned managed identity pane.
- Subscription - choose the Azure subscription containing the user-assigned managed identity you want to use.
- User assigned managed identities - search for the user-assigned managed identity you want to use.
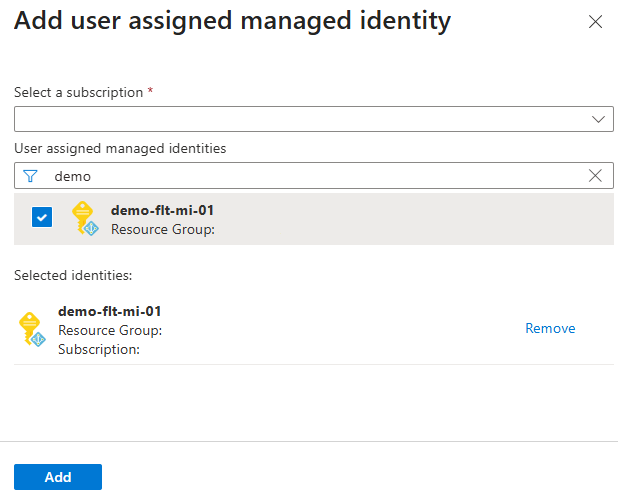
Select Add to add the user-assigned managed identity to the Fleet Manager.
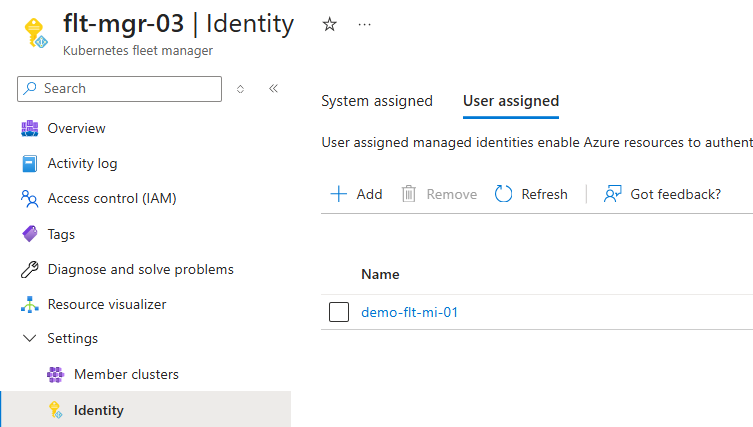
After a few moments the User assigned list changes and the user-assigned managed identity is listed.


Determine type of managed identity in use
You can check the Fleet Manager managed identity settings using the Identity blade in the Fleet Manager's Settings section.
Check both the System assigned and User assigned sections to determine which type of managed identity is enabled.
Next steps
- Use Azure Resource Manager templates to create a managed identity-enabled Fleet Manager.
Collaborate with us on GitHub
The source for this content can be found on GitHub, where you can also create and review issues and pull requests. For more information, see our contributor guide.

Azure Kubernetes Service