Note
Access to this page requires authorization. You can try signing in or changing directories.
Access to this page requires authorization. You can try changing directories.
OPC UA servers are software applications that communicate with assets. OPC UA servers expose OPC UA tags that represent tags. OPC UA tags provide real-time or historical data about the status, performance, quality, or condition of assets.
An asset in Azure IoT Operations is a logical entity that you create to represent a physical asset or device. An Azure IoT Operations asset can have custom properties, data points, streams, and events that describe its behavior and characteristics. An asset is associated with one or more devices. Azure IoT Operations stores asset definitions in the Azure Device Registry.
A device in Azure IoT Operations is a logical entity that defines the connections to physical assets or devices. Without a device, data can't flow from a physical device or asset to the MQTT broker. When you configure a device and asset, a connection is established to the physical asset or device and data point values, events, and streams arrive in Azure IoT Operations instance. A device has one or more inbound endpoints. Azure IoT Operations stores device definitions in the Azure Device Registry.
This article describes how to use the operations experience web UI and the Azure CLI to:
- Define the devices that connect OPC UA servers to your Azure IoT Operations instance.
- Add assets, and define their tags and events to enable data flow from OPC UA servers to the MQTT broker.
These assets, tags, and events map inbound data from OPC UA servers to friendly names that you can use in the MQTT broker and data flows.
Prerequisites
To configure devices and assets, you need a running preview instance of Azure IoT Operations.
To sign in to the operations experience web UI, you need a Microsoft Entra ID account with at least contributor permissions for the resource group that contains your Kubernetes - Azure Arc instance. You can't sign in with a Microsoft account (MSA). To create a suitable Microsoft Entra ID account in your Azure tenant:
- Sign in to the Azure portal with the same tenant and user name that you used to deploy Azure IoT Operations.
- In the Azure portal, go to the Microsoft Entra ID section, select Users > +New user > Create new user. Create a new user and make a note of the password, you need it to sign in later.
- In the Azure portal, go to the resource group that contains your Kubernetes - Azure Arc instance. On the Access control (IAM) page, select +Add > Add role assignment.
- On the Add role assignment page, select Privileged administrator roles. Then select Contributor and then select Next.
- On the Members page, add your new user to the role.
- Select Review and assign to complete setting up the new user.
You can now use the new user account to sign in to the operations experience web UI.
Your IT administrator must have configured the OPC UA connector template for your Azure IoT Operations instance in the Azure portal.
An OPC UA server that you can reach from your Azure IoT Operations cluster. If you don't have an OPC UA server, use the built-in OPC PLC simulator that comes with Azure IoT Operations.
Create a device
An Azure IoT Operations deployment can include an optional built-in OPC PLC simulator. To create a device that uses the built-in OPC PLC simulator:
Select devices and then Create device:
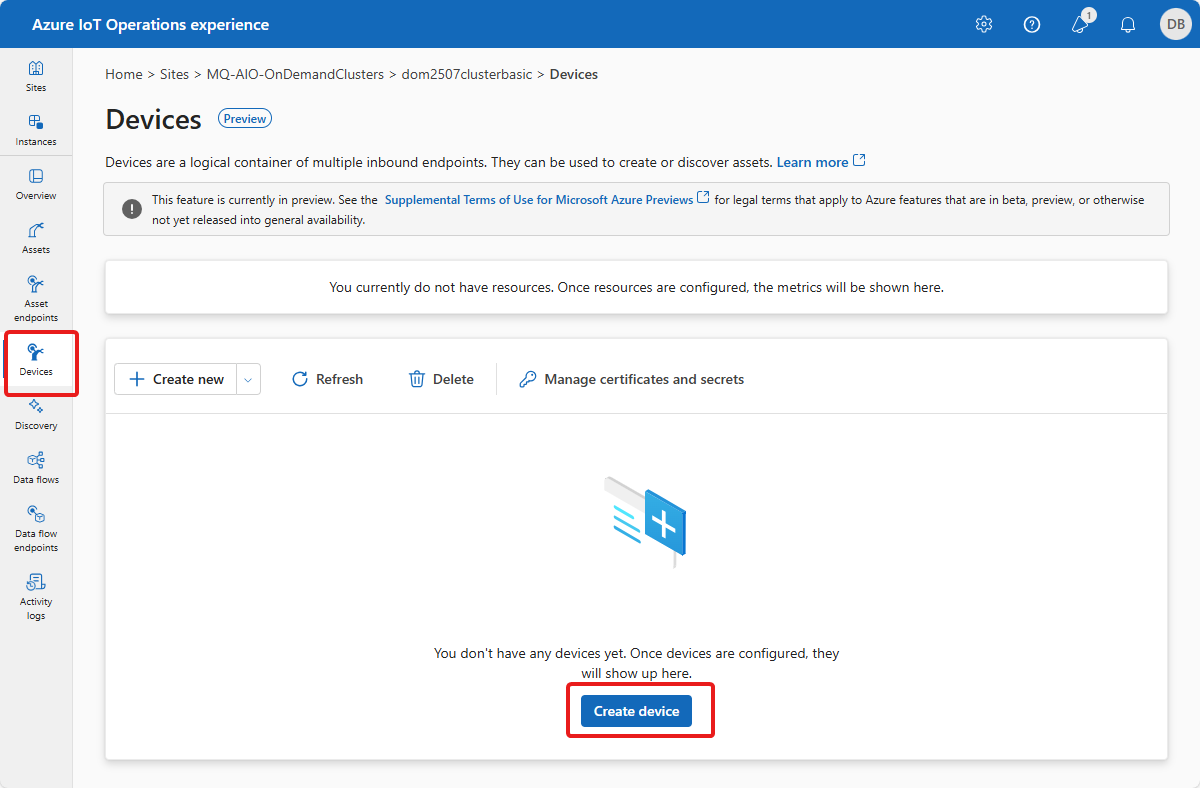
Tip
You can use the filter box to search for devices.
On the Basics page, enter a device name and select New on the Microsoft.OpcUa tile to add an endpoint for the device:

Enter your endpoint information. For example, to use the OPC PLC simulator, enter the following values:
Field Value Name opc-ua-connector-0Connector for OPC UA URL opc.tcp://opcplc-000000:50000User authentication AnonymousSelect Next and on the Additional Info page, enter any custom properties for the device.
Select Next to review your device details. Then select Create.


This configuration deploys a new device resource called opc-ua-connector to the cluster with an inbound endpoint called opc-ua-connector-0.
When the OPC PLC simulator is running, data flows from the simulator, to the connector for OPC UA, and then to the MQTT broker.
Configure a device to use a username and password
The previous example uses the Anonymous authentication mode. This mode doesn't require a username or password.
To use the UsernamePassword authentication mode, complete the following steps:
- Follow the steps in Configure OPC UA user authentication with username and password to add secrets for username and password in Azure Key Vault, and project them into Kubernetes cluster.
- In the operations experience, select Username password for the User authentication field to configure the device endpoint to use these secrets. Then enter the following values for the Username reference and Password reference fields:
| Field | Value |
|---|---|
| Username reference | aio-opc-ua-broker-user-authentication/username |
| Password reference | aio-opc-ua-broker-user-authentication/password |
Add an asset, tags, and events
To add an asset in the operations experience:
Select the Assets tab. Before you create any assets, you see the following screen:

Tip
You can use the filter box to search for assets.
Select Create namespace asset.
On the asset details screen, enter the following asset information:
- Inbound endpoint. Select your device inbound endpoint from the list.
- Asset name
- Description
Configure the set of custom properties that you want to associate with the asset. You can accept the default list of properties or add your own. The following properties are available by default:
- Manufacturer
- Manufacturer URI
- Model
- Product code
- Hardware version
- Software version
- Serial number
- Documentation URI
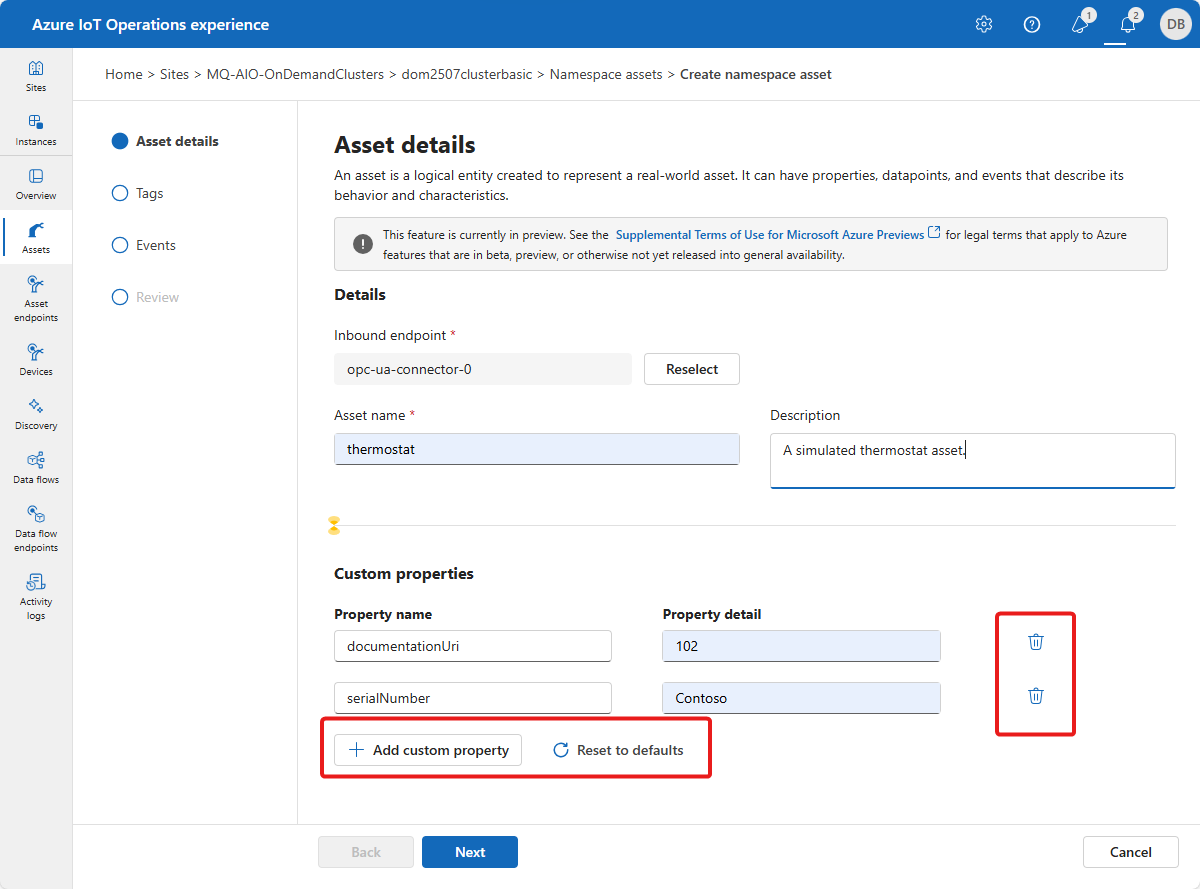
Select Next to go to the Tags page.


Add individual tags to an asset
Now you can define the tags associated with the asset. To add OPC UA tags:
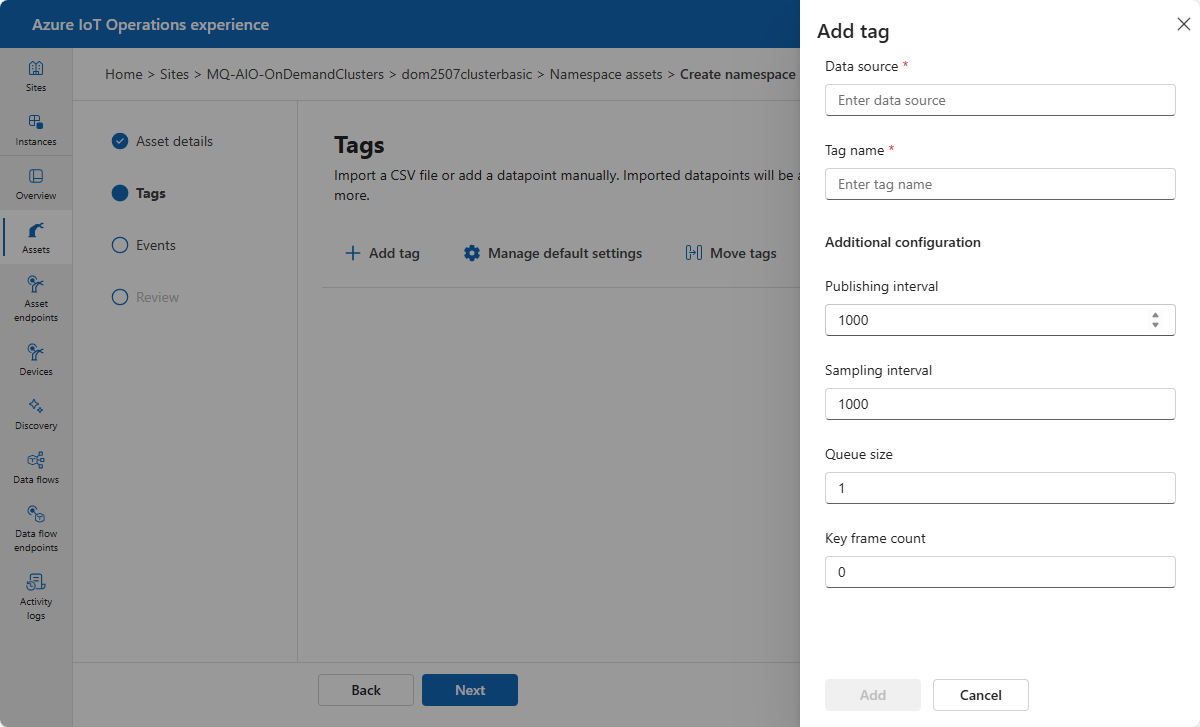
Select Add tag.
Enter your tag details:
- Data source. This value is the node ID from the OPC UA server.
- Tag name (Optional). This value is the friendly name that you want to use for the tag. If you don't specify a tag name, the node ID is used as the tag name.
- Publishing interval (milliseconds). You can override the default value for this tag.
- Sampling interval (milliseconds). You can override the default value for this tag.
- Queue size. You can override the default value for this tag.
- Key frame count. You can override the default value for this tag.
The following table shows some example tag values that you can use with the built-in OPC PLC simulator:
Data source Tag name ns=3;s=FastUInt10 Temperature ns=3;s=FastUInt100 Humidity To configure default settings for messages from the asset, select Manage default settings. These settings apply to all the OPC UA tags that belong to the asset. You can override these settings for each tag that you add. Default settings include:
- Sampling interval (milliseconds): The sampling interval indicates the fastest rate at which the OPC UA server should sample its underlying source for data changes.
- Publishing interval (milliseconds): The rate at which OPC UA server should publish data.
- Queue size: The depth of the queue to hold the sampling data before publishing it.
To configure the MQTT topic to publish the tag data to, select Manage default dataset. Enter an MQTT topic name such as
azure-iot-operations/data/thermostat, then select Update.On the Tags page, select Next to go to the Add events page.

Add individual events to an asset
Now you can define the events associated with the asset. To add OPC UA events:
Select Add event.
Enter your event details:
- Event notifier. This value is the event notifier from the OPC UA server.
- Event name (Optional). This value is the friendly name that you want to use for the event. If you don't specify an event name, the event notifier is used as the event name.
- Publishing interval (milliseconds). You can override the default value for this tag.
- Sampling interval (milliseconds). You can override the default value for this tag.
- Queue size. You can override the default value for this tag.
- Key frame count. You can override the default value for this tag.

Select Manage default settings to configure default event settings for the asset. These settings apply to all the OPC UA events that belong to the asset. You can override these settings for each event that you add. Default event settings include:
- Publishing interval (milliseconds): The rate at which OPC UA server should publish data.
- Queue size: The depth of the queue to hold the sampling data before publishing it.

Review your changes
Review your asset and OPC UA tag and event details and make any adjustments you need:

Update an asset
Find and select the asset you created previously. Use the Asset details, Tags, and Events tabs to make any changes:

On the Tags tab, you can add tags, update existing tags, or remove tags.
To update a tag, select an existing tag and update the tag information. Then select Update:

To remove tags, select one or more tags and then select Remove tags:

You can also add, update, and delete events and properties in the same way.
When you're finished making changes, select Save to save your changes.
Delete an asset
To delete an asset, select the asset you want to delete. On the Asset details page, select Delete. Confirm your changes to delete the asset:
