Note
Access to this page requires authorization. You can try signing in or changing directories.
Access to this page requires authorization. You can try changing directories.
Azure DevOps Services | Azure DevOps Server 2022 - Azure DevOps Server 2019
In earlier versions of Azure Pipelines, deploying applications to multiple servers required significant planning and maintenance. Windows PowerShell remoting had to be enabled manually, specific ports needed to be opened, and deployment agents had to be installed on each server. Managing roll-out deployments also required manual intervention. These challenges have been greatly simplified with the introduction of Deployment Groups.
A deployment group installs a deployment agent on each target server in the group and enables the release pipeline to gradually deploy the application across those servers. You can create multiple pipelines for roll-out deployments, allowing phased delivery of application updates to different user groups.
Note
Deployment groups are used in Classic pipelines. If you are using YAML pipelines, see Environments.
Prerequisites
| Product | Requirements |
|---|---|
| Azure DevOps | - An Azure DevOps organization. - An Azure DevOps project. |
| Azure DevOps Demo Generator | - Set up the Demo Generator. - Create a new Azure DevOps project and make sure to choose the DeploymentGroups template (number 15 in the list). |
| Azure | - An Azure subscription. |
Set up resources in Azure
This section guides you through setting up your Azure resources using an ARM template. It provisions six Virtual Machine (VM) web servers with IIS configured, a SQL Server VM (DB server), an Azure Load Balancer, and all necessary network connections.
Select the
button to initiate the deployment of your resources in Azure.
Fill in the required information, then select Review + create. You can use any allowed combination of usernames and passwords, as they won’t be used again in this tutorial. The Env Prefix Name is added to all resource names to ensure global uniqueness. Use something personal or random. If you encounter a naming conflict during validation or creation, try changing this value and redeploying. Provisioning typically takes 10–15 minutes.
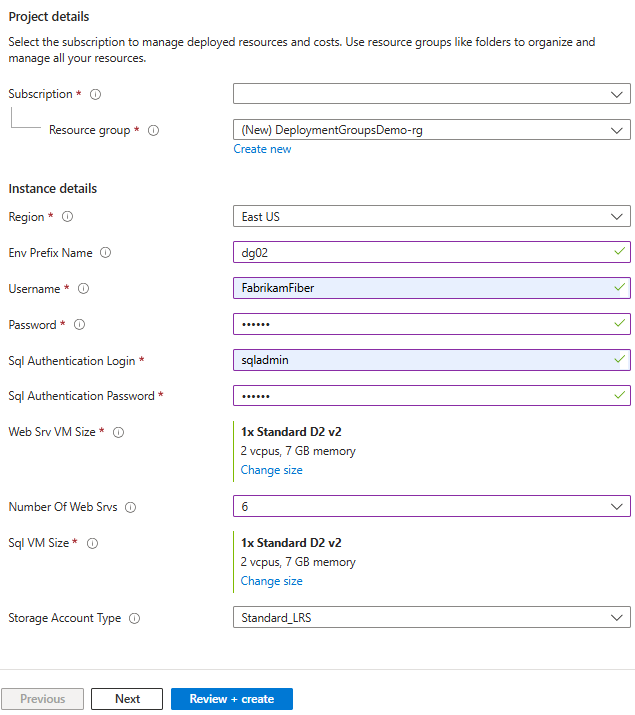
After validation completes, select Create to deploy your resources.
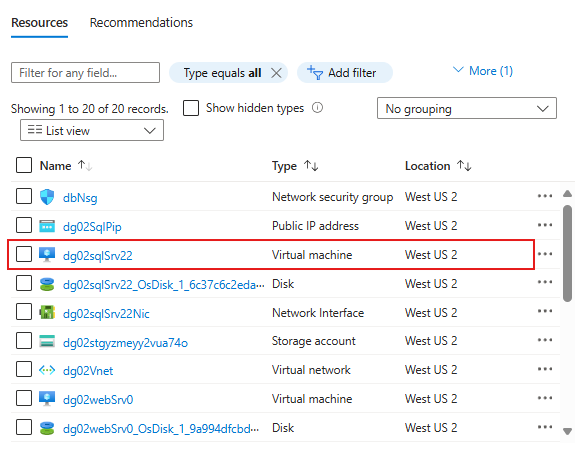
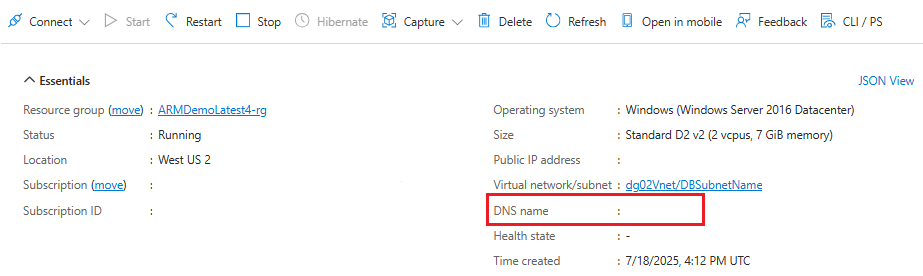
Once deployment finishes, go to your resource group in the Azure portal to review the generated resources. Select the DB server VM with sqlSrv in its name to view its details.
Copy the DNS name as you’ll need it in a later step.
Create a deployment group
A deployment group is a collection of machines, each with a deployment agent installed. These machines communicate with Azure Pipelines to coordinate application deployments.
Navigate to the Azure DevOps project you created earlier using the demo generator.
Select Pipelines > Deployment groups.
Select Add a deployment group.
Enter Release as the Deployment group name, then select Create. A registration script will be generated. You can use this script to register target servers and install the deployment agent manually. However, in this tutorial, the target servers are automatically registered as part of the release pipeline.
Create a personal access token
From your Azure DevOps project, select the User Settings icon, and then select Personal Access Tokens.
Select New Token, enter a name for your PAT, and then choose an expiration date.
Select Custom defined for Scopes, select Show all scopes, and then check the following scopes:
- Project and Team -> Read & write.
- Agent Pools -> Read & manage
- Deployment Groups -> Read & manage.
Select Create when you're done, and copy your PAT as you'll need it in the following section.
Configure the release pipeline
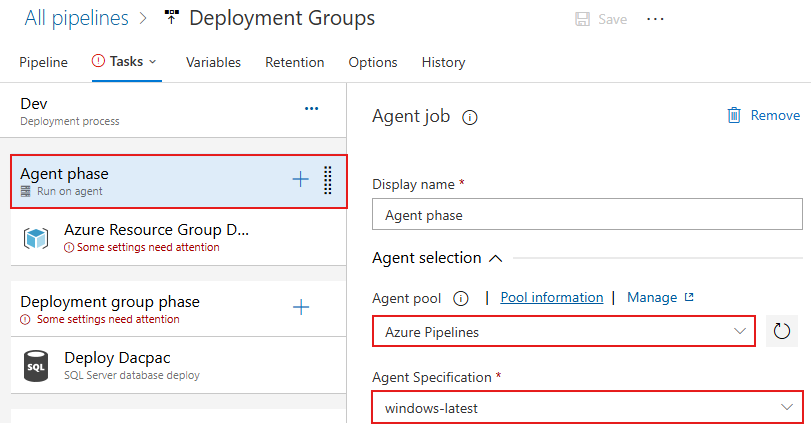
The Classic release pipeline template includes one agent job, the Agent phase, which runs tasks on an agent in an agent pool. It also includes two deployment group jobs: the Deployment group phase and the IIS Deployment phase. Deployment group jobs run tasks on machines defined in a deployment group. Follow the steps below to configure each job.
Configure the agent job
Navigate to your Azure DevOps project and select Pipelines > Releases.
Select the Deployment Groups release definiton, then select Edit.
Select the Tasks tab to view the deployment tasks in your pipeline.
Select the Agent phase stage, and then choose the Azure Pipelines pool and the windows-latest specification.
Select the Azure Resource Group Deployment task, select the Azure subscription you used earlier to create your resources, then select Authorize to authorize the connection. Once authorized, select the Resource group you created for this tutorial.
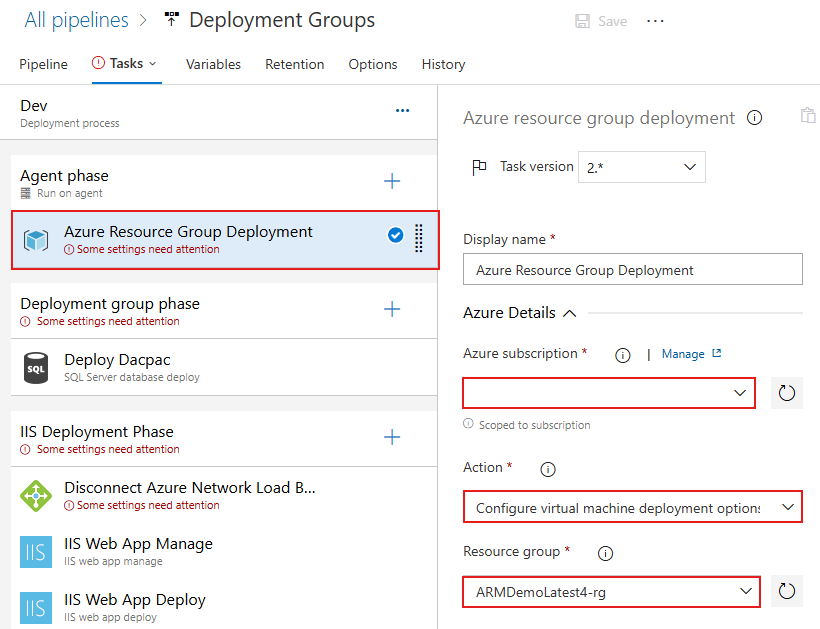
This task will run on virtual machines in Azure and must be able to connect back to the pipeline to complete the deployment group requirements. To secure the connection, a service connection must be set up using the Personal Access Token (PAT) you created earlier. Scroll down within the same task, and select New under Azure Pipelines service connection.
In the New service connection panel, enter the Connection URL of your Azure DevOps organization
https://dev.azure.com/organizationName. Paste in the Personal Access Token you created earlier, specify a Service connection name, and check the Grant access permission to all pipelines box. Select Verify and save when you're done.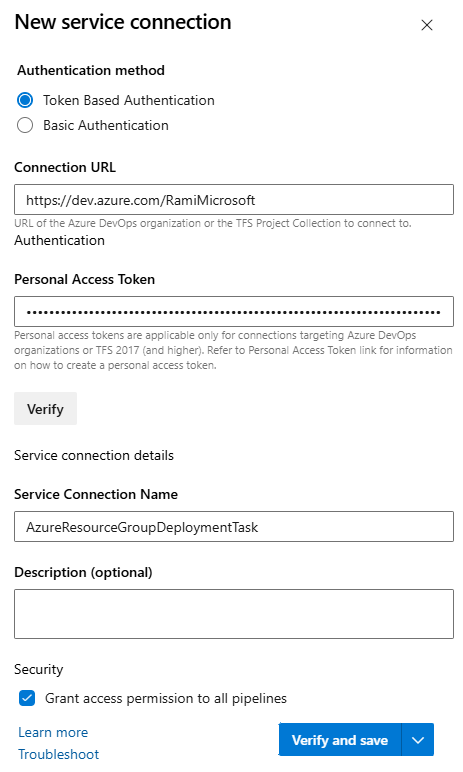
Scroll down in th Azure Resource Group Deployment task, then select from the dropdown menus your Team project and the Deployment Group you created earlier.

Configure the deployment group jobs
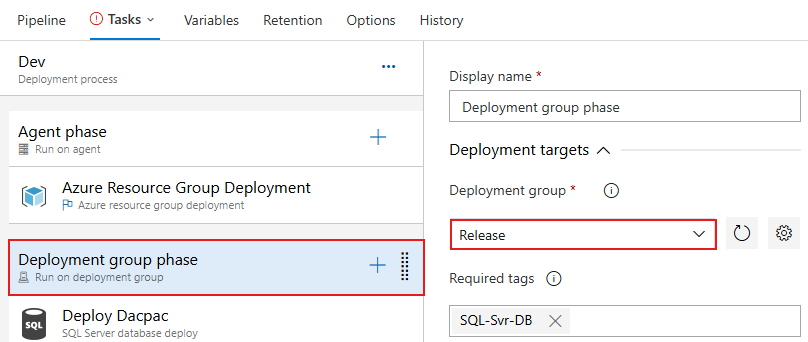
From the Deployment Groups release definition, select the Deployment group phase job. This job executes tasks on the machines defined in the deployment group. This job uses the SQL-Svr-DB tag to deploy to a subset of targets in the deployment group. Under the Deployment Group dropdown, select the Release deployment group you created earlier.
Select the IIS Deployment phase job. This job uses the WebSrv tag to deploy the web application to a subset of the web servers. Choose the Deployment Group you created earlier from the dropdown.
The Disconnect Azure Network Load Balancer and Connect Azure Network Load Balancer tasks are deprecated. you can disable them for now by right clicking on the task and selecting Disable select task(s).
The IIS Web App Manage and IIS Web App Deploy tasks are prefilled and requires no changes.
Select the Variables tab from the upper left corner, select Pipeline variables, and provide the following values. Replace the placeholder in the DefaultConnectionString variable with the SQL server DNS name that you copied earlier:
Variable Name Variable Value DatabaseName PartsUnlimited-Dev DBPassword xxxxxxxx DBUserName xxxxxxxx DefaultConnectionString Data Source=[YOUR_DNS_NAME];Initial Catalog=PartsUnlimited-Dev;User ID=xxxxxxxx;Password=xxxxxxxx;MultipleActiveResultSets=False;Connection Timeout=30; ServerName localhost Select Save, add a comment if you'd like, then select Ok.
Tip
If you receive an error that the DefaultConnectionString variable must be saved as a secret, select the padlock icon next to its value to protect it.
Create a release and deploy application
Now that the release definition is configured and saved, you can proceed to create a release to deploy your web app to Azure. However, before starting the release, you have to make sure the build pipeline has run at least once. This generates the pipeline artifact required for deployment. If you try to run the release pipeline before the build pipeline, the Artifacts section in the release panel will be empty. Follow the steps below to run your pipeline, generate a pipeline artifact then create a new release:
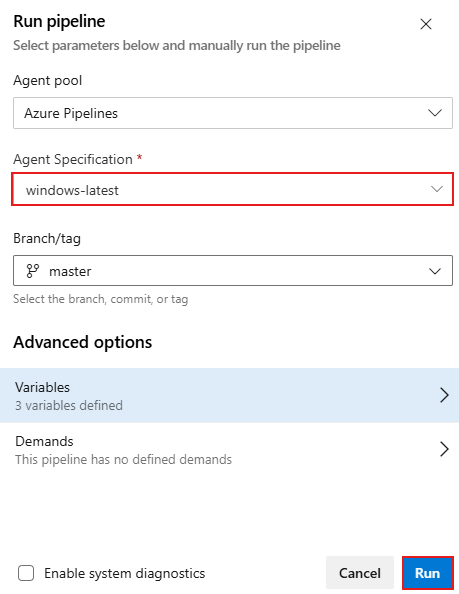
From your Azure DevOps project, select Pipeline, and then select the Deployment Groups build pipeline.
Select Run pipeline. In the pipeline run panel, select your Agent specification, then select Run.
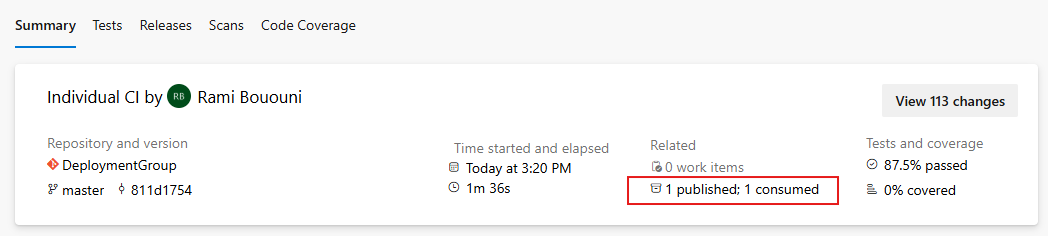
After the pipeline completes successfully, it will generate a pipeline artifact. You can view it from the pipeline summary window:
Now go to Pipelines > Release, select your release definition, and then select Create release to start the deployment pipeline.
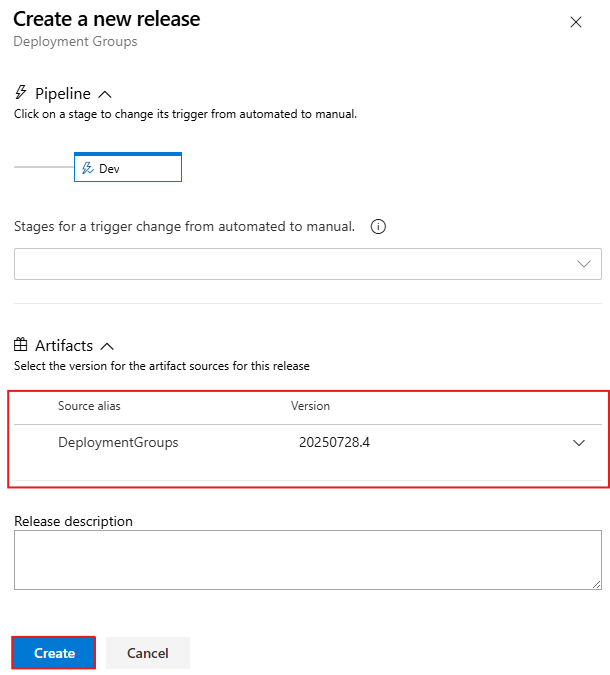
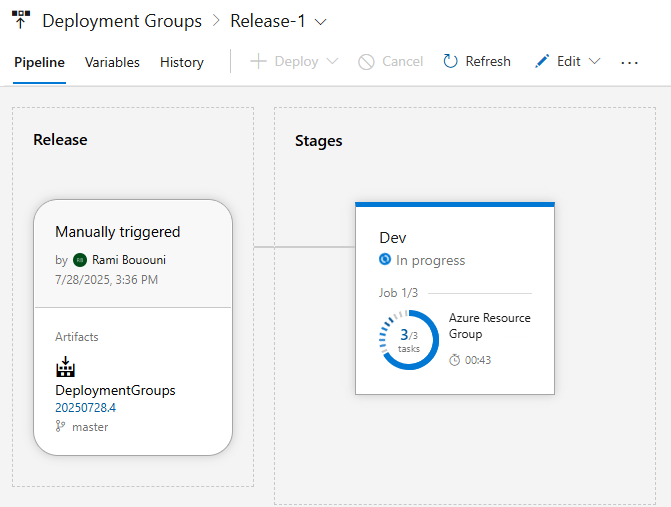
Select Create when you're done then select the pipeline run to open the overview. You should see your pipeline In progress. Click on the stage to view the detailed deployment logs.
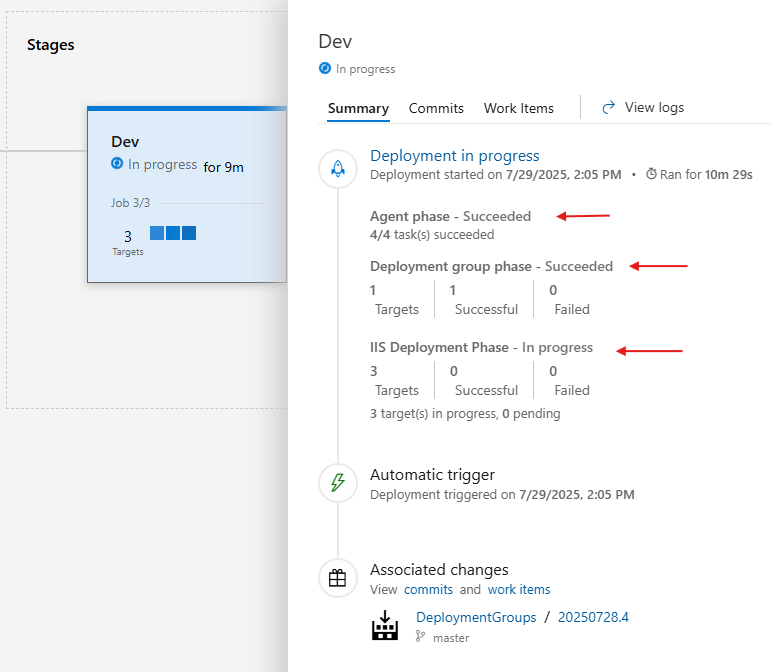
In the summary window, you can see the status of each phase of the deployment:
Troubleshooting
- Unable to connect to master or target server or A connection was successfully established with the server, but then an error occurred during the login process.
If you encounter either of these errors while running the Sql Dacpac Deployment On Machine Group task, follow these steps:
- Verify your database:
Make sure that the database was successfully created during the resource deployment. You can confirm this using the Azure CLI or sqlcmd:
sqlcmd -S <server-name> -U <username> -P <password> -Q "SELECT name FROM sys.databases"
If your database is not present in the list, you can create a new one using the following command:
sqlcmd -S <server-name> -U <username> -P <password> -Q "CREATE DATABASE [YourDatabaseName]"
- Verify your SQL Server Authentication:
Make sure the SQL Server Authentication is enabled, your SQL Server must be configured to allow both SQL and Windows Authentication (Mixed Mode). To enable this:
a. Connect using SSMS or sqlcmd
b. Run the following query:
EXEC xp_instance_regwrite
    N'HKEY_LOCAL_MACHINE',
    N'Software\\Microsoft\\MSSQLServer\\MSSQLServer',
    N'LoginMode',
    REG_DWORD,
    2;
c. Restart the SQL Server service for the change to take effect:
net stop MSSQLSERVER
net start MSSQLSERVER
- Some of my agents are offline even though the agent is running on my VM
If one or more of your agents are showing as offline, you can try a couple of things. First, log in to the VM where the agent is running and run the following command to check if your VM is resolving to the same set of IPs.
nslookup dev.azure.com
If all VMs are resolving to the same set of IPs, make sure the load balancer is configured with the correct outbound rule. You can add a backend pool to your load balancer in Azure, add the NICs of your VMs to the backend pool, and then associate it with your load balancer's outbound rule. To do this:
Navigate to Azure and find your load balancer.
Select Backend pools, choose your existing pool or create a new one, and add your web servers under IP configurations.
Go to Load balancing rules, select your load balancing rule, and choose your backend pool from the Backend pool dropdown.
Clean up resources
This tutorial created an Azure DevOps project and deployed resources in Azure. If you no longer need them, follow these steps to clean up:
Delete the Azure DevOps project: Navigate to your Project settings > Overview > Delete.
Delete the Azure Resource Group All Azure resources created during this tutorial were placed in the same resource group. Deleting the resource group will remove all associated resources. You can do this via the Azure portal or CLI:
Azure CLI
az group delete --name <RESOURCE_GROUP_NAME> --yes --no-waitAzure portal
Navigate to Azure portal > Resource groups.
Select the resource group you used in the tutorial.
Select Delete resource group, confirm the name, then select Delete.