Azure DevOps Services | Azure DevOps Server 2022 | Azure DevOps Server 2020
Using upstream sources in Azure Artifacts enables you to manage all your application dependencies from a single feed. It simplifies consuming packages from public registries like NuGet.org or npmjs.com, while also providing protection against outages or compromised packages. You can also publish your own packages to the same feed and manage all your dependencies in one location.
This tutorial walks you through enabling upstream sources in your feed and consuming packages from public registries such as NuGet.org or npmjs.com.
Prerequisites
Create a feed and enable upstream sources
Sign in to your Azure DevOps organization, and then navigate to your project.
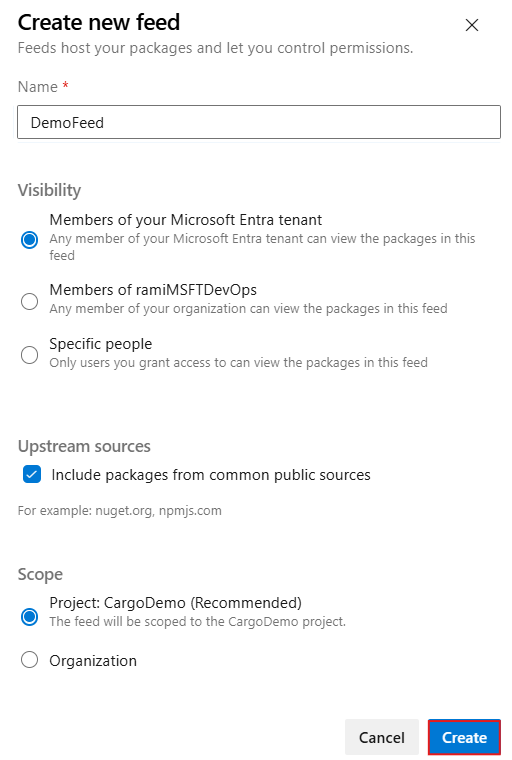
Select Artifacts, and then select Create Feed to create a new feed.
Provide a Name for your feed, choose its Visibility and Scope, and make sure you check the Include packages from common public sources checkbox to enable upstream sources.
Select Create when you're done.
Important
To add a feed from a different organization as an upstream source, the target feed owner must share the target view with All feeds and people in organizations associated with my Microsoft Entra tenant by navigating to Feed Settings > Views > Select the ellipsis button on the right for the specified view > Edit .
Authenticate with the feed
Now that you've created your feed, select the appropriate tab based on the technology you're using and follow the instructions to set up your configuration file and connect to your feed:
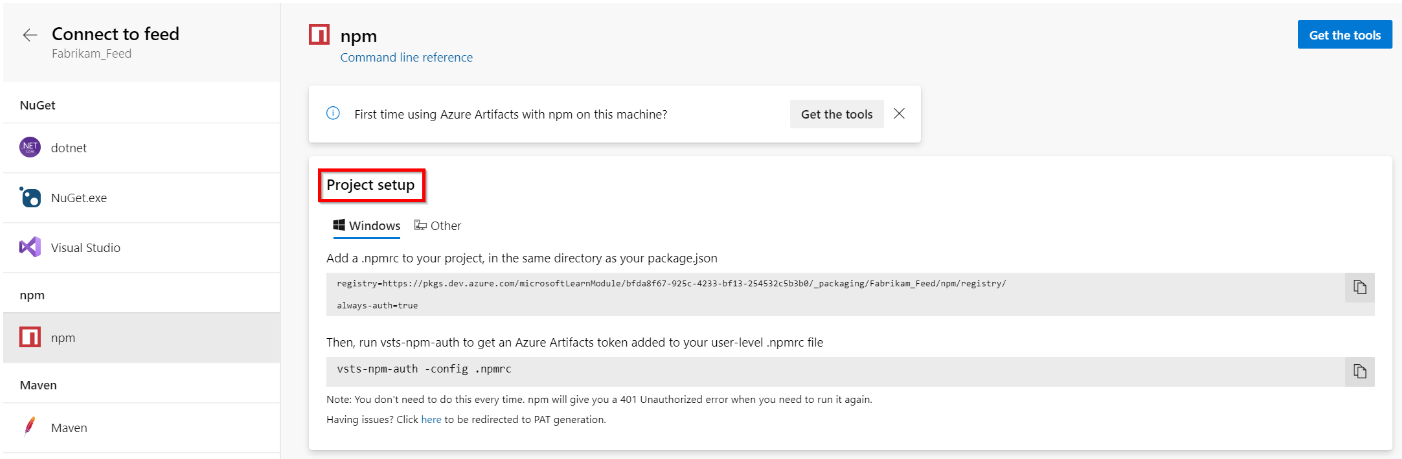
Sign in to your Azure DevOps organization, and then navigate to your project.
Select Artifacts, select your feed from the dropdown menu, and then select Connect to feed.
Select npm from the left navigation pane, and follow the provided instructions in the Project setup section to set up your config file. If you don’t already have a .npmrc file, create a new one in the root of your project (the same folder as your package.json). Open your new .npmrc file and paste in the provided snippet.
Sign in to your Azure DevOps organization, and then navigate to your project.
Select Artifacts, select your feed from the dropdown menu, and then select Connect to feed.
Select NuGet.exe from the left navigation pane, then copy the XML snippet provided in the Project Setup section.
Create a new nuget.config file in the root of your project, and paste in the XML snippet you copied in the previous step.
Sign in to your Azure DevOps organization, and then navigate to your project.
Select Artifacts, select your feed from the dropdown menu, and then select Connect to feed.
Select pip from the left navigation pane.
Create a virtual environment if you haven't done so already.
Add a pip.ini (Windows) or pip.conf (Mac/Linux) file to your virtualenv and paste in the snippet provided in the Project setup section.
Sign in to your Azure DevOps organization, and then navigate to your project.
Select Artifacts, select your feed from the dropdown menu, and then select Connect to feed.
Select Maven from the left navigation pane.
Add the snippet provided in the Project setup section to the <repositories> and <distributionManagement> sections in your pom.xml. Your file should look similar to the following:
<repository>
  <id>[FEED-NAME]</id>
  <url>https://pkgs.dev.azure.com/[ORGANIZATION-NAME]/_packaging/[FEED-NAME]/maven/v1</url>
  <releases>
    <enabled>true</enabled>
  </releases>
  <snapshots>
    <enabled>true</enabled>
  </snapshots>
</repository>
Paste the provided <server> snippet into your settings.xml file. You file should look similar to this:
<settings xmlns="http://maven.apache.org/SETTINGS/1.0.0"
          xmlns:xsi="http://www.w3.org/2001/XMLSchema-instance"
          xsi:schemaLocation="http://maven.apache.org/SETTINGS/1.0.0
                              https://maven.apache.org/xsd/settings-1.0.0.xsd">
  <servers>
    <server>
      <id>[FEED-NAME]</id>
      <username>[ORGANIZATION-NAME]</username>
      <password>[PERSONAL_ACCESS_TOKEN]</password>
    </server>
  </servers>
</settings>
Create a personal access token with Packaging > Read & write scopes and paste your personal access token into the <password> tag in your settings.xml file.
Sign in to your Azure DevOps organization, and then navigate to your project.
Select Artifacts, select your feed from the dropdown menu, and then select Connect to feed.
Select Gradle from the left navigation pane.
Add the snippet provided in the Project setup section to the repositories and publishing sections in your build.gradle file. Your file should resemble the following:
maven {
    url 'https://pkgs.dev.azure.com/[ORGANIZATION-NAME]/_packaging/[FEED-NAME]/maven/v1'
    name '[FEED-NAME]'
    authentication {
        basic(BasicAuthentication)
    }
}
Paste the provided <server> snippet into your settings.xml file. Your file should resemble the following:
<settings xmlns="http://maven.apache.org/SETTINGS/1.0.0"
          xmlns:xsi="http://www.w3.org/2001/XMLSchema-instance"
          xsi:schemaLocation="http://maven.apache.org/SETTINGS/1.0.0
                              https://maven.apache.org/xsd/settings-1.0.0.xsd">
  <servers>
    <server>
      <id>[FEED-NAME]</id>
      <username>[ORGANIZATION-NAME]</username>
      <password>[PERSONAL_ACCESS_TOKEN]</password>
    </server>
  </servers>
</settings>
Create a personal access token with Packaging > Read & write scopes. Paste your personal access token into the <password> tag in your settings.xml file.
Sign in to your Azure DevOps organization, and navigate to your project.
Select Artifacts, select your feed from the dropdown menu, and then select Connect to feed.
Select Cargo from the left navigation pane.
Add the snippet provided in the Project setup section to your cargo/config.toml file in your source repository. Your config.toml file should resemble the following:
  [registries]
  FEED_NAME = { index = "sparse+https://pkgs.dev.azure.com/ORGANIZATION_NAME/PROJECT_NAME/_packaging/FEED_NAME/Cargo/index/" }
  ```
Add the second snippet provided in the Project setup section to your cargo/config.toml file to replace the crates.io source with your feed. Your file should resemble the following:
[source.crates-io]
replace-with = "FEED_NAME"
Configure a credential provider
Log in to the registry
Restore packages
Now that you've enabled upstream sources and authenticated with your feed, select the appropriate tab based on your package type, and follow the instructions to restore packages from public registries into your Azure Artifacts feed.
Remove the node_modules folder from your project.
Open a command prompt window and run the following command to restore your packages. Once completed, your feed should have a saved copy of any packages installed from upstream.
npm install --force
Note
The --force flag ensures that packages are pulled from the remote source even if a local copy exists.
Clear your local cache.
nuget locals -clear all
Open a command prompt window and run the following command to restore your packages. Once completed, your feed should have a saved copy of any packages installed from upstream.
nuget.exe restore
Related content