Note
Access to this page requires authorization. You can try signing in or changing directories.
Access to this page requires authorization. You can try changing directories.
In this quickstart: learn how to use TypeSpec to design, generate, and implement a RESTful TypeScript API application. TypeSpec is an open-source language for describing cloud service APIs and generates client and server code for multiple platforms. By following this quickstart, you learn how to define your API contract once and generate consistent implementations, helping you build more maintainable and well-documented API services.
In this quickstart, you:
- Define your API using TypeSpec
- Create an API server application
- Integrate Azure Cosmos DB for persistent storage
- Deploy to Azure
- Run and test your API
Important
@typespec/http-server-js emitter is currently in PREVIEW.
This information relates to a prerelease product that may be substantially modified before it's released. Microsoft makes no warranties, expressed or implied, with respect to the information provided here.
Prerequisites
- An active Azure account. Create an account for free if you don't have one.
- Node.js LTS installed on your system.
- TypeScript for writing and compiling TypeScript code.
- Docker
- Visual Studio Code
- TypeSpec extension
- Optional: Deployment with Azure Developer CLI
Developing with TypeSpec
TypeSpec defines your API in a language-agnostic way and generates the API server and client library for multiple platforms. This functionality allows you to:
- Define your API contract once
- Generate consistent server and client code
- Focus on implementing business logic rather than API infrastructure
TypeSpec provides API service management:
- API definition language
- Server-side routing middleware for API
- Client libraries for consuming API
You provide client requests and server integrations:
- Implement business logic in middleware such as Azure services for databases, storage, and messaging
- Hosting server for your API (locally or in Azure)
- Deployment scripts for repeatable provisioning and deployment
Create a new TypeSpec application
Create a new folder to hold the API server and TypeSpec files.
mkdir my_typespec_quickstart
cd my_typespec_quickstart
Install the TypeSpec compiler globally:
npm install -g @typespec/compilerCheck TypeSpec installed correctly:
tsp --versionInitialize the TypeSpec project:
tsp initAnswer the following prompts with the answers provided:
- Initialize a new project here? Y
- Select a project template? Generic REST API
- Enter a project name: Widgets
- What emitters do you want to use?
- OpenAPI 3.1 document
- JavaScript server stubs
TypeSpec emitters are libraries that utilize various TypeSpec compiler APIs to reflect on the TypeSpec compilation process and generate artifacts.
Wait for the initialization to complete before continuing.
Compile the project:
tsp compile .TypeSpec generates the default project in
./tsp-output, creating two separate folders:- schema is the OpenApi 3 specification. Notice that the few lines in
./main.tspgenerated over 200 lines of OpenApi specification for you. - server is the generated middleware. This middleware can be incorporated into a Node.js server project.
./tsp-output/js/src/generated/models/all/demo-service.tsdefines the interfaces for the Widgets API../tsp-output/js/src/generated/http/openapi3.tsdefines the Open API spec as a TypeScript file and is regenerated every time you compile your TypeSpec project.
- schema is the OpenApi 3 specification. Notice that the few lines in
Configure TypeSpec emitters
Use the TypeSpec files to configure the API server generation to scaffold the entire Express.js server.
Open the
./tsconfig.yamland replace the existing configuration with the following YAML:emit: - "@typespec/openapi3" - "@typespec/http-server-js" options: "@typespec/openapi3": emitter-output-dir: "{output-dir}/server/schema" openapi-versions: - 3.1.0 "@typespec/http-server-js": emitter-output-dir: "{output-dir}/server" express: trueThis configuration creates a complete Express.js API server:
express: Generate the Express.js API server, including the Swagger UI.emitter-output-dir: Generate everything into./serverdirectory.
Delete the existing
./tsp-output. Don't worry, you'll generate the server in the next step.Use the TypeSpec JavaScript emitter to create the Express.js server:
npx hsjs-scaffoldChange into the new
./tsp-output/serverdirectory:cd ./tsp-output/serverCompile the TypeScript into JavaScript.
tscRun the project:
npm startWait for the notification to Open in browser.
Open the browser and go to
http://localhost:3000/.api-docs.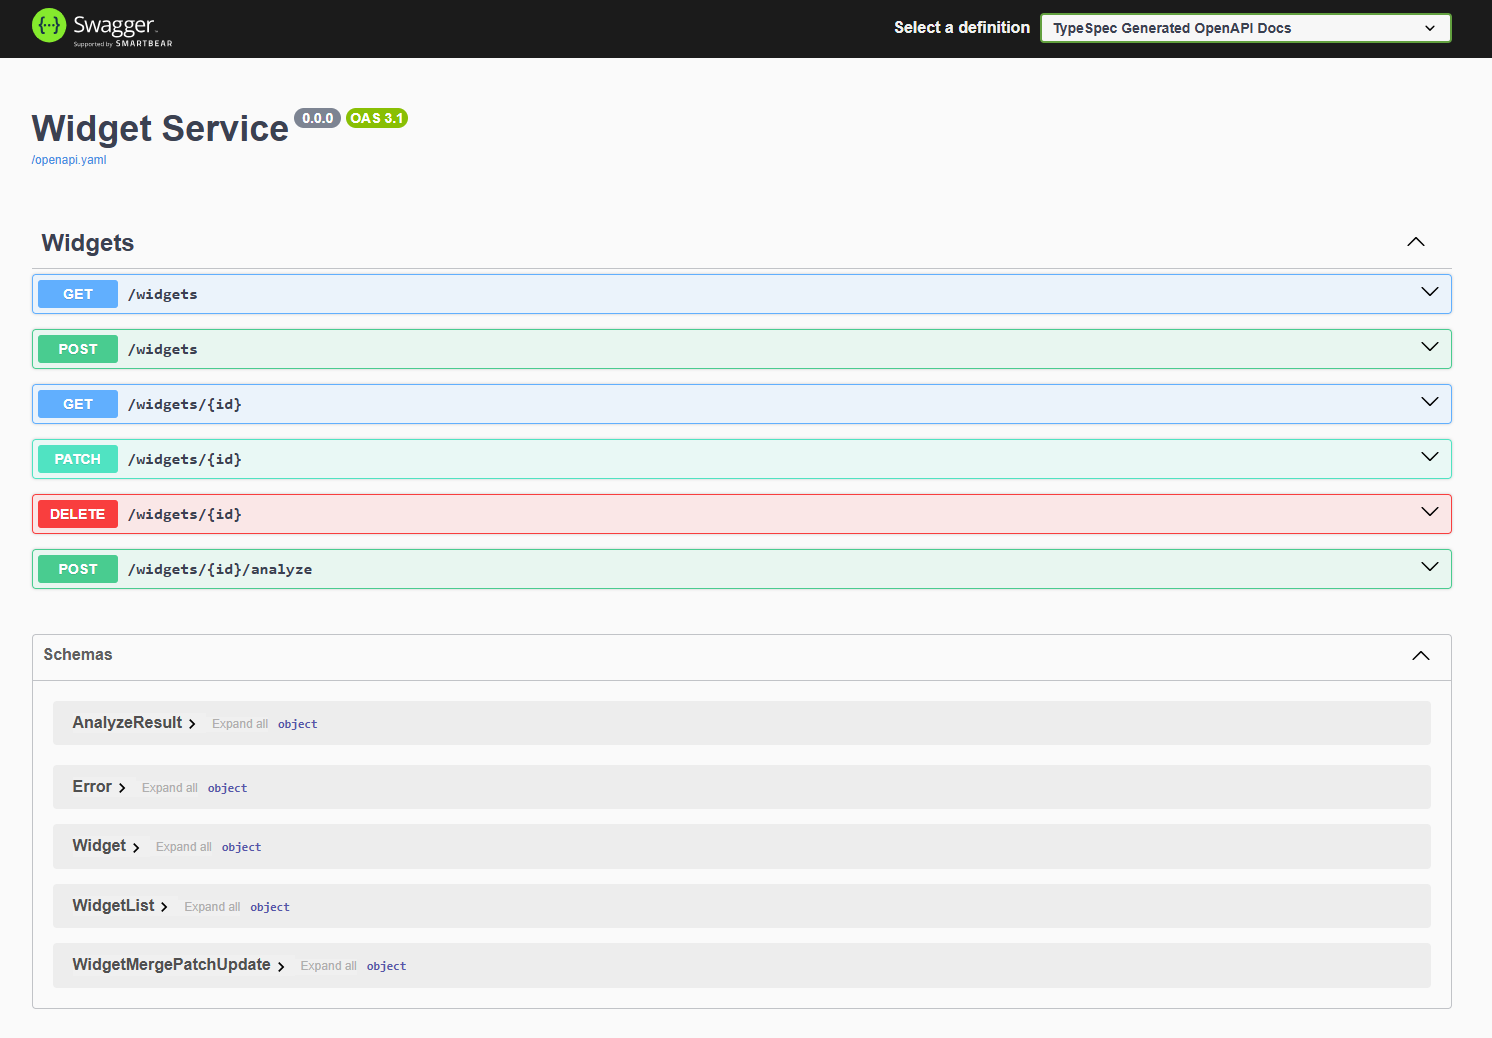
The default TypeSpec API and server both work. If you want to finish off this API server, add your business logic to support the Widgets APIs in
./tsp-output/server/src/controllers/widgets.ts. The UI is connected to the API which returns hardcoded fake data.
Understand application file structure
The Express.js project structure found at tsp-output/server/ includes the generated server, the package.json, and the middleware for your Azure integration.
server
├── package.json
├── package-lock.json
├── src
│   ├── controllers
│   │   └── widgets.ts
│   ├── generated
│   │   ├── helpers
│   │   │   ├── datetime.ts
│   │   │   ├── header.ts
│   │   │   ├── http.ts
│   │   │   ├── multipart.ts
│   │   │   ├── router.ts
│   │   │   └── temporal
│   │   │       ├── native.ts
│   │   │       └── polyfill.ts
│   │   ├── http
│   │   │   ├── openapi3.ts
│   │   │   ├── operations
│   │   │   │   └── server-raw.ts
│   │   │   └── router.ts
│   │   └── models
│   │       └── all
│   │           ├── demo-service.ts
│   │           └── typespec.ts
│   ├── index.ts
│   └── swagger-ui.ts
The file structure for the parent TypeSpec project includes this Express.js project in tsp-output:
├── tsp-output
├── .gitignore
├── main.tsp
├── package-lock.json
├── package.json
├── tspconfig.yaml
Change persistence to Azure Cosmos DB no-sql
Now that the basic Express.js API server is working, update the Express.js server to work with Azure Cosmos DB for a persistent data store. This includes changes to the index.ts to use Cosmos DB integration in the middleware. All changes should happen outside the ./tsp-output/server/src/generated directory.
In the
./tsp-output/serverdirectory, add Azure Cosmos DB to the project:npm install @azure/cosmosAdd the Azure Identity library to authenticate to Azure:
npm install @azure/identityCreate an
./tsp-output/server/src/azuredirectory to hold source code specific to Azure.Create the
cosmosClient.tsfile in that directory to create a Cosmos DB client object and paste in the following code:import { CosmosClient, Database, Container } from "@azure/cosmos"; import { DefaultAzureCredential } from "@azure/identity"; /** * Interface for CosmosDB configuration settings */ export interface CosmosConfig { endpoint: string; databaseId: string; containerId: string; partitionKey: string; } /** * Singleton class for managing CosmosDB connections */ export class CosmosClientManager { private static instance: CosmosClientManager; private client: CosmosClient | null = null; private config: CosmosConfig | null = null; private constructor() {} /** * Get the singleton instance of CosmosClientManager */ public static getInstance(): CosmosClientManager { if (!CosmosClientManager.instance) { CosmosClientManager.instance = new CosmosClientManager(); } return CosmosClientManager.instance; } /** * Initialize the CosmosDB client with configuration if not already initialized * @param config CosmosDB configuration */ private ensureInitialized(config: CosmosConfig): void { if (!this.client || !this.config) { this.config = config; this.client = new CosmosClient({ endpoint: config.endpoint, aadCredentials: new DefaultAzureCredential(), }); } } /** * Get a database instance, creating it if it doesn't exist * @param config CosmosDB configuration * @returns Database instance */ private async getDatabase(config: CosmosConfig): Promise<Database> { this.ensureInitialized(config); const { database } = await this.client!.databases.createIfNotExists({ id: config.databaseId }); return database; } /** * Get a container instance, creating it if it doesn't exist * @param config CosmosDB configuration * @returns Container instance */ public async getContainer(config: CosmosConfig): Promise<Container> { const database = await this.getDatabase(config); const { container } = await database.containers.createIfNotExists({ id: config.containerId, partitionKey: { paths: [config.partitionKey] } }); return container; } /** * Clean up resources and close connections */ public dispose(): void { this.client = null; this.config = null; } } export const buildError = (error: any, message: string) => { const statusCode = error?.statusCode || 500; return { code: statusCode, message: `${message}: ${error?.message || 'Unknown error'}` }; };Notice the file uses the endpoint, database, and container. It doesn't need a connection string or key because it's using the Azure Identity credential
DefaultAzureCredential. Learn more about this method of secure authentication for both local and production environments.Create a new Widget controller,
./tsp-output/server/src/controllers/WidgetsCosmos.ts, and paste in the following integration code for Azure Cosmos DB.import { Widgets, Widget, WidgetList, AnalyzeResult,Error } from "../generated/models/all/demo-service.js"; import { WidgetMergePatchUpdate } from "../generated/models/all/typespec/http.js"; import { CosmosClientManager, CosmosConfig, buildError } from "../azure/cosmosClient.js"; import { HttpContext } from "../generated/helpers/router.js"; import { Container } from "@azure/cosmos"; export interface WidgetDocument extends Widget { _ts?: number; _etag?: string; } /** * Implementation of the Widgets API using Azure Cosmos DB for storage */ export class WidgetsCosmosController implements Widgets<HttpContext> { private readonly cosmosConfig: CosmosConfig; private readonly cosmosManager: CosmosClientManager; private container: Container | null = null; /** * Creates a new instance of WidgetsCosmosController * @param azureCosmosEndpoint Cosmos DB endpoint URL * @param databaseId The Cosmos DB database ID * @param containerId The Cosmos DB container ID * @param partitionKey The partition key path */ constructor(azureCosmosEndpoint: string, databaseId: string, containerId: string, partitionKey: string) { if (!azureCosmosEndpoint) throw new Error("azureCosmosEndpoint is required"); if (!databaseId) throw new Error("databaseId is required"); if (!containerId) throw new Error("containerId is required"); if (!partitionKey) throw new Error("partitionKey is required"); this.cosmosConfig = { endpoint: azureCosmosEndpoint, databaseId: databaseId, containerId: containerId, partitionKey: partitionKey }; this.cosmosManager = CosmosClientManager.getInstance(); } /** * Get the container reference, with caching * @returns The Cosmos container instance */ private async getContainer(): Promise<Container | null> { if (!this.container) { try { this.container = await this.cosmosManager.getContainer(this.cosmosConfig); return this.container; } catch (error: any) { console.error("Container initialization error:", error); throw buildError(error, `Failed to access container ${this.cosmosConfig.containerId}`); } } return this.container; } /** * Create a new widget * @param widget The widget to create * @returns The created widget with assigned ID */ async create(ctx: HttpContext, body: Widget ): Promise<Widget | Error> { const id = body.id; try { const container = await this.getContainer(); if(!container) { return buildError({statusCode:500}, "Container is not initialized"); } if (!body.id) { return buildError({statusCode:400}, "Widget ID is required"); } const response = await container.items.create<Widget>(body, { disableAutomaticIdGeneration: true }); if (!response.resource) { return buildError({statusCode:500}, `Failed to create widget ${body.id}: No resource returned`); } return this.documentToWidget(response.resource); } catch (error: any) { if (error?.statusCode === 409) { return buildError({statusCode:409}, `Widget with id ${id} already exists`); } return buildError(error, `Failed to create widget ${id}`); } } /** * Delete a widget by ID * @param id The ID of the widget to delete */ async delete(ctx: HttpContext, id: string): Promise<void | Error> { try { const container = await this.getContainer(); if(!container) { return buildError({statusCode:500}, "Container is not initialized"); } await container.item(id, id).delete(); } catch (error: any) { if (error?.statusCode === 404) { return buildError({statusCode:404}, `Widget with id ${id} not found`); } return buildError(error, `Failed to delete widget ${id}`); } } /** * Get a widget by ID * @param id The ID of the widget to retrieve * @returns The widget if found */ async read(ctx: HttpContext, id: string): Promise<Widget | Error> { try { const container = await this.getContainer(); if(!container) { return buildError({statusCode:500}, "Container is not initialized"); } const { resource } = await container.item(id, id).read<WidgetDocument>(); if (!resource) { return buildError({statusCode:404}, `Widget with id ${id} not found`); } return this.documentToWidget(resource); } catch (error: any) { return buildError(error, `Failed to read widget ${id}`); } } /** * List all widgets with optional paging * @returns List of widgets */ async list(ctx: HttpContext): Promise<WidgetList | Error> { try { const container = await this.getContainer(); if(!container) { return buildError({statusCode:500}, "Container is not initialized"); } const { resources } = await container.items .query({ query: "SELECT * FROM c" }) .fetchAll(); return { items: resources.map(this.documentToWidget) }; } catch (error: any) { return buildError(error, "Failed to list widgets"); } } /** * Update an existing widget * @param id The ID of the widget to update * @param body The partial widget data to update * @returns The updated widget */ async update( ctx: HttpContext, id: string, body: WidgetMergePatchUpdate, ): Promise<Widget | Error> { try { const container = await this.getContainer(); if(!container) { return buildError({statusCode:500}, "Container is not initialized"); } // First check if the widget exists const { resource: item } = await container.item(id).read<WidgetDocument>(); if (!item) { return buildError({statusCode:404}, `Widget with id ${id} not found`); } // Apply patch updates to the existing widget const updatedWidget: Widget = { ...item, ...body, id }; // Replace the document in Cosmos DB const { resource } = await container.item(id).replace(updatedWidget); if (!resource) { return buildError({statusCode:500}, `Failed to update widget ${id}: No resource returned`); } return this.documentToWidget(resource); } catch (error: any) { return buildError(error, `Failed to update widget ${id}`); } } async analyze(ctx: HttpContext, id: string): Promise<AnalyzeResult | Error> { return { id: "mock-string", analysis: "mock-string", }; } /** * Convert a Cosmos DB document to a Widget */ private documentToWidget(doc: WidgetDocument): Widget { return Object.fromEntries( Object.entries(doc).filter(([key]) => !key.startsWith('_')) ) as Widget; } }Update the
./tsp-output/server/src/index.tsto import the new controller, get the Azure Cosmos DB environment settings, then create the WidgetsCosmosController and pass to the router.// Generated by Microsoft TypeSpec import { WidgetsCosmosController } from "./controllers/WidgetsCosmos.js"; import { createDemoServiceRouter } from "./generated/http/router.js"; import express from "express"; import morgan from "morgan"; import { addSwaggerUi } from "./swagger-ui.js"; const azureCosmosEndpoint = process.env.AZURE_COSMOS_ENDPOINT!; const azureCosmosDatabase = "WidgetDb"; const azureCosmosContainer = "Widgets"; const azureCosmosPartitionKey = "/Id"; const router = createDemoServiceRouter( new WidgetsCosmosController( azureCosmosEndpoint, azureCosmosDatabase, azureCosmosContainer, azureCosmosPartitionKey) ); const PORT = process.env.PORT || 3000; const app = express(); app.use(morgan("dev")); const SWAGGER_UI_PATH = process.env.SWAGGER_UI_PATH || "/.api-docs"; addSwaggerUi(SWAGGER_UI_PATH, app); app.use(router.expressMiddleware); app.listen(PORT, () => { console.log(`Server is running at http://localhost:${PORT}`); console.log( `API documentation is available at http://localhost:${PORT}${SWAGGER_UI_PATH}`, ); });In a terminal at
./tsp-output/server, compile the TypeScript into JavaScript.tscThe project now builds with Cosmos DB integration. Let's create the deployment scripts to create the Azure resources and deploy the project.
Create deployment infrastructure
Create the files needed to have a repeatable deployment with Azure Developer CLI and Bicep templates.
At the root of the TypeSpec project, create an
azure.yamldeployment definition file and paste in the following source:# yaml-language-server: $schema=https://raw.githubusercontent.com/Azure/azure-dev/main/schemas/v1.0/azure.yaml.json name: azure-typespec-scaffold-js metadata: template: azd-init@1.14.0 services: api: project: ./ host: containerapp language: js docker: path: Dockerfile pipeline: provider: github hooks: postprovision: windows: shell: pwsh run: | # Set environment variables for the Container App azd env set AZURE_COSMOS_ENDPOINT "$env:AZURE_COSMOS_ENDPOINT" continueOnError: false interactive: true posix: shell: sh run: | # Set environment variables for the Container App azd env set AZURE_COSMOS_ENDPOINT "$AZURE_COSMOS_ENDPOINT" continueOnError: false interactive: trueNotice that this configuration references the entire TypeSpec project.
At the root of the TypeSpec project, create the
./Dockerfilewhich is used to build the container for Azure Container Apps.# Stage 1: Build stage FROM node:20-alpine AS builder WORKDIR /app # Install TypeScript globally RUN npm install -g typescript # Copy package files first to leverage Docker layer caching COPY package*.json ./ # Create the tsp-output/server directory structure RUN mkdir -p tsp-output/server # Copy server package.json COPY tsp-output/server/package.json ./tsp-output/server/ # Install build and dev dependencies RUN npm i --force --no-package-lock RUN cd tsp-output/server && npm install # Copy the rest of the application code COPY . . # Build the TypeScript code RUN cd tsp-output/server && tsc #--------------------------------------------------------------- # Stage 2: Runtime stage FROM node:20-alpine AS runtime # Set NODE_ENV to production for better performance ENV NODE_ENV=production WORKDIR /app # Copy only the server package files COPY tsp-output/server/package.json ./ # Install only production dependencies RUN npm install # Copy all necessary files from the builder stage # This includes the compiled JavaScript, any static assets, etc. COPY --from=builder /app/tsp-output/server/dist ./dist # Set default port and expose it ENV PORT=3000 EXPOSE 3000 # Run the application CMD ["node", "./dist/src/index.js"]At the root of the TypeSpec project, create an
./infradirectory.Create a
./infra/main.bicepparamfile and copy in the following to define the parameters we need for deployment:using './main.bicep' param environmentName = readEnvironmentVariable('AZURE_ENV_NAME', 'dev') param location = readEnvironmentVariable('AZURE_LOCATION', 'eastus2') param deploymentUserPrincipalId = readEnvironmentVariable('AZURE_PRINCIPAL_ID', '')This param list provides the minimum parameters needed for this deployment.
Create a
./infra/main.bicepfile and copy in the following to define the Azure resources for provisioning and deployment:metadata description = 'Bicep template for deploying a GitHub App using Azure Container Apps and Azure Container Registry.' targetScope = 'resourceGroup' param serviceName string = 'api' var databaseName = 'WidgetDb' var containerName = 'Widgets' var partitionKey = '/id' @minLength(1) @maxLength(64) @description('Name of the environment that can be used as part of naming resource convention') param environmentName string @minLength(1) @description('Primary location for all resources') param location string @description('Id of the principal to assign database and application roles.') param deploymentUserPrincipalId string = '' var resourceToken = toLower(uniqueString(resourceGroup().id, environmentName, location)) var tags = { 'azd-env-name': environmentName repo: 'https://github.com/typespec' } module managedIdentity 'br/public:avm/res/managed-identity/user-assigned-identity:0.4.1' = { name: 'user-assigned-identity' params: { name: 'identity-${resourceToken}' location: location tags: tags } } module cosmosDb 'br/public:avm/res/document-db/database-account:0.8.1' = { name: 'cosmos-db-account' params: { name: 'cosmos-db-nosql-${resourceToken}' location: location locations: [ { failoverPriority: 0 locationName: location isZoneRedundant: false } ] tags: tags disableKeyBasedMetadataWriteAccess: true disableLocalAuth: true networkRestrictions: { publicNetworkAccess: 'Enabled' ipRules: [] virtualNetworkRules: [] } capabilitiesToAdd: [ 'EnableServerless' ] sqlRoleDefinitions: [ { name: 'nosql-data-plane-contributor' dataAction: [ 'Microsoft.DocumentDB/databaseAccounts/readMetadata' 'Microsoft.DocumentDB/databaseAccounts/sqlDatabases/containers/items/*' 'Microsoft.DocumentDB/databaseAccounts/sqlDatabases/containers/*' ] } ] sqlRoleAssignmentsPrincipalIds: union( [ managedIdentity.outputs.principalId ], !empty(deploymentUserPrincipalId) ? [deploymentUserPrincipalId] : [] ) sqlDatabases: [ { name: databaseName containers: [ { name: containerName paths: [ partitionKey ] } ] } ] } } module containerRegistry 'br/public:avm/res/container-registry/registry:0.5.1' = { name: 'container-registry' params: { name: 'containerreg${resourceToken}' location: location tags: tags acrAdminUserEnabled: false anonymousPullEnabled: true publicNetworkAccess: 'Enabled' acrSku: 'Standard' } } var containerRegistryRole = subscriptionResourceId( 'Microsoft.Authorization/roleDefinitions', '8311e382-0749-4cb8-b61a-304f252e45ec' ) module registryUserAssignment 'br/public:avm/ptn/authorization/resource-role-assignment:0.1.1' = if (!empty(deploymentUserPrincipalId)) { name: 'container-registry-role-assignment-push-user' params: { principalId: deploymentUserPrincipalId resourceId: containerRegistry.outputs.resourceId roleDefinitionId: containerRegistryRole } } module logAnalyticsWorkspace 'br/public:avm/res/operational-insights/workspace:0.7.0' = { name: 'log-analytics-workspace' params: { name: 'log-analytics-${resourceToken}' location: location tags: tags } } module containerAppsEnvironment 'br/public:avm/res/app/managed-environment:0.8.0' = { name: 'container-apps-env' params: { name: 'container-env-${resourceToken}' location: location tags: tags logAnalyticsWorkspaceResourceId: logAnalyticsWorkspace.outputs.resourceId zoneRedundant: false } } module containerAppsApp 'br/public:avm/res/app/container-app:0.9.0' = { name: 'container-apps-app' params: { name: 'container-app-${resourceToken}' environmentResourceId: containerAppsEnvironment.outputs.resourceId location: location tags: union(tags, { 'azd-service-name': serviceName }) ingressTargetPort: 3000 ingressExternal: true ingressTransport: 'auto' stickySessionsAffinity: 'sticky' scaleMaxReplicas: 1 scaleMinReplicas: 1 corsPolicy: { allowCredentials: true allowedOrigins: [ '*' ] } managedIdentities: { systemAssigned: false userAssignedResourceIds: [ managedIdentity.outputs.resourceId ] } secrets: { secureList: [ { name: 'azure-cosmos-db-nosql-endpoint' value: cosmosDb.outputs.endpoint } { name: 'user-assigned-managed-identity-client-id' value: managedIdentity.outputs.clientId } ] } containers: [ { image: 'mcr.microsoft.com/devcontainers/typescript-node' name: serviceName resources: { cpu: '0.25' memory: '.5Gi' } env: [ { name: 'AZURE_COSMOS_ENDPOINT' secretRef: 'azure-cosmos-db-nosql-endpoint' } { name: 'AZURE_CLIENT_ID' secretRef: 'user-assigned-managed-identity-client-id' } ] } ] } } output AZURE_COSMOS_ENDPOINT string = cosmosDb.outputs.endpoint output AZURE_COSMOS_DATABASE string = databaseName output AZURE_COSMOS_CONTAINER string = containerName output AZURE_COSMOS_PARTITION_KEY string = partitionKey output AZURE_CONTAINER_REGISTRY_ENDPOINT string = containerRegistry.outputs.loginServer output AZURE_CONTAINER_REGISTRY_NAME string = containerRegistry.outputs.nameThe OUTPUT variables allow you to use the provisioned cloud resources with your local development.
Deploy application to Azure
You can deploy this application to Azure using Azure Container Apps:
In a terminal at the root of the project, authenticate to the Azure Developer CLI:
azd auth loginDeploy to Azure Container Apps using the Azure Developer CLI:
azd upAnswer the following prompts with the answers provided:
- Enter a unique environment name:
tsp-server-js - Select an Azure Subscription to use: select your subscription
- Select an Azure location to use: select a location near you
- Pick a resource group to use: Select Create a new resource group
- Enter a name for the new resource group: accept the default provided
- Enter a unique environment name:
Wait until the deployment completes. The response includes information similar to the following:
Deploying services (azd deploy)

  (✓) Done: Deploying service api
  - Endpoint: https://container-app-123.ambitiouscliff-456.centralus.azurecontainerapps.io/


SUCCESS: Your up workflow to provision and deploy to Azure completed in 6 minutes 32 seconds.
Use application in browser
Once deployed, you can:
- In the console, select the
Endpointurl to open it in a browser. - Add the route,
/.api-docs, to the endpoint to use the Swagger UI. - Use the Try it now feature on each method to create, read, update, and delete widgets through the API.
Grow your application
Now that you have the entire end to end process working, continue to build your API:
- Learn more about the TypeSpec language to add more APIs and API layer features in the
./main.tsp. - Add more emitters and configure their parameters in the
./tspconfig.yaml. - As you add more features in your TypeSpec files, support those changes with source code in the server project.
- Continue to use passwordless authentication with Azure Identity.
Clean up resources
When you're done with this quickstart, you can remove the Azure resources:
azd down
Or delete the resource group directly from the Azure portal.