Note
Access to this page requires authorization. You can try signing in or changing directories.
Access to this page requires authorization. You can try changing directories.
This article explains how to build a Model Context Protocol (MCP) server using Node.js and TypeScript. The server runs tools and services in a serverless environment. Use this structure as a starting point to create custom MCP servers.
Get to the code
Explore the TypeScript remote Model Context Protocol (MCP) server sample. It demonstrates how to use Node.js and TypeScript to build a remote MCP server and deploy it to Azure Container Apps.
Architectural overview
The following diagram shows the simple architecture of the sample app:

The MCP server runs as a containerized app on Azure Container Apps (ACA). It uses a Node.js/TypeScript backend to provide tools to the MCP client through the Model Context Protocol. All tools work with a backend SQLite database.
Cost
To keep costs low, this sample uses basic or consumption pricing tiers for most resources. Adjust the tier as needed, and delete resources when you're done to avoid charges.
Prerequisites
- Visual Studio Code - Latest version to support MCP Server development.
- GitHub Copilot Visual Studio Code extension
- GitHub Copilot Chat Visual Studio Code extension
- Azure Developer CLI (azd)
A development container includes all the dependencies you need for this article. You can run it in GitHub Codespaces (in a browser) or locally using Visual Studio Code.
To follow this article, make sure you meet these prerequisites:
- An Azure subscription – Create one for free
- Azure account permissions – Your Azure account must have
Microsoft.Authorization/roleAssignments/writepermissions, such as Role Based Access Control Administrator, User Access Administrator, or Owner. If you don't have subscription-level permissions, you must be granted RBAC for an existing resource group and deploy to that group.- Your Azure account also needs
Microsoft.Resources/deployments/writepermissions at the subscription level.
- Your Azure account also needs
- GitHub account
Open development environment
Follow these steps to set up a preconfigured development environment with all the required dependencies.
GitHub Codespaces runs a development container managed by GitHub with Visual Studio Code for the Web as the interface. Use GitHub Codespaces for the simplest setup, as it comes with the necessary tools and dependencies preinstalled for this article.
Important
All GitHub accounts can use Codespaces for up to 60 hours free each month with two core instances. For more information, see GitHub Codespaces monthly included storage and core hours.
Use the following steps to create a new GitHub Codespace on the main branch of the Azure-Samples/mcp-container-ts GitHub repository.
Right-click the following button and select Open link in new window. This action lets you have the development environment and the documentation open side by side.

On the Create codespace page, review and then select Create new codespace.
Wait for the codespace to start. It might take a few minutes.
Sign in to Azure with the Azure Developer CLI in the terminal at the bottom of the screen.
azd auth loginCopy the code from the terminal and then paste it into a browser. Follow the instructions to authenticate with your Azure account.
You do the rest of the tasks in this development container.
Note
To run the MCP server locally:
- Set up your environment as described in the Local environment setup section in the sample repository.
- Configure your MCP Server to use the local environment by following the instructions in the Configure the MCP server in Visual Studio Code section in the sample repository.
- Skip to the Use TODO MCP server tools in agent mode section to continue.
Deploy and run
The sample repository contains all the code and configuration files for the MCP server Azure deployment. The following steps walk you through the sample MCP server Azure deployment process.
Deploy to Azure
Important
Azure resources in this section start costing money immediately, even if you stop the command before it finishes.
Run the following Azure Developer CLI command for Azure resource provisioning and source code deployment:
azd upUse the following table to answer the prompts:
Prompt Answer Environment name Keep it short and lowercase. Add your name or alias. For example, my-mcp-server. It's used as part of the resource group name.Subscription Select the subscription to create the resources in. Location (for hosting) Select a location near you from the list. Location for the Azure OpenAI model Select a location near you from the list. If the same location is available as your first location, select that. Wait until the app is deployed. Deployment usually takes between 5 and 10 minutes to complete.
Once the deployment is complete, you can access the MCP server using the URL provided in the output. The URL looks like this:
https://<env-name>.<container-id>.<region>.azurecontainerapps.io
- Copy the URL to your clipboard. You'll need it in the next section.
Configure the MCP server in Visual Studio Code
Configure the MCP server in your local VS Code environment by adding the URL to the mcp.json file in the .vscode folder.
Open the
mcp.jsonfile in the.vscodefolder.Locate the
mcp-server-sse-remotesection in the file. It should look like this:"mcp-server-sse-remote": { "type": "sse", "url": "https://<container-id>.<location>.azurecontainerapps.io/sse" }Replace the existing
urlvalue with the URL you copied in the previous step.Save the
mcp.jsonfile in the.vscodefolder.
Use TODO MCP server tools in agent mode
After modifying the MCP server, you can use the tools, it provides in agent mode. To use MCP tools in agent mode:
Open the Chat view (
Ctrl+Alt+I), and select Agent mode from the dropdown.Select the Tools button to view the list of available tools. Optionally, select or deselect the tools you want to use. You can search tools by typing in the search box.
Enter a prompt such as "I need to send an email to my manager on Wednesday" in the chat input box and notice how tools are automatically invoked as needed, as in the following screenshot:
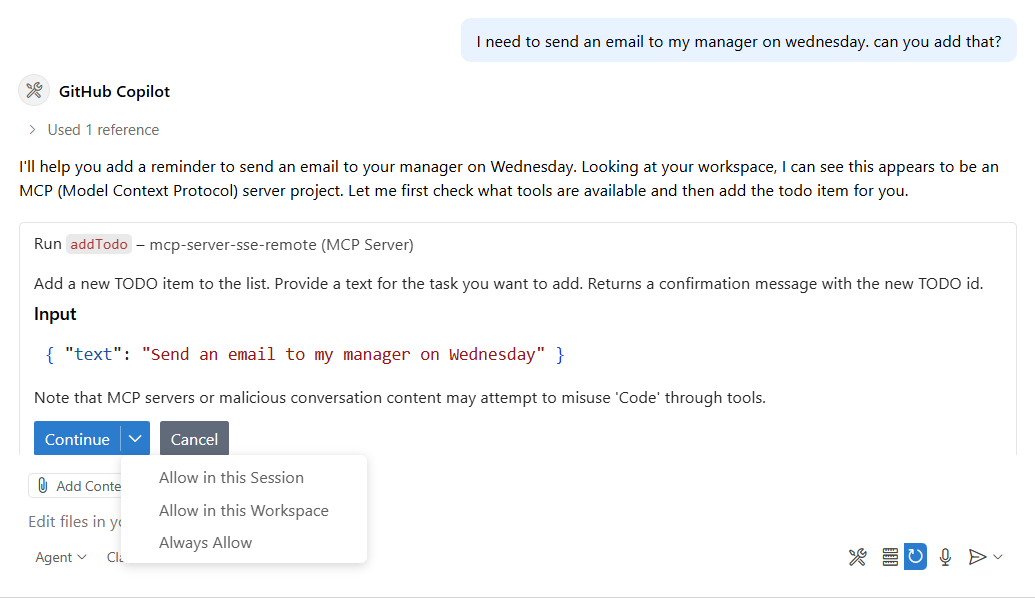

Note
By default, when a tool is invoked, you need to confirm the action before the tool runs. Otherwise, tools might run locally on your machine and might perform actions that modify files or data.
Use the Continue button dropdown options to automatically confirm the specific tool for the current session, workspace, or all future invocations.
Exploring the sample code
This section provides an overview of the key files and code structure in the MCP server sample. The code is organized into several main components:
index.ts: The main entry point for the MCP server, which sets up the Express.js HTTP server and routing.server.ts: The transport layer that manages Server-Sent Events (SSE) connections and MCP protocol handling.tools.ts: Contains business logic and utility functions for the MCP server.types.ts: Defines TypeScript types and interfaces used throughout the MCP server.
index.ts - How the server starts and accepts HTTP connections
The index.ts file is the main entry point for the MCP server. It initializes the server, sets up the Express.js HTTP server, and defines routing for Server-Sent Events (SSE) endpoints.
Create the MCP server instance
The following code snippet initializes the MCP server using the SSEPServer class, which is a wrapper around the core MCP Server class. This class handles the transport layer for Server-Sent Events (SSE) and manages client connections.
const server = new SSEPServer(
  new Server(
    {
      name: 'todo-sse-server',
      version: '1.0.0',
    },
    {
      capabilities: {
        tools: {},
      },
    }
  )
);
Concepts:
- Composition pattern:
SSEPServerwraps the low-levelServerclass - Capabilities declaration: Server announces it supports tools (but not resources/prompts)
- Naming convention: Server name becomes part of MCP identification
Set up Express routes
The following code snippet sets up the Express.js server to handle incoming HTTP requests for SSE connections and message handling:
router.post('/messages', async (req: Request, res: Response) => {
  await server.handlePostRequest(req, res);
});

router.get('/sse', async (req: Request, res: Response) => {
  await server.handleGetRequest(req, res);
});
Concepts:
- Two-endpoint pattern: GET for establishing SSE connection, POST for sending messages
- Delegation pattern: Express routes immediately delegate to
SSEPServer
Process lifecycle management
The following code snippet handles the server's lifecycle, including starting the server and gracefully shutting it down on termination signals:
process.on('SIGINT', async () => {
  log.error('Shutting down server...');
  await server.close();
  process.exit(0);
});
Concepts:
- Graceful shutdown: Proper cleanup on Ctrl+C
- Async cleanup: Server close operation is asynchronous
- Resource management: Important for SSE connections
Transport layer: server.ts
The server.ts file implements the transport layer for the MCP server, specifically handling Server-Sent Events (SSE) connections and routing MCP protocol messages.
Set up an SSE client connection and create a transport
The SSEPServer class is the main transport layer for handling Server-Sent Events (SSE) in the MCP server. It uses the SSEServerTransport class to manage individual client connections. It manages multiple transports and their lifecycle.
export class SSEPServer {
  server: Server;
  transport: SSEServerTransport | null = null;
  transports: Record<string, SSEServerTransport> = {};

  constructor(server: Server) {
    this.server = server;
    this.setupServerRequestHandlers();
  }
}
Concepts:
- State management: Tracks both current transport and all transports
- Session mapping:
transportsobject maps session IDs to transport instances - Constructor delegation: Immediately sets up request handlers
SSE connection establishment (handleGetRequest)
The handleGetRequest method is responsible for establishing a new SSE connection when a client makes a GET request to the /sse endpoint.
async handleGetRequest(req: Request, res: Response) {
  log.info(`GET ${req.originalUrl} (${req.ip})`);
  try {
    log.info("Connecting transport to server...");
    this.transport = new SSEServerTransport("/messages", res);
    TransportsCache.set(this.transport.sessionId, this.transport);

    res.on("close", () => {
      if (this.transport) {
        TransportsCache.delete(this.transport.sessionId);
      }
    });

    await this.server.connect(this.transport);
    log.success("Transport connected. Handling request...");
  } catch (error) {
    // Error handling...
  }
}
Concepts:
- Transport creation: New
SSEServerTransportfor each GET request - Session management: Autogenerated session ID stored in cache
- Event handlers: Cleanup on connection close
- MCP connection:
server.connect()establishes protocol connection - Async flow: Connection setup is asynchronous with error boundaries
Message processing (handlePostRequest)
The handlePostRequest method processes incoming POST requests to handle MCP messages sent by the client. It uses the session ID from the query parameters to find the correct transport instance.
async handlePostRequest(req: Request, res: Response) {
  log.info(`POST ${req.originalUrl} (${req.ip}) - payload:`, req.body);

  const sessionId = req.query.sessionId as string;
  const transport = TransportsCache.get(sessionId);
  if (transport) {
    await transport.handlePostMessage(req, res, req.body);
  } else {
    log.error("Transport not initialized. Cannot handle POST request.");
    res.status(400).json(/* error response */);
  }
}
Concepts:
- Session lookup: Uses
sessionIdquery parameter to find transport - Session validation: Validates SSE connection first.
- Message delegation: Transport handles actual message processing
- Error responses: Proper HTTP error codes for missing sessions
MCP Protocol Handler Setup (setupServerRequestHandlers)
The setupServerRequestHandlers method registers the following handlers for MCP protocol requests:
- A handler for
ListToolsRequestSchemathat returns the list of available TODO tools. - A handler for
CallToolRequestSchemathat locates and executes the requested tool with the provided arguments.
This method uses Zod schemas to define the expected request and response formats.
private setupServerRequestHandlers() {
  this.server.setRequestHandler(ListToolsRequestSchema, async (_request) => {
    return {
      tools: TodoTools,
    };
  });

  this.server.setRequestHandler(CallToolRequestSchema, async (request) => {
    const { name, arguments: args } = request.params;

    const tool = TodoTools.find((tool) => tool.name === name);
    if (!tool) {
      return this.createJSONErrorResponse(`Tool "${name}" not found.`);
    }

    const response = await tool.execute(args as any);
    return { content: [{ type: "text", text: response }] };
  });
}
Concepts:
- Schema-Based Routing: Uses Zod schemas for type-safe request handling
- Tool Discovery:
ListToolsRequestSchemareturns static TodoTools array - Tool Execution:
CallToolRequestSchemafinds and executes tools - Error Handling: Graceful handling of unknown tools
- Response Format: MCP-compliant response structure
- Type Safety: TypeScript types ensure correct argument passing
Business logic: tools.ts
The tools.ts file defines the actual functionality available to MCP clients:
- Tool metadata (name, description, schemas)
- Input validation schemas
- Tool execution logic
- Integration with database layer
This MCP Server defines four TODO management tools:
add_todo: Creates a new TODO itemcomplete_todo: Marks a TODO item as completeddelete_todo: Deletes a TODO itemlist_todos: Lists all TODO itemsupdate_todo_text: Updates the text of an existing TODO item
Tool Definition Pattern
The tools are defined as an array of objects, each representing a specific TODO operation. In the following code snippet, the addTodo tool is defined:
{
  name: "addTodo",
  description: "Add a new TODO item to the list...",
  inputSchema: {
    type: "object",
    properties: {
      text: { type: "string" },
    },
    required: ["text"],
  },
  outputSchema: { type: "string" },
  async execute({ text }: { text: string }) {
    const info = await addTodo(text);
    return `Added TODO: ${text} (id: ${info.lastInsertRowid})`;
  },
}
Each tool definition has:
name: Unique identifier for the tooldescription: Brief description of the tool's purposeinputSchema: Zod schema defining the expected input formatoutputSchema: Zod schema defining the expected output formatexecute: Function implementing the tool's logic
These tool definitions are imported in server.ts and exposed through the ListToolsRequestSchema handler.
Concepts:
- Modular Tool Design: Each tool is a self-contained object
- JSON Schema Validation:
inputSchemadefines expected parameters - Type Safety: TypeScript types match schema definitions
- Async Execution: All tool executions are asynchronous
- Database Integration: Calls imported database functions
- Human-Readable Responses: Returns formatted strings, not raw data
Tool Array Export
The tools are exported as a static array, making them easy to import and use in the server. Each tool is an object with its metadata and execution logic. This structure allows the MCP server to dynamically discover and execute tools based on client requests.
export const TodoTools = [
  { /* addTodo */ },
  { /* listTodos */ },
  { /* completeTodo */ },
  { /* deleteTodo */ },
  { /* updateTodoText */ },
];
Concepts:
- Static Registration: Tools defined at module load time
- Array Structure: Simple array makes tools easy to iterate
- Import/Export: Clean separation from server logic
Tool execution error handling
Each tool's execute function handles errors smoothly and returns clear messages instead of throwing exceptions. This approach ensures the MCP server provides a seamless user experience.
Tools handle various error scenarios:
async execute({ id }: { id: number }) {
  const info = await completeTodo(id);
  if (info.changes === 0) {
    return `TODO with id ${id} not found.`;
  }
  return `Marked TODO ${id} as completed.`;
}
Concepts:
- Database Response Checking: Uses
info.changesto detect failures - Graceful Degradation: Returns descriptive error messages vs throwing
- User-Friendly Errors: Messages suitable for AI interpretation
Data layer: db.ts
The db.ts file manages the SQLite database connection and handles CRUD operations for the TODO app. It uses the better-sqlite3 library for synchronous database access.
Database initialization
The database initializes by connecting to SQLite and creating tables if they don't exist. The following code snippet shows the initialization process:
const db = new Database(":memory:", {
  verbose: log.info,
});

try {
  db.pragma("journal_mode = WAL");
  db.prepare(
    `CREATE TABLE IF NOT EXISTS ${DB_NAME} (
     id INTEGER PRIMARY KEY AUTOINCREMENT,
     text TEXT NOT NULL,
     completed INTEGER NOT NULL DEFAULT 0
   )`
  ).run();
  log.success(`Database "${DB_NAME}" initialized.`);
} catch (error) {
  log.error(`Error initializing database "${DB_NAME}":`, { error });
}
Concepts:
- In-Memory Database:
:memory:means data lost on restart (demo/testing only) - WAL Mode: Write-Ahead Logging for better performance
- Schema Definition: Simple TODO table with autoincrement ID
- Error Handling: Graceful handling of initialization failures
- Logging Integration: Database operations are logged for debugging
CRUD operation patterns
The db.ts file provides four main CRUD operations for managing TODO items:
Create operation:
export async function addTodo(text: string) {
  log.info(`Adding TODO: ${text}`);
  const stmt = db.prepare(`INSERT INTO todos (text, completed) VALUES (?, 0)`);
  return stmt.run(text);
}
Read operation:
export async function listTodos() {
  log.info("Listing all TODOs...");
  const todos = db.prepare(`SELECT id, text, completed FROM todos`).all() as Array<{
    id: number;
    text: string;
    completed: number;
  }>;
  return todos.map(todo => ({
    ...todo,
    completed: Boolean(todo.completed),
  }));
}
Update operation:
export async function completeTodo(id: number) {
  log.info(`Completing TODO with ID: ${id}`);
  const stmt = db.prepare(`UPDATE todos SET completed = 1 WHERE id = ?`);
  return stmt.run(id);
}
Delete operation:
export async function deleteTodo(id: number) {
  log.info(`Deleting TODO with ID: ${id}`);
  const row = db.prepare(`SELECT text FROM todos WHERE id = ?`).get(id) as
    | { text: string }
    | undefined;
  if (!row) {
    log.error(`TODO with ID ${id} not found`);
    return null;
  }
  db.prepare(`DELETE FROM todos WHERE id = ?`).run(id);
  log.success(`TODO with ID ${id} deleted`);
  return row;
}
Concepts:
- Prepared Statements: Protection against SQL injection
- Type Casting: Explicit TypeScript types for query results
- Data Transformation: Converting SQLite integers to booleans
- Atomic Operations: Each function is a single database transaction
- Return Value Consistency: Functions return operation metadata
- Defensive Programming: Check-before-delete pattern
Schema Design
The database schema is defined in the db.ts file using a simple SQL statement. The todos table has three fields:
CREATE TABLE todos (
  id INTEGER PRIMARY KEY AUTOINCREMENT,  -- Unique identifier
  text TEXT NOT NULL,                    -- TODO description
  completed INTEGER NOT NULL DEFAULT 0   -- Boolean as integer
);
Helper utilities: helpers/ directory
The helpers/ directory provides utility functions and classes for the server.
Structured logging for debugging and monitoring: helpers/logs.ts
The helpers/logs.ts file provides a structured logging utility for the MCP server. It uses the debug library for logging and chalk for color-coded output in the console.
export const logger = (namespace: string) => {
  const dbg = debug('mcp:' + namespace);
  const log = (colorize: ChalkInstance, ...args: any[]) => {
    const timestamp = new Date().toISOString();
    const formattedArgs = [timestamp, ...args].map((arg) => {
      if (typeof arg === 'object') {
        return JSON.stringify(arg, null, 2);
      }
      return arg;
    });
    dbg(colorize(formattedArgs.join(' ')));
  };

  return {
    info(...args: any[]) { log(chalk.cyan, ...args); },
    success(...args: any[]) { log(chalk.green, ...args); },
    warn(...args: any[]) { log(chalk.yellow, ...args); },
    error(...args: any[]) { log(chalk.red, ...args); },
  };
};
Session management for SSE transports: helpers/cache.ts
The helpers/cache.ts file uses a Map to store SSE transports by session ID. This approach allows the server to quickly find and manage active connections.
import type { SSEServerTransport } from "@modelcontextprotocol/sdk/server/sse";

export const TransportsCache = new Map<string, SSEServerTransport>();
Note
The TransportsCache is a simple in-memory cache. In production, consider using a more robust solution like Redis or a database for session management.
Execution flow summary
The following diagram illustrates the complete request journey from the client to the MCP server and back, including tool execution and database operations:

Clean up GitHub Codespaces
Delete the GitHub Codespaces environment to maximize your free per-core hours.
Important
For more information about your GitHub account's free storage and core hours, see GitHub Codespaces monthly included storage and core hours.
Sign into the GitHub Codespaces dashboard.
Find your active Codespaces created from the
Azure-Samples//mcp-container-tsGitHub repository.Open the context menu for the codespace and select Delete.
Get help
Log your issue to the repository's Issues.