Note
Access to this page requires authorization. You can try signing in or changing directories.
Access to this page requires authorization. You can try changing directories.
Important
- Starting August 15, 2025, Azure CDN from Microsoft (classic) will no longer support new domain onboarding or profile creation. Migrate to AFD Standard and Premium to create new domains or profiles and avoid service disruption. Learn more
- Starting August 15, 2025, Azure CDN from Microsoft (classic) will no longer support Managed certificates. To avoid service disruption, either switch to Bring Your Own Certificate (BYOC) or migrate to AFD Standard and Premium by this date. Existing managed certificates will be auto renewed before August 15, 2025, and remain valid until April 14, 2026. Learn more
- Azure CDN Standard from Microsoft (classic) will be retired on September 30, 2027. To avoid service disruption migrate to AFD Standard or Premium. Learn more.
- Azure CDN from Edgio was retired on January 15, 2025. Learn more.
This article describes how to set up and use the Standard rules engine for Azure Content Delivery Network.
Standard rules engine
You can use the Standard rules engine for Azure Content Delivery Network to customize how HTTP requests are handled. For example, you can use the rules engine to enforce content delivery to use specific protocols, to define a caching policy, or to modify an HTTP header. This article demonstrates how to create a rule that automatically redirects users to HTTPS.
Note
The rules engine that's described in this article is available only for Standard Azure Content Delivery Network from Microsoft.
Redirect users to HTTPS
In your Microsoft profiles, go to Azure Content Delivery Network.
On the CDN profile page, select the endpoint you want to create rules for.
Select the Rules Engine tab.
The Rules Engine pane opens and displays the list of available global rules.

Important
The order in which multiple rules are listed affects how rules are handled. The actions that are specified in a rule might be overwritten by a subsequent rule.
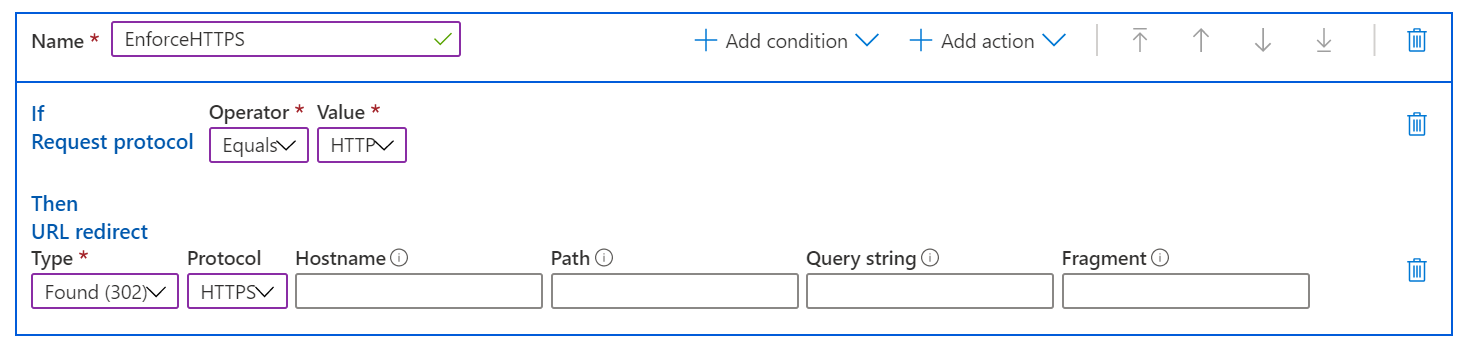
Select Add rule and enter a rule name. Rule names must begin with a letter and can contain only numbers and letters.
To identify the type of requests the rule applies to, create a match condition:
Select Add condition, and then select the Request protocol match condition.
- For Operator, select Equals.
- For Value, select HTTP.


Note
You can select from multiple match conditions in the Add condition dropdown list. For a detailed list of match conditions, see Match conditions in the Standard rules engine.
Select the action to apply to the requests that satisfy the match condition:
Select Add action, and then select URL redirect.
- For Type, select Found (302).
- For Protocol, select HTTPS.
- Leave all other fields blank to use incoming values.

Note
You can select from multiple actions in the Add action dropdown list. For a detailed list of actions, see Actions in the Standard rules engine.
Select Save to save the new rule. The rule is now available to use.
Important
Rule changes might take up to 15 minutes to propagate through Azure Content Delivery Network.