Applies to: Azure Local 2311.2 and later
This article describes how to manage Azure Local virtual machines (VMs) enabled by Azure Arc. The procedures to enable guest management, start, stop, restart, pause, save, or delete an Azure Local VM, are detailed.
Prerequisites
Access to an Azure Local instance that's deployed and registered. The deployment of an Azure Local instance includes the creation of an Azure Arc resource bridge and a custom location.
Go to the resource group in Azure. The displayed information includes the custom location and the Azure Arc resource bridge created for Azure Local. Make a note of the subscription, the resource group, and the custom location. You use them later in this scenario.
One or more Azure Local VMs running on your Azure Local instance. For more information, see Create Azure Local virtual machines.
Enable guest management
It's important to understand two agents in the context of guest management: a VM guest agent and an Azure Connected Machine agent. Every Azure Local VM created via the Azure portal or the Azure CLI is provisioned with a guest agent (also called mocguestagent) on it.
When you enable guest management on an Azure Local VM, the guest agent installs the Azure Connected Machine agent. You use the Azure Connected Machine agent to manage Azure Local VM extensions on your VM.
Here are some key considerations for enabling guest management on a VM after you provision it:
- Make sure that your Azure Local instance is running 2311.2 or later.
- Enabling guest management after VM provisioning isn't supported for Windows Server 2012 and Windows Server 2012 R2.
- The steps to enable guest management differ based on whether a guest agent is running on your Azure Local VM.
Verify that the guest agent is running
To verify that the guest agent is running on the Azure Local VM:
Connect to the machine.
Run the following command:
az stack-hci-vm show --name "<VM name>" --resource-group "<Resource group name>"
Here's a snippet of the sample output that indicates that the guest agent is running. Look for statuses under vmAgent in the output.
"instanceView": {
  "vmAgent": {
    "statuses": [
      {
        "code": "ProvisioningState/succeeded",
        "displayStatus": "Connected",
        "level": "Info",
        "message": "Successfully established connection with mocguestagent",
        "time": "2024-01-13T00:57:39Z"
      },
      {
        "code": "ProvisioningState/succeeded",
        "displayStatus": "Connected",
        "level": "Info",
        "message": "New mocguestagent version detected 'v0.13.0-3-gd13b4794",
        "time": "2024-01-13T00:57:39Z"
      }
    ],
    "vmConfigAgentVersion": "v0.13.0-3-gd13b4794"
  }
}
The guest agent is running when statuses indicates code as ProvisioningState/succeeded and indicates displayStatus as Connected.
If you're running an older version, statuses indicates code as OK and indicates displayStatus as Active.
If your statuses don't match the preceding output, follow the steps in Enable guest management when the guest agent is not running.
Enable guest management on a VM when the guest agent is running
To enable guest management on an Azure Local VM that has the guest agent running:
Run the following command, which sets the enable-agent parameter to true:
az stack-hci-vm update --name "mylocal-vm" --enable-agent true --resource-group "mylocal-rg"
Guest management should take a few minutes to become enabled.
Verify that guest management is enabled. Follow the steps in Verify that guest management is enabled in the Azure portal.
Enable guest management on a VM when the guest agent is not running
The guest agent doesn't run in two scenarios: when the status is Connecting and when the status is null. The following sections describe these scenarios and the corresponding steps.
Status displayed as Connecting
This sample output snippet shows a status of Connecting:
"instanceView": {
      "vmAgent": {
        "statuses": [
          {
            "code": "ProvisioningState/InProgress",
            "displayStatus": "Connecting",
            "level": "Info",
            "message": "Waiting for connection with mocguestagent",
            "time": "2024-01-19T01:41:15Z"
          }
        ]
      }
    },
The guest agent is not running when statuses indicates code as ProvisioningState/InProgress and indicates displayStatus as Connecting.
If you're running an older version, statuses indicates code as OK, displayStatus as Active, and message as Successfully started HyperV listener.
Follow these steps:
Connect to the VM by using the OS-specific steps. Run Azure PowerShell as an administrator.
Run one of the following commands to enable the guest agent on your VM, based on the OS type.
Use this command for Linux:
sudo -- sh -c 'mkdir /mociso && mount -L mocguestagentprov /mociso && bash /mociso/install.sh && umount /mociso && rm -df /mociso && eject LABEL=mocguestagentprov'
Use this command for Windows:
$d=Get-Volume -FileSystemLabel mocguestagentprov;$p=Join-Path ($d.DriveLetter+':\') 'install.ps1';powershell $p
Here's a sample output for a Linux VM that shows successful installation of the guest agent.
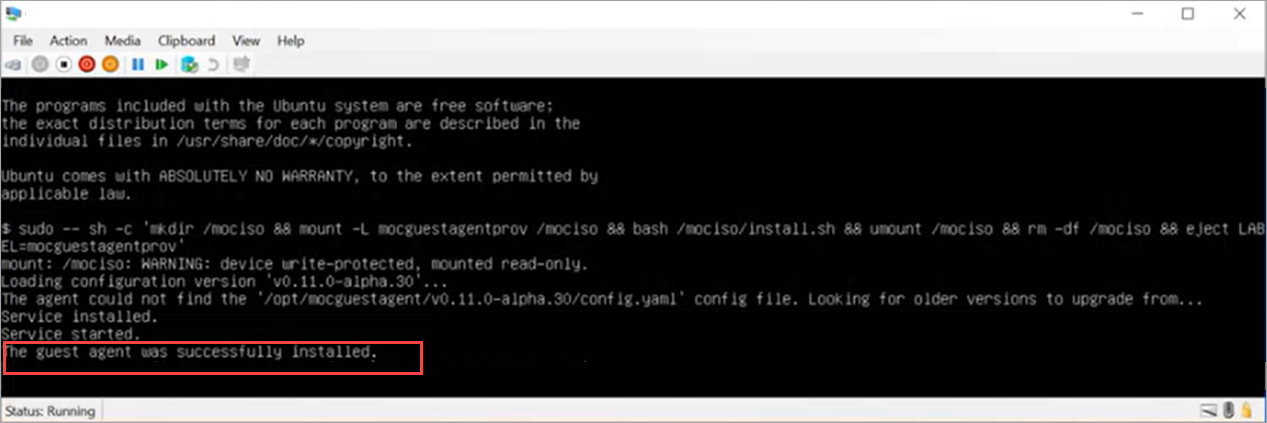
Connect to one of the machines. Run the following command to enable guest management:
az stack-hci-vm update --name "mylocal-vm" --enable-agent true --resource-group "mylocal-rg"
Verify that guest management is enabled. Follow the steps in Verify that guest management is enabled in the Azure portal.
Status displayed as null
The following sample output snippet shows a null status. This status indicates that the required iso for the guest agent is missing.
"instanceView": {
      "vmAgent": {
        "statuses": []
      }
    },
Follow these steps:
Connect to a machine.
Run the following command:
az stack-hci-vm update --name "<VM Name>" --resource-group "<Resource group name>" --enable-vm-config-agent true
The enable-vm-config-agent parameter mounts the required iso for the guest agent.
Wait a few minutes and rerun the az stack-hci-vm show command. When the status shows Connecting, follow the steps in Status displayed as Connecting.
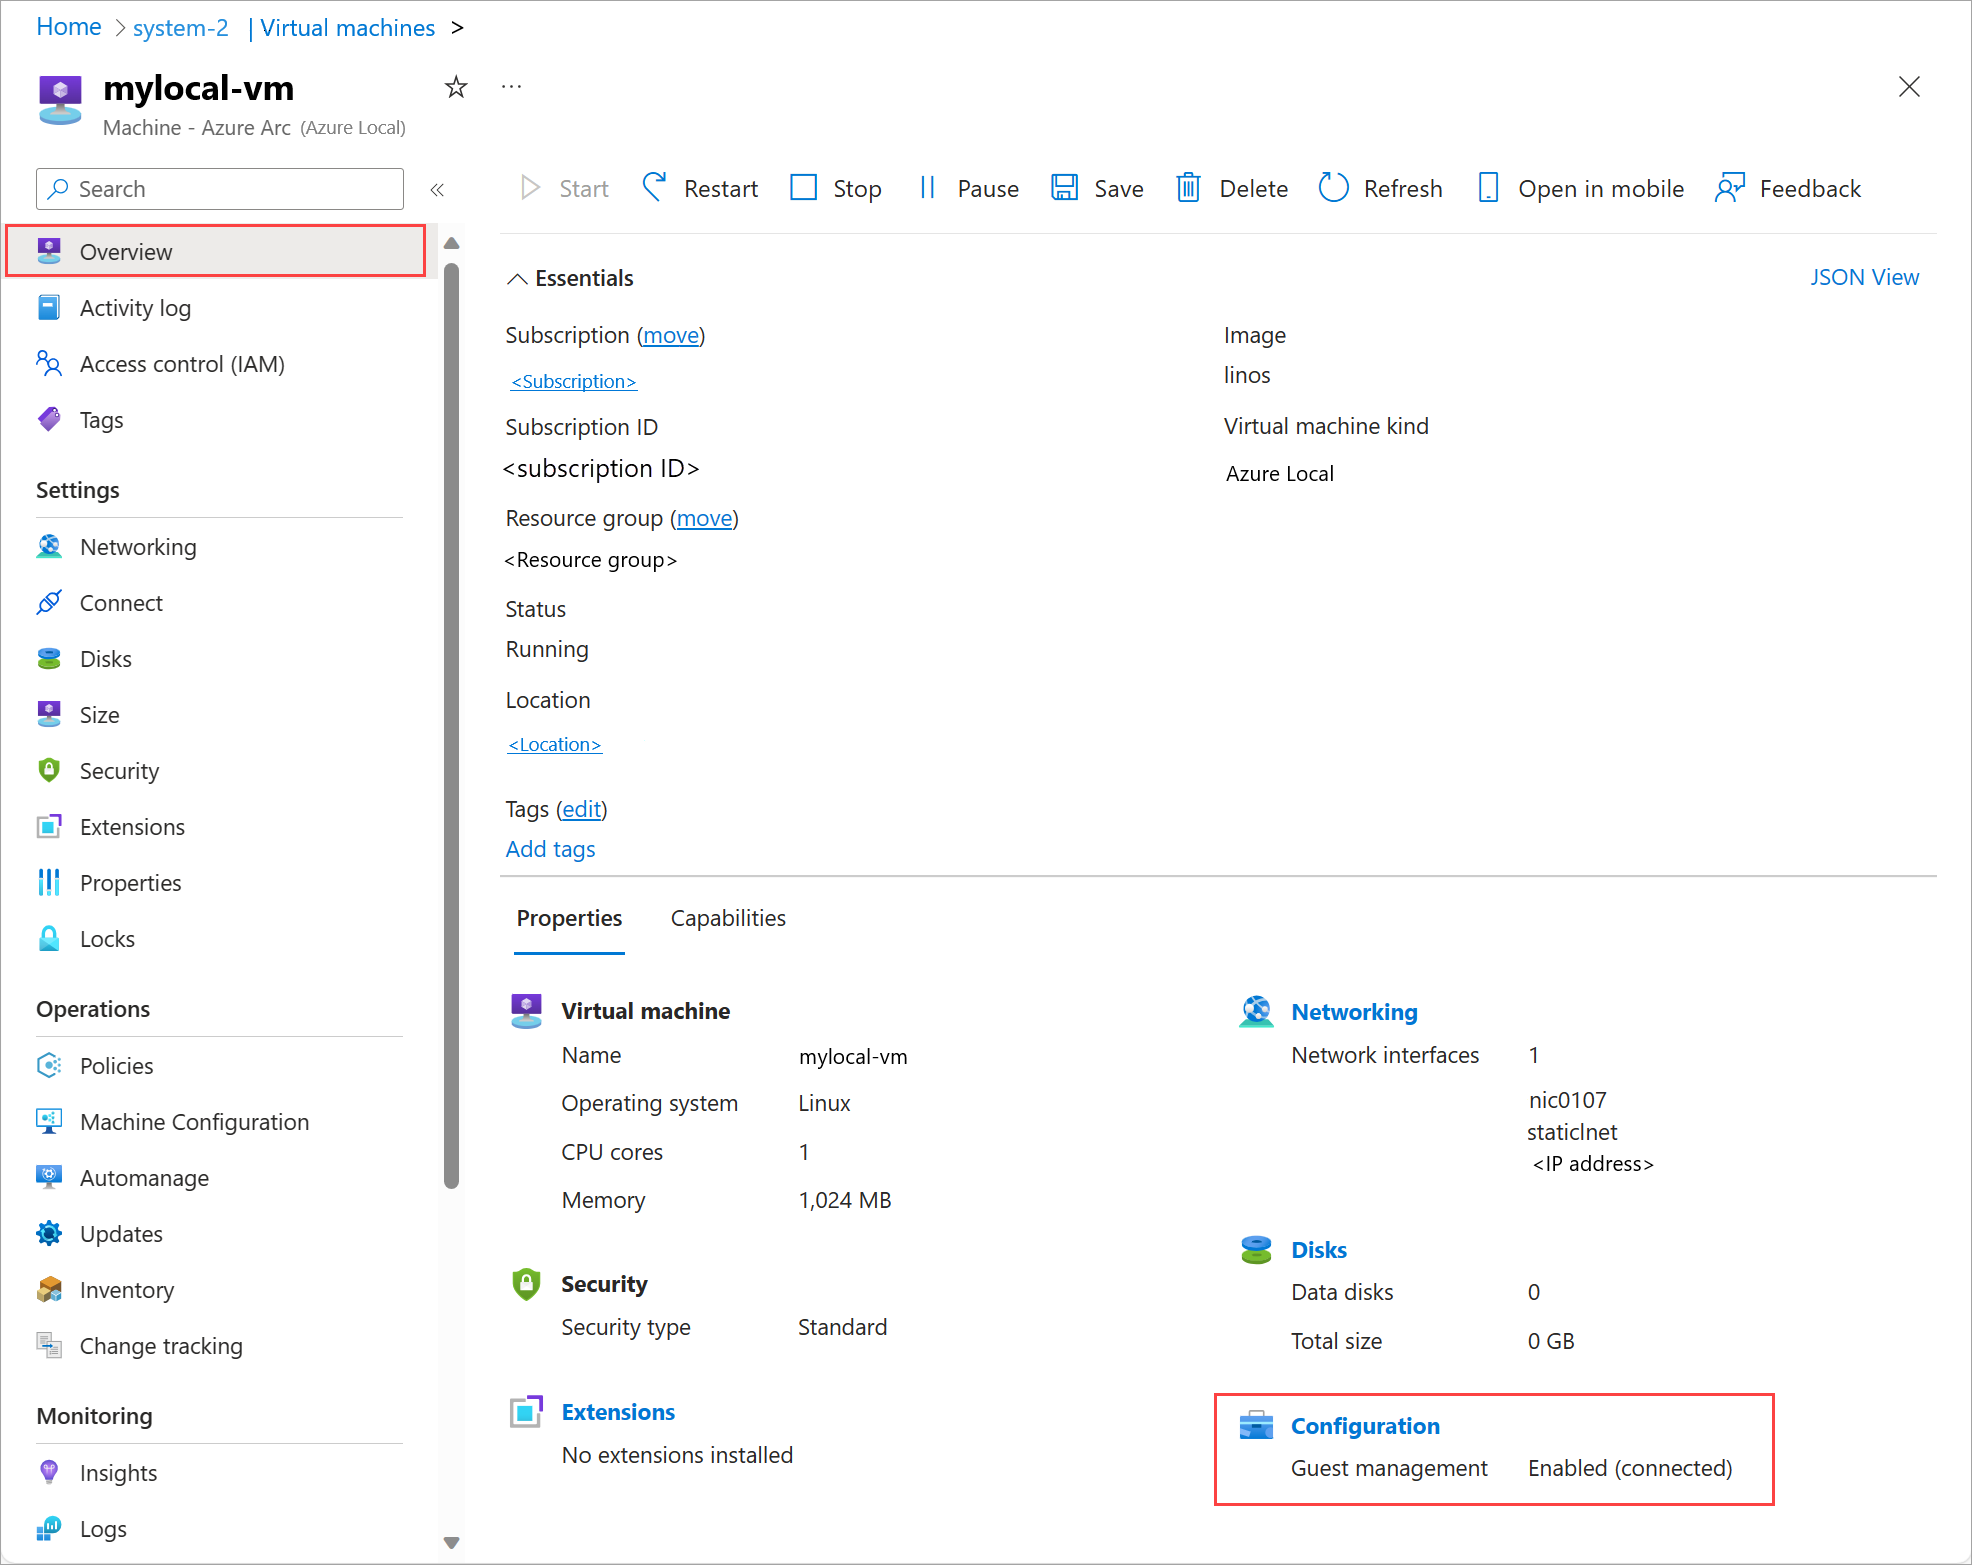
Verify that guest management is enabled in the Azure portal
Go to the Azure portal.
Go to Your Azure Local > Virtual machines, and then select the VM on which you enabled guest management.
On the Overview page, on the Properties tab, go to Configuration. Guest management should show Enabled (Connected).
View VM properties
To view VM properties for your Azure Local instance, follow these steps in the Azure portal:
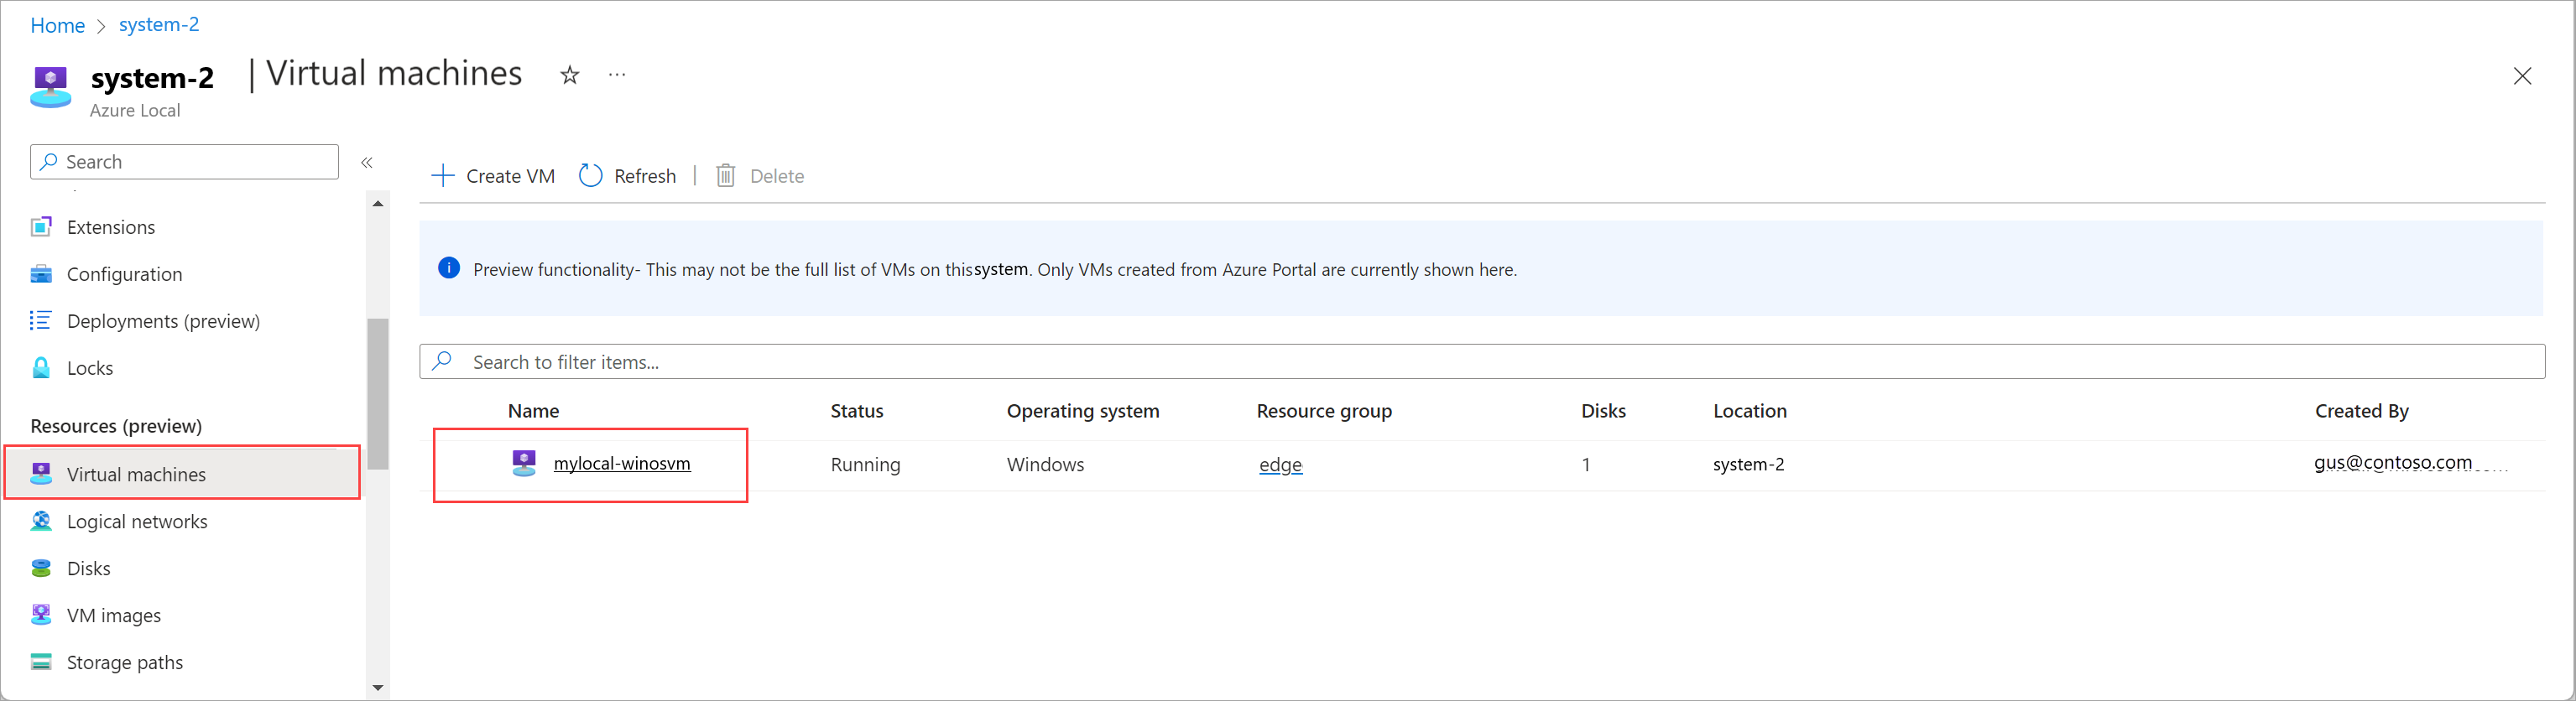
Go to the Azure Local resource, and then go to Virtual machines.
In the list of virtual machines, select the name of the VM whose properties you want to view.
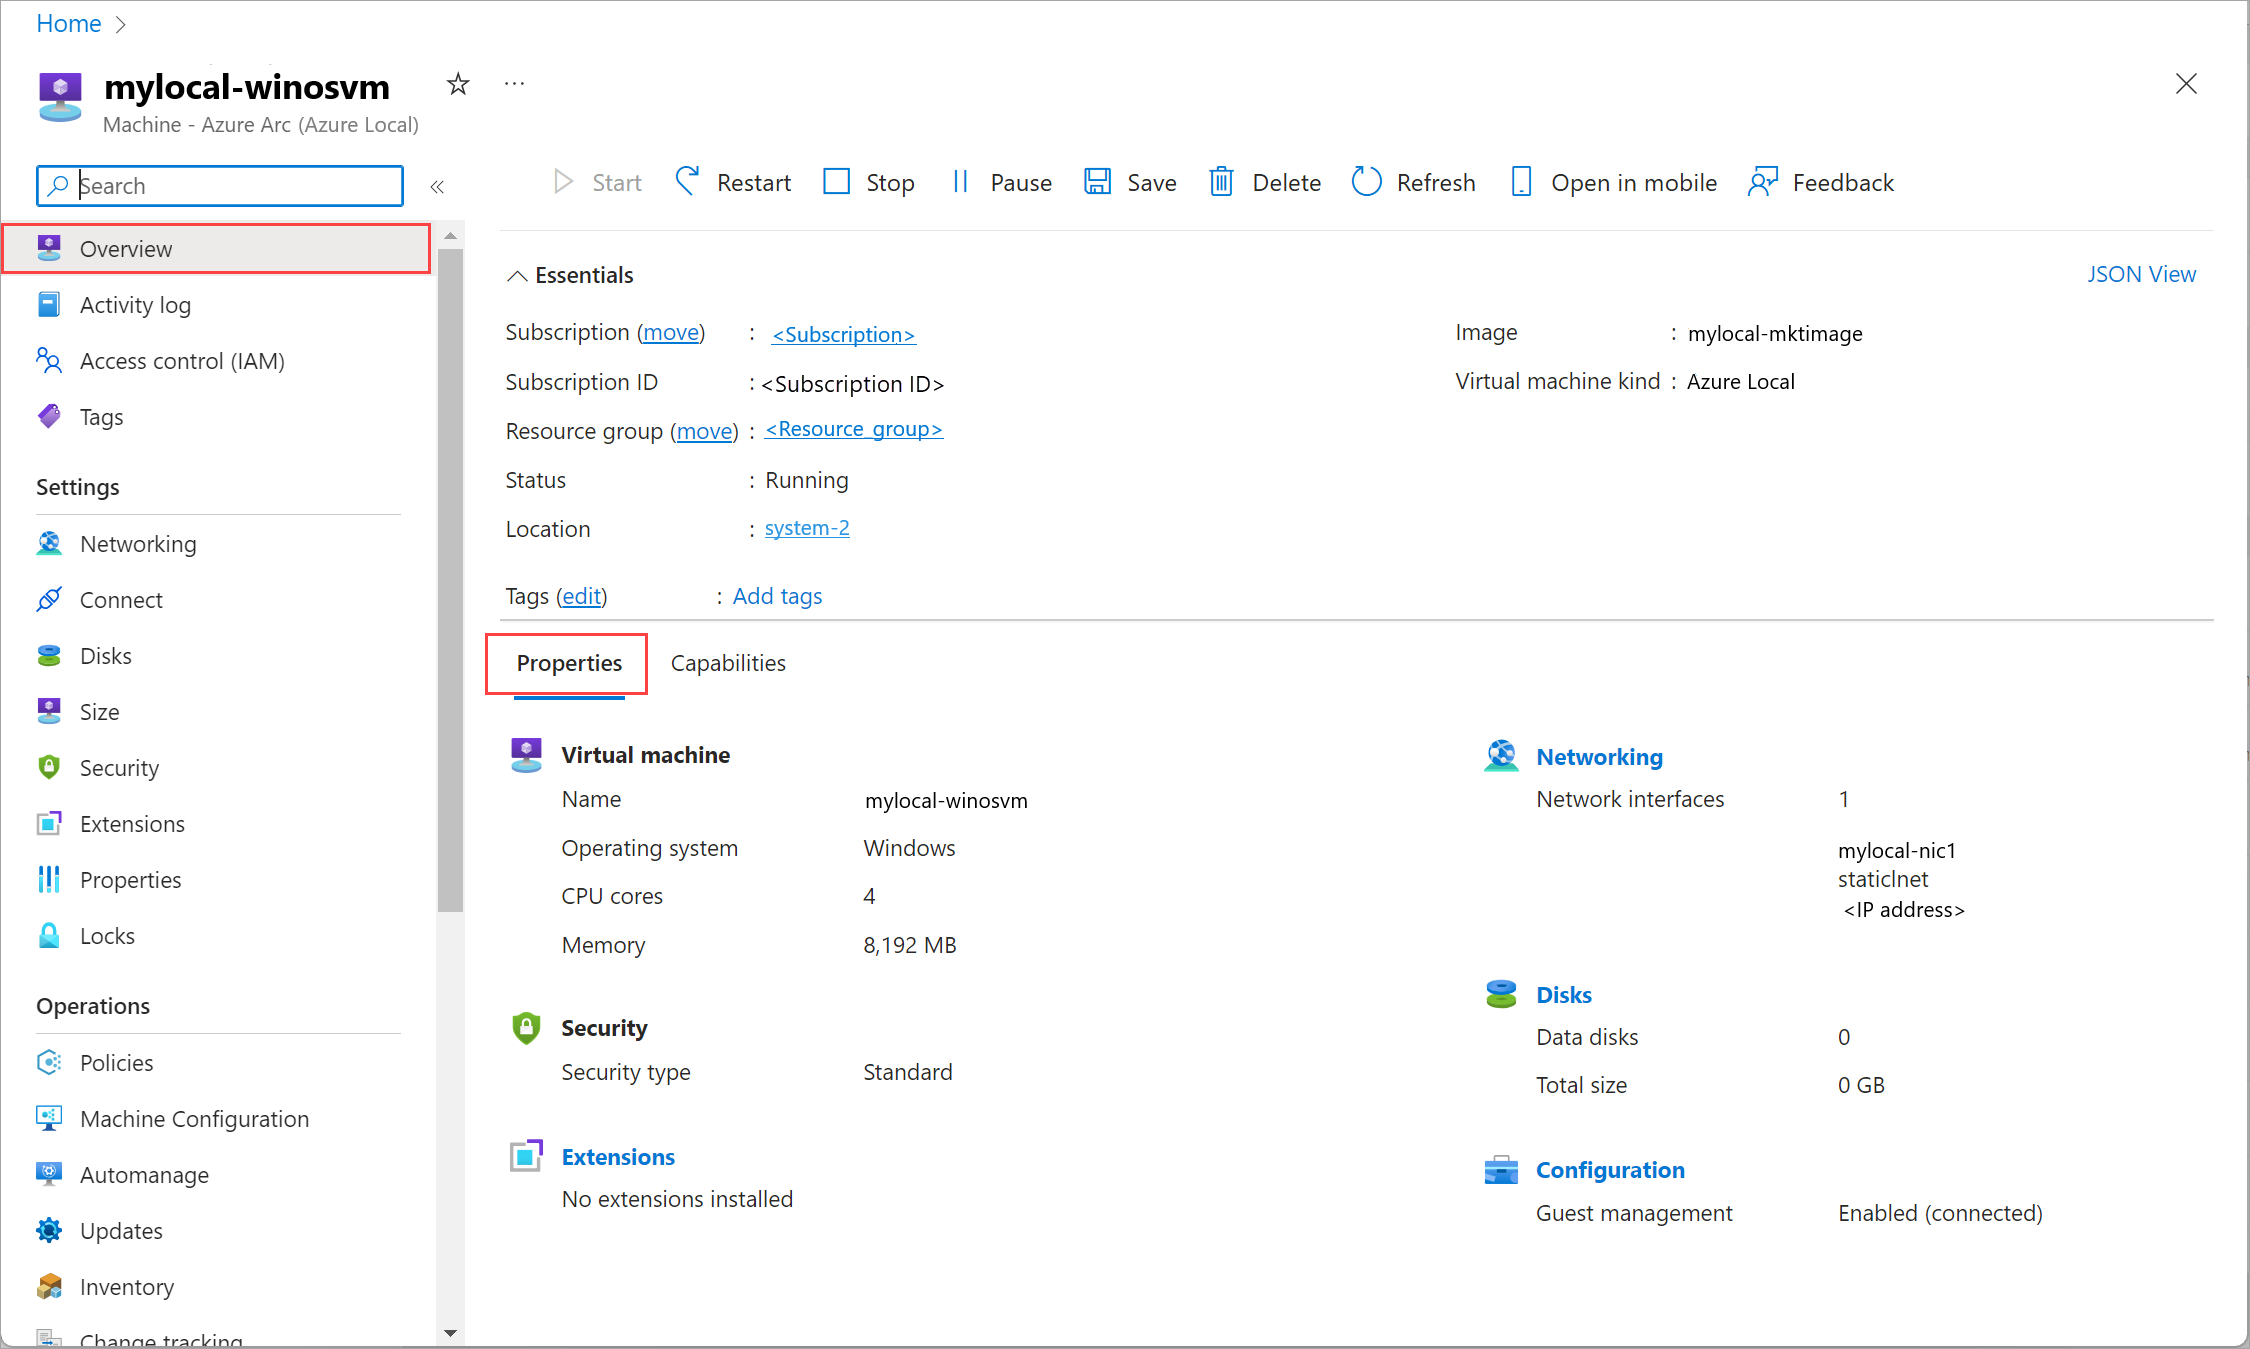
On the Overview page, select the Properties tab to view the properties of your VM.
Start a VM
To start a VM, follow these steps in the Azure portal for your Azure Local instance:
Go to the Azure Local resource, and then go to Virtual machines.
In the list of virtual machines, select a VM that isn't running and that you want to start.
On the Overview page for the VM, on the command bar, select Start.
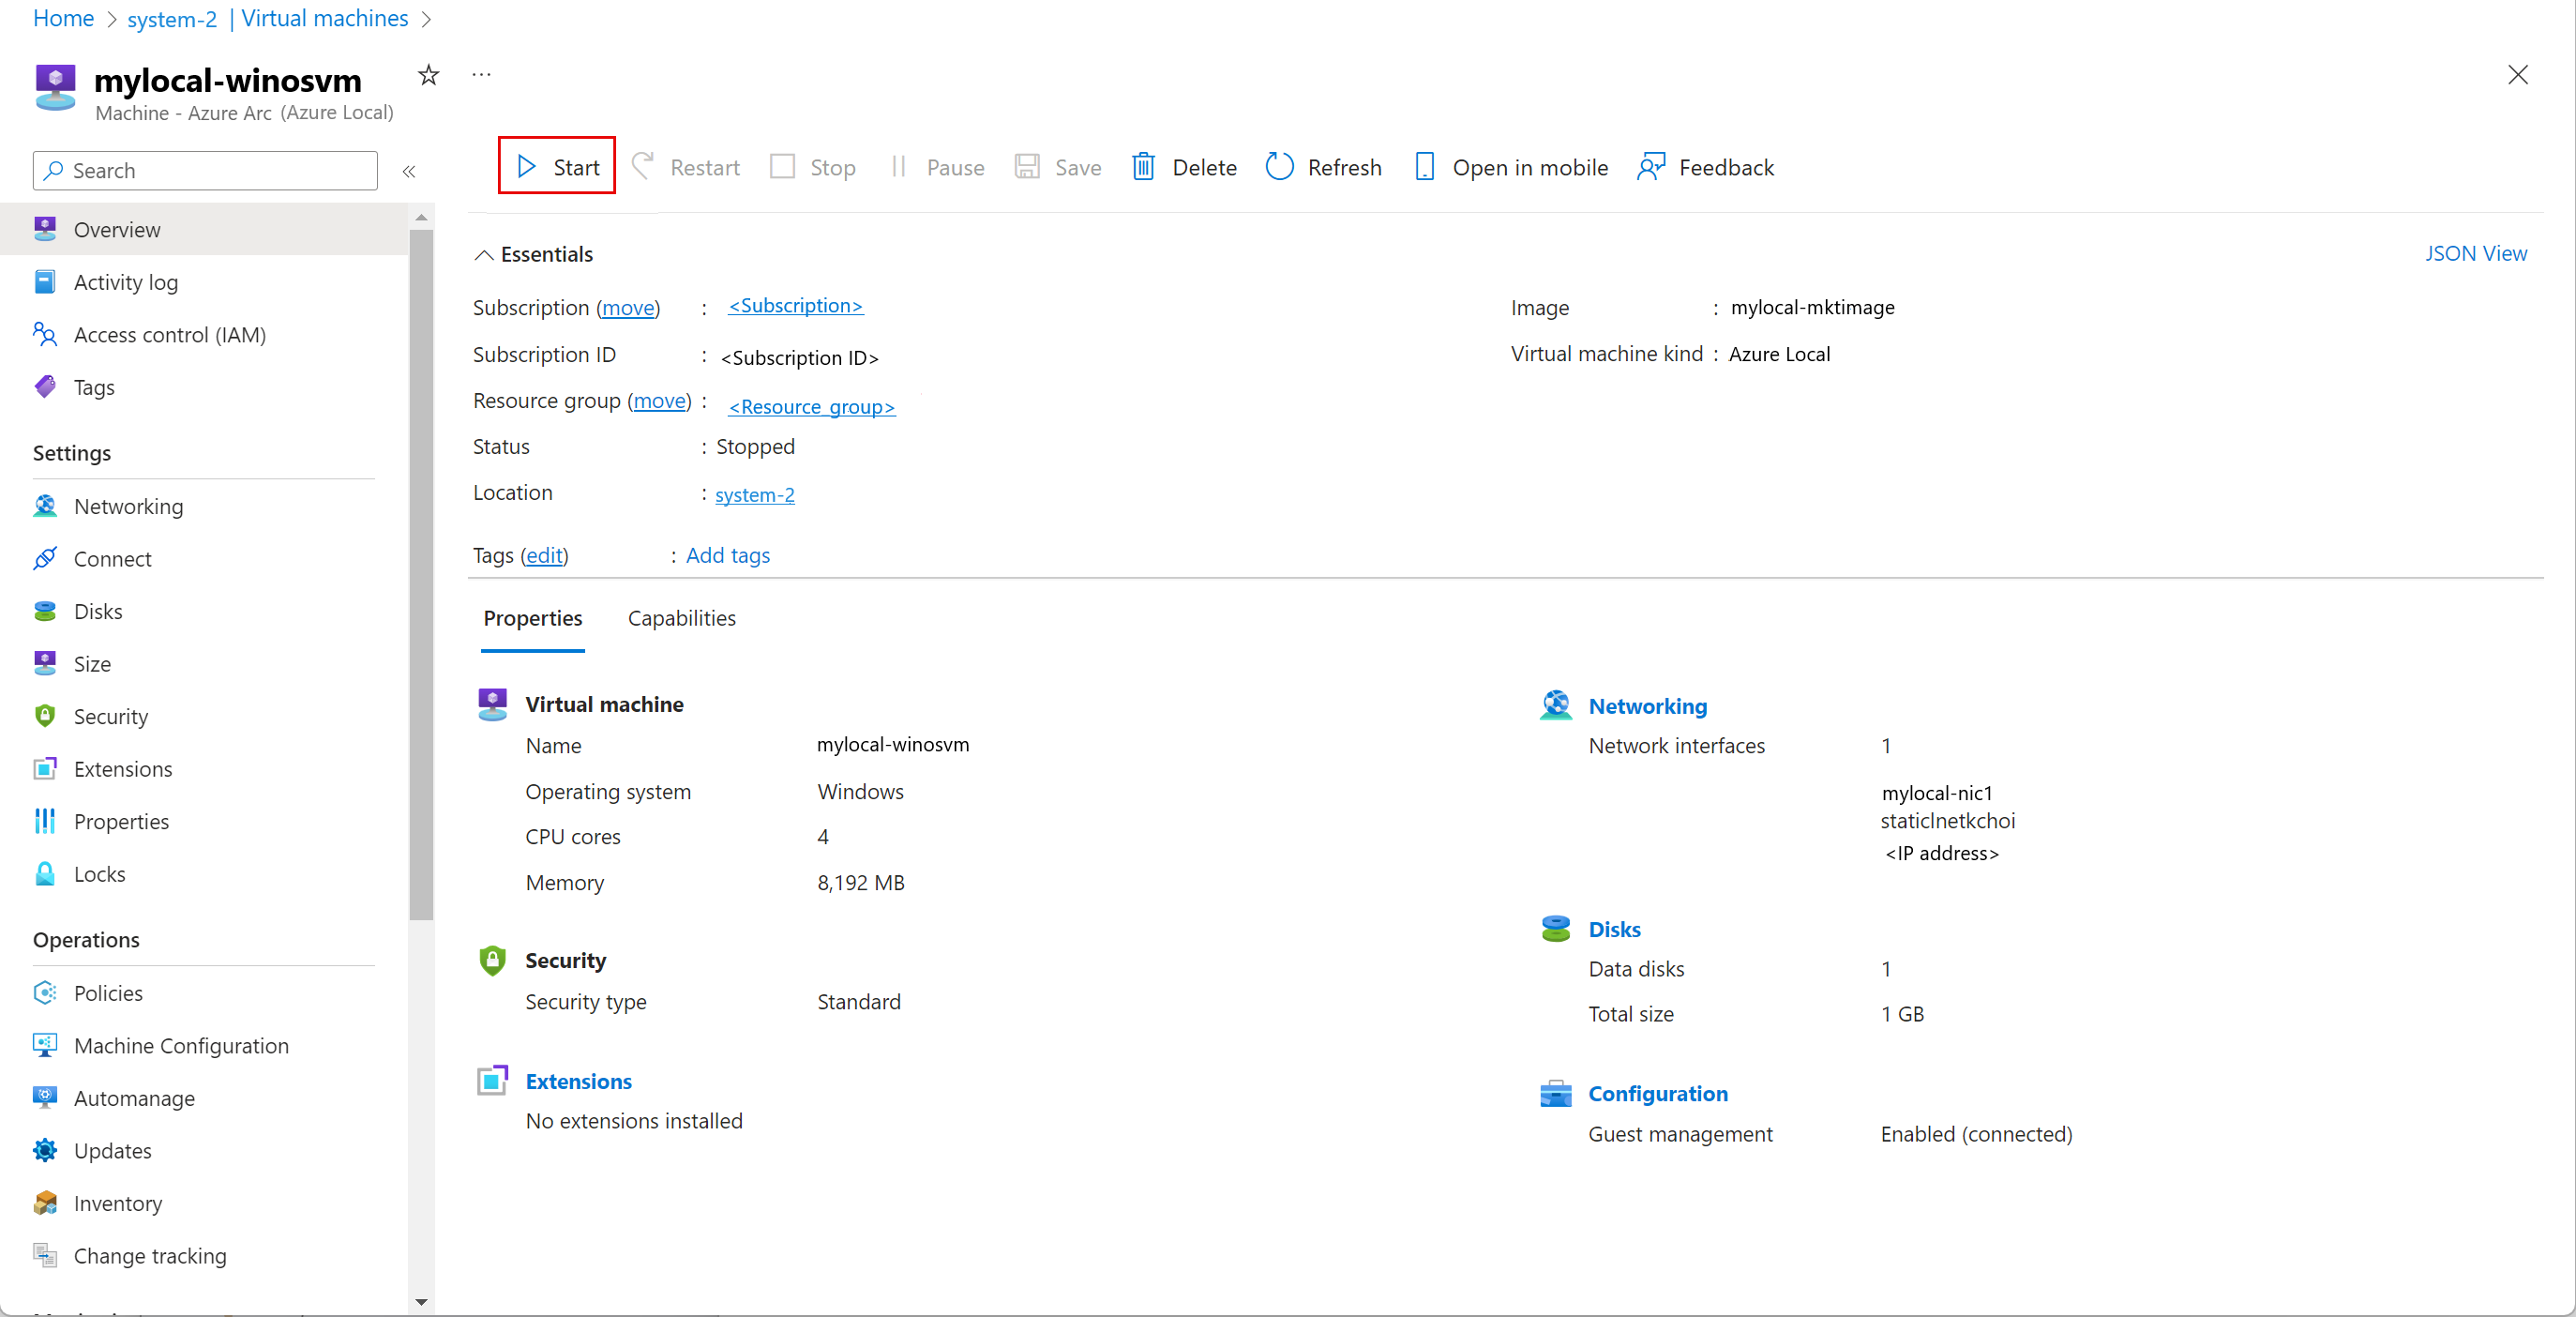
On the confirmation dialog, select Yes.
Verify that the VM started.
Restart a VM
To restart a VM, follow these steps in the Azure portal for your Azure Local instance:
Go to the Azure Local resource, and then go to Virtual machines.
In the list of virtual machines, select a VM that's stopped and that you want to restart.
On the Overview page for the VM, on the command bar, select Restart.
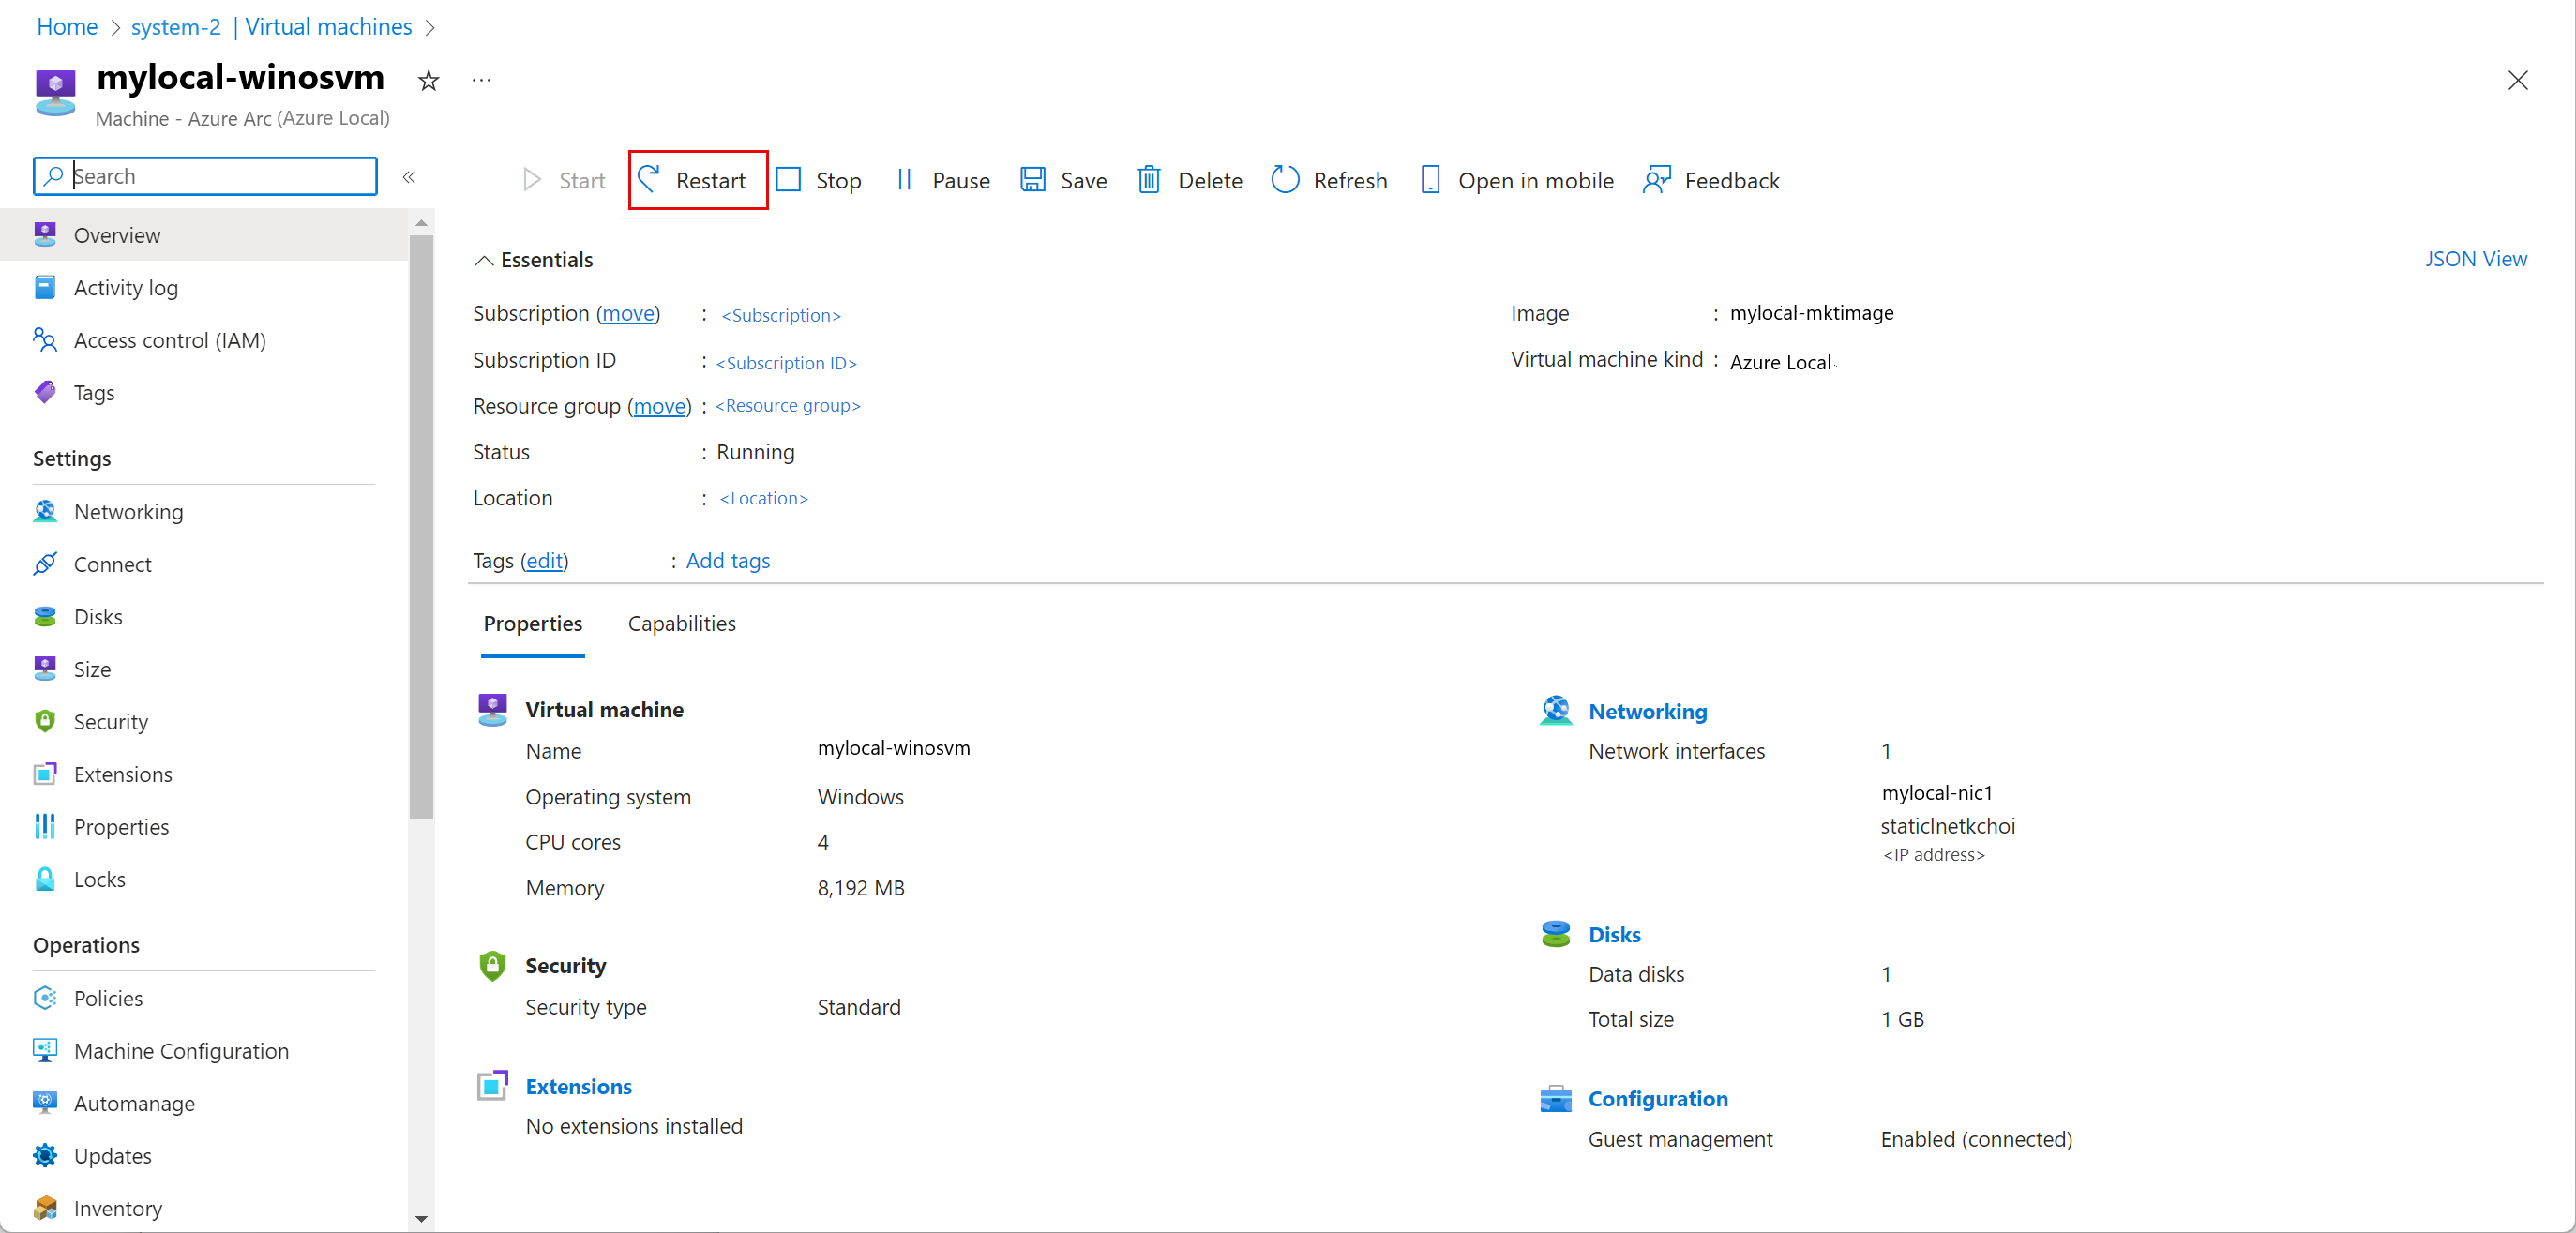
On the confirmation dialog, select Yes.
Verify that the VM restarted.
Stop a VM
To stop a VM, follow these steps in the Azure portal for your Azure Local instance:
Go to the Azure Local resource, and then go to Virtual machines.
In the list of virtual machines, select a VM that's running and that you want to stop.
On the Overview page for the VM, on the command bar, select Stop.

On the confirmation dialog, select Yes.
Verify that the VM stopped.
Pause a VM
Pausing a VM is useful to save compute resources when you're not using the VM. Pausing a VM stops any CPU activity.
You can pause only running VMs. After you pause a VM, you can resume it later.
To pause a VM, follow these steps in the Azure portal for your Azure Local instance:
Go to the Azure Local resource, and then go to Virtual machines.
In the list of virtual machines, select a VM that's currently running and that you want to pause.
On the Overview page for the VM, on the command bar, select Pause.
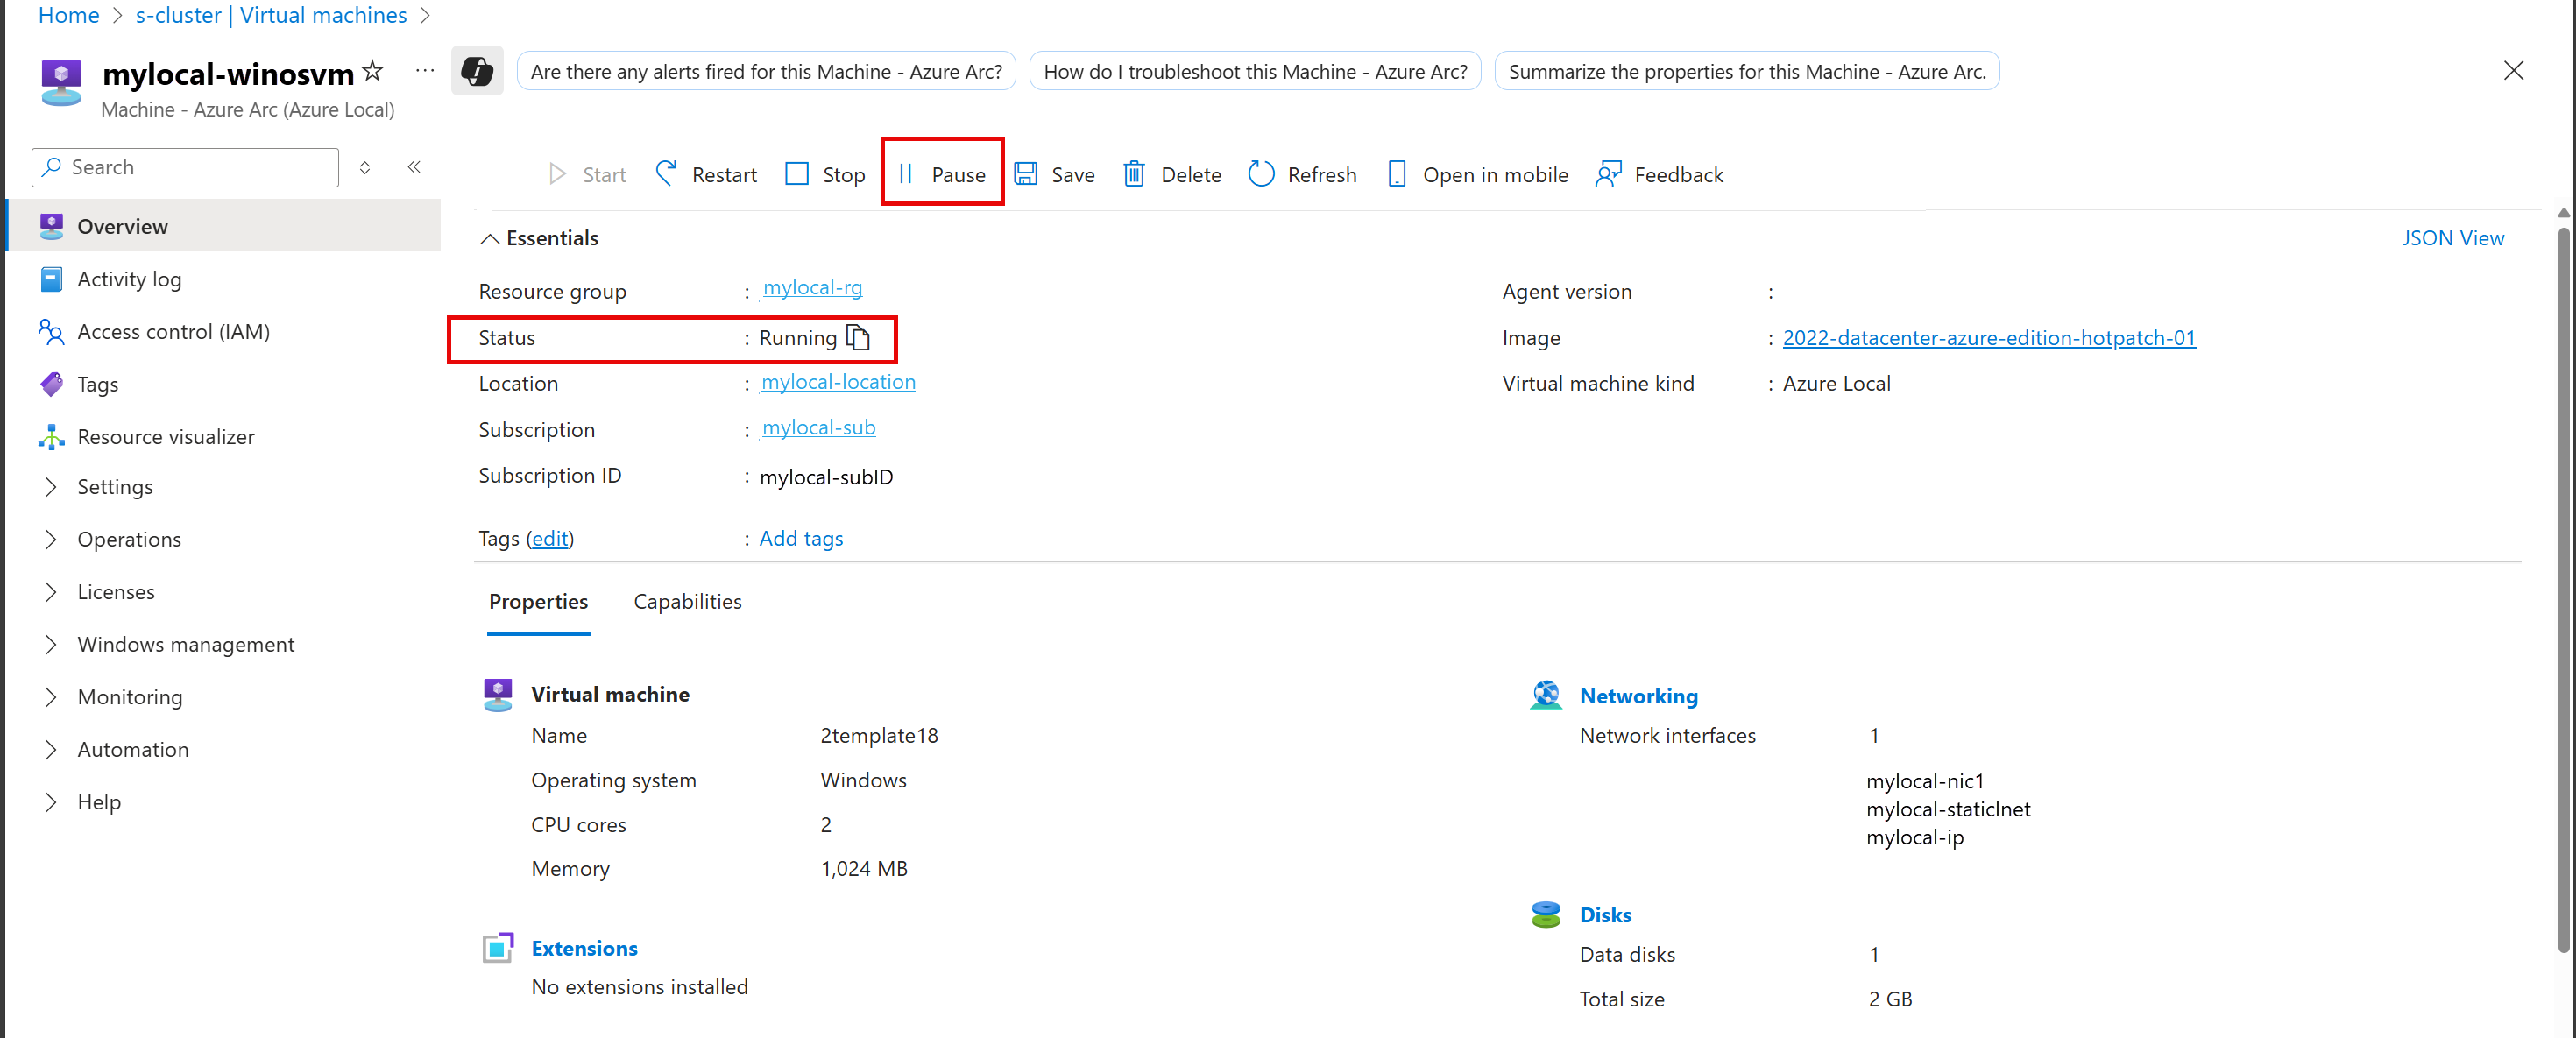
On the confirmation dialog, select Yes.
Verify that the VM's status changed to Paused.
To pause a VM, run the following commands in the Azure CLI on the computer that you're using to connect to Azure Local.
Connect to a machine on your system.
Run the following Azure PowerShell cmdlet:
#Set input parameters

$rg = "<Resource group name>"
$vmName = "<VM name>"

#Pause the VM

az stack-hci-vm pause --name $vmName --resource-group $rg
The parameters for this cmdlet are as follows:
| Parameter |
Description |
name |
Name of the virtual machine. |
resource-group |
Name of the resource group. You can configure the default group by using az configure --defaults group=<name>. |
subscription |
Name or ID of the subscription. You can configure the default subscription by using az account set -s NAME_OR_ID. |
Check the VM status to verify that the VM is paused:
#Check the VM status

az stack-hci-vm show --name $vmName --resource-group $rg
Start the VM to resume the VM from the paused state:
#Start the VM

az stack-hci-vm start --name $vmName --resource-group $rg
Verify that the VM is running.
Example output
Expand this section to see an example output.
#Set parameters

[v-host1]: PS C:\Users\HCIDeploymentUser> $rg = "<Resource group name>"
[v-host1]: PS C:\Users\HCIDeploymentUser> $vmName = "<VM name>"

#Pause the VM

[v-host1]: PS C:\Users\HCIDeploymentUser> az stack-hci-vm pause --name $vmName --resource-group $rg

#Show the current state of the VM
[v-host1]: PS C:\Users\HCIDeploymentUser> az stack-hci-vm show -g $rg --name $vmName
{
  "attestationStatus": null,
  "virtualmachineinstance": {
    "extendedLocation": {
      "name": "/subscriptions/<Subscription ID>/resourcegroups/<Resource group name>/providers/Microsoft.ExtendedLocation/customLocations/s-cluster-customlocation",
      "type": "CustomLocation"
    },
    "id": "/subscriptions/<Subscription ID>/resourceGroups/<Resource group name>/providers/Microsoft.HybridCompute/machines/testvm001/providers/Microsoft.AzureStackHCI/virtualMachineInstances/default",
    "identity": null,
    "name": "default",
    "properties": {
      "guestAgentInstallStatus": null,
      "hardwareProfile": {
        "dynamicMemoryConfig": {
          "maximumMemoryMb": null,
          "minimumMemoryMb": null,
          "targetMemoryBuffer": null
        },
        "memoryMb": 2000,
        "processors": 2,
        "vmSize": "Custom"
      },
      "httpProxyConfig": null,
      "instanceView": {
        "vmAgent": {
          "statuses": [
            {
              "code": "ProvisioningState/succeeded",
              "displayStatus": "Connected",
              "level": "Info",
              "message": "Connection with mocguestagent was successfully reestablished",
              "time": "2024-06-24T16:30:05+00:00"
            },
          ],
          "vmConfigAgentVersion": "v0.18.0-4-gd54376b0"
        }
      },
      "networkProfile": {
        "networkInterfaces": []
      },
      "osProfile": {
        "adminPassword": null,
        "adminUsername": "azureuser",
        "computerName": "testvm001",
        "linuxConfiguration": {
          "disablePasswordAuthentication": false,
          "provisionVmAgent": false,
          "provisionVmConfigAgent": true,
          "ssh": {
            "publicKeys": null
          }
        },
        "windowsConfiguration": {
          "enableAutomaticUpdates": null,
          "provisionVmAgent": false,
          "provisionVmConfigAgent": true,
          "ssh": {
            "publicKeys": null
          },
          "timeZone": null
        }
      },
      "provisioningState": "Succeeded",
      "resourceUid": null,
      "securityProfile": {
        "enableTpm": false,
        "securityType": null,
        "uefiSettings": {
          "secureBootEnabled": true
        }
      },
      "status": {
        "errorCode": "",
        "errorMessage": "",
        "powerState": "Paused",
        "provisioningStatus": null
      },
      "storageProfile": {
        "dataDisks": [],
        "imageReference": {
          "id": "/subscriptions/<Subscription ID>/resourceGroups/<Resource group name>/providers/Microsoft.AzureStackHCI/galleryImages/WinImage-26tdJUIS",
          "resourceGroup": "<Resource group name>"
        },
        "osDisk": {
          "id": null,
          "osType": "Windows"
        },
        "vmConfigStoragePathId": "/subscriptions/<Subscription ID>/resourceGroups/<Resource group name>/providers/Microsoft.AzureStackHCI/storageContainers/UserStorage2-guid"
      },
      "vmId": "<guid>"
    },
    "resourceGroup": "<Resource group name>",
    "systemData": {
      "createdAt": "2024-06-24T01:29:06.594266+00:00",
      "createdBy": "7d6ffe2f-dac5-4e74-9bf2-4830cf7f4668",
      "createdByType": "Application",
      "lastModifiedAt": "2024-06-24T16:41:27.166668+00:00",
      "lastModifiedBy": "319f651f-7ddb-4fc6-9857-7aef9250bd05",
      "lastModifiedByType": "Application"
    },
    "type": "microsoft.azurestackhci/virtualmachineinstances"
  }
}

#Start the VM after it was paused.

[v-host1]: PS C:\Users\HCIDeploymentUser> az stack-hci-vm start --name $vmName --resource-group $rg
Inside _start_initial/subscriptions/<Subscription ID>/resourceGroups/<Resource group name>/providers/Microsoft.HybridCompute/machines/testvm0012024-02-01-preview/https://management.azure.com/subscriptions/<Subscription ID>/resourceGroups/<Resource group name>/providers/Microsoft.HybridCompute/machines/testvm001/providers/Microsoft.AzureStackHCI/virtualMachineInstances/default/start?api-version=2024-02-01-preview

#Show the current state of the VM. The VM should be running.

[v-host1]: PS C:\Users\HCIDeploymentUser> az stack-hci-vm show -g $rg --name $vmName
{
  "attestationStatus": null,
  "virtualmachineinstance": {
    "extendedLocation": {
      "name": "/subscriptions/<Subscription ID>/resourcegroups/<Resource group name>/providers/Microsoft.ExtendedLocation/customLocations/s-cluster-customlocation",
      "type": "CustomLocation"
    },
    "id": "/subscriptions/<Subscription ID>/resourceGroups/<Resource group name>/providers/Microsoft.HybridCompute/machines/testvm001/providers/Microsoft.AzureStackHCI/virtualMachineInstances/default",
    "identity": null,
    "name": "default",
    "properties": {
      "guestAgentInstallStatus": null,
      "hardwareProfile": {
        "dynamicMemoryConfig": {
          "maximumMemoryMb": null,
          "minimumMemoryMb": null,
          "targetMemoryBuffer": null
        },
        "memoryMb": 2000,
        "processors": 2,
        "vmSize": "Custom"
      },
      "httpProxyConfig": null,
      "instanceView": {
        "vmAgent": {
          "statuses": [
            {
              "code": "ProvisioningState/succeeded",
              "displayStatus": "Connected",
              "level": "Info",
              "message": "Connection with mocguestagent was successfully reestablished",
              "time": "2024-06-24T17:25:19+00:00"
            }
          ],
          "vmConfigAgentVersion": "v0.18.0-4-gd54376b0"
        }
      },
      "networkProfile": {
        "networkInterfaces": []
      },
      "osProfile": {
        "adminPassword": null,
        "adminUsername": "azureuser",
        "computerName": "testvm001",
        "linuxConfiguration": {
          "disablePasswordAuthentication": false,
          "provisionVmAgent": false,
          "provisionVmConfigAgent": true,
          "ssh": {
            "publicKeys": null
          }
        },
        "windowsConfiguration": {
          "enableAutomaticUpdates": null,
          "provisionVmAgent": false,
          "provisionVmConfigAgent": true,
          "ssh": {
            "publicKeys": null
          },
          "timeZone": null
        }
      },
      "provisioningState": "Succeeded",
      "resourceUid": null,
      "securityProfile": {
        "enableTpm": false,
        "securityType": null,
        "uefiSettings": {
          "secureBootEnabled": true
        }
      },
      "status": {
        "errorCode": "",
        "errorMessage": "",
        "powerState": "Running",
        "provisioningStatus": null
      },
      "storageProfile": {
        "dataDisks": [],
        "imageReference": {
          "id": "/subscriptions/<Subscription ID>/resourceGroups/<Resource group name>/providers/Microsoft.AzureStackHCI/galleryImages/WinImage-26tdJUIS",
          "resourceGroup": "<Resource group name>"
        },
        "osDisk": {
          "id": null,
          "osType": "Windows"
        },
        "vmConfigStoragePathId": "/subscriptions/<Subscription ID>/resourceGroups/<Resource group name>/providers/Microsoft.AzureStackHCI/storageContainers/UserStorage2-guid"
      },
      "vmId": "<guid>"
    },
    "resourceGroup": "<Resource group name>",
    "systemData": {
      "createdAt": "2024-06-24T01:29:06.594266+00:00",
      "createdBy": "<guid>",
      "createdByType": "Application",
      "lastModifiedAt": "2024-06-24T17:28:13.206935+00:00",
      "lastModifiedBy": "<guid>",
      "lastModifiedByType": "Application"
    },
    "type": "microsoft.azurestackhci/virtualmachineinstances"
  }
}
Save a VM
Saving a VM stores its current state to the disk and stops the VM. Saving a VM frees up memory and CPU resources. You can save only running VMs.
To save a VM, follow these steps in the Azure portal for your Azure Local instance:
Go to the Azure Local resource, and then go to Virtual machines.
In the list of virtual machines, select a VM that's currently running and that you want to save.
On the Overview page for the VM, on the command bar, select Save.
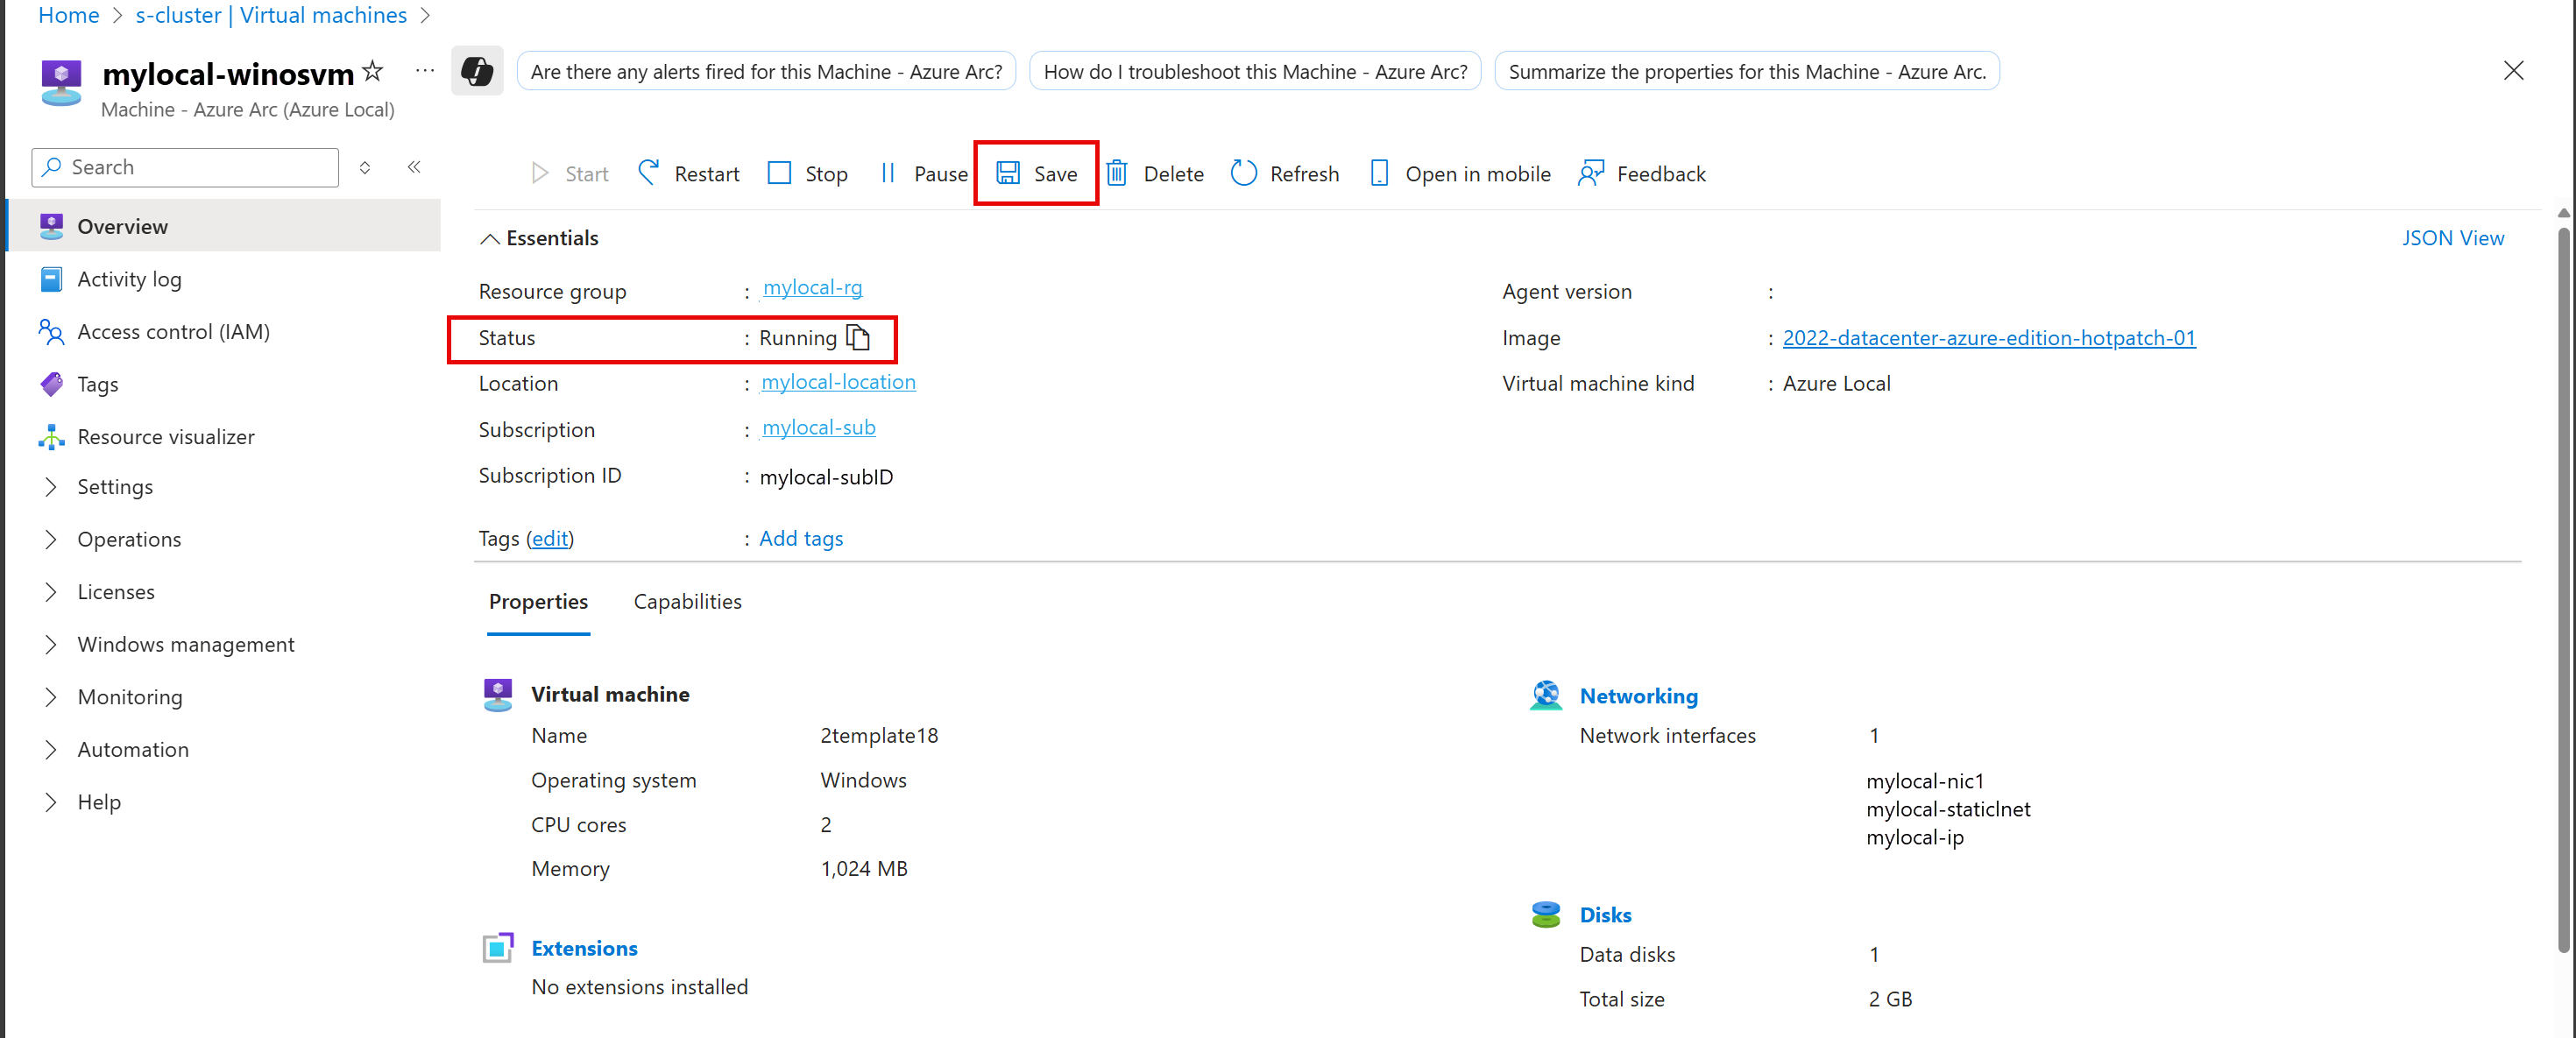
On the confirmation dialog, select Yes.
Verify that the VM's status changed to Saved.
To save a VM, run the following commands in the Azure CLI on the computer that you're using to connect to Azure Local.
Connect to a machine on your system.
Run the following Azure PowerShell cmdlet:
#Set input parameters

$rg = "<Resource group name>"
$vmName = "<VM name>"

#Save the VM

az stack-hci-vm save --name $vmName --resource-group $rg
The parameters for this cmdlet are as follows:
| Parameter |
Description |
name |
Name of the virtual machine. |
resource-group |
Name of the resource group. You can configure the default group by using az configure --defaults group=<name>. |
subscription |
Name or ID of the subscription. You can configure the default subscription by using az account set -s <Subscription name or Subscription ID>. |
Check the VM status to verify that the VM is saved:
#Check the VM status

az stack-hci-vm show --name $vmName --resource-group $rg
Start the VM to resume the VM from the saved state:
#Start the VM

az stack-hci-vm start --name $vmName --resource-group $rg
Verify that the VM is running.
Example output
Expand this section to see an example output.
#Set parameters

[v-host1]: PS C:\Users\HCIDeploymentUser> $rg = "<Resource group name>"
[v-host1]: PS C:\Users\HCIDeploymentUser> $vmName = "<VM name>"

#Save the VM

[v-host1]: PS C:\Users\HCIDeploymentUser> az stack-hci-vm save --name $vmName --resource-group $rg

#Show the current state of the VM

[v-host1]: PS C:\Users\HCIDeploymentUser> az stack-hci-vm show -g $rg --name $vmName
{
  "attestationStatus": null,
  "virtualmachineinstance": {
    "extendedLocation": {
      "name": "/subscriptions/<Subscription ID>/resourcegroups/<Resource group name>/providers/Microsoft.ExtendedLocation/customLocations/s-cluster-customlocation",
      "type": "CustomLocation"
    },
    "id": "/subscriptions/<Subscription ID>/resourceGroups/<Resource group name>/providers/Microsoft.HybridCompute/machines/testvm001/providers/Microsoft.AzureStackHCI/virtualMachineInstances/default",
    "identity": null,
    "name": "default",
    "properties": {
      "guestAgentInstallStatus": null,
      "hardwareProfile": {
        "dynamicMemoryConfig": {
          "maximumMemoryMb": null,
          "minimumMemoryMb": null,
          "targetMemoryBuffer": null
        },
        "memoryMb": 2000,
        "processors": 2,
        "vmSize": "Custom"
      },
      "httpProxyConfig": null,
      "instanceView": {
        "vmAgent": {
          "statuses": [
            {
              "code": "ProvisioningState/succeeded",
              "displayStatus": "Connected",
              "level": "Info",
              "message": "Connection with mocguestagent was successfully reestablished",
              "time": "2024-06-24T17:25:19+00:00"
            },
          ],
          "vmConfigAgentVersion": "v0.18.0-4-gd54376b0"
        }
      },
      "networkProfile": {
        "networkInterfaces": []
      },
      "osProfile": {
        "adminPassword": null,
        "adminUsername": "azureuser",
        "computerName": "testvm001",
        "linuxConfiguration": {
          "disablePasswordAuthentication": false,
          "provisionVmAgent": false,
          "provisionVmConfigAgent": true,
          "ssh": {
            "publicKeys": null
          }
        },
        "windowsConfiguration": {
          "enableAutomaticUpdates": null,
          "provisionVmAgent": false,
          "provisionVmConfigAgent": true,
          "ssh": {
            "publicKeys": null
          },
          "timeZone": null
        }
      },
      "provisioningState": "Succeeded",
      "resourceUid": null,
      "securityProfile": {
        "enableTpm": false,
        "securityType": null,
        "uefiSettings": {
          "secureBootEnabled": true
        }
      },
      "status": {
        "errorCode": "",
        "errorMessage": "",
        "powerState": "Saved",
        "provisioningStatus": null
      },
      "storageProfile": {
        "dataDisks": [],
        "imageReference": {
          "id": "/subscriptions/<Subscription ID>/resourceGroups/<Resource group name>/providers/Microsoft.AzureStackHCI/galleryImages/WinImage-26tdJUIS",
          "resourceGroup": "<Resource group name>"
        },
        "osDisk": {
          "id": null,
          "osType": "Windows"
        },
        "vmConfigStoragePathId": "/subscriptions/<Subscription ID>/resourceGroups/<Resource group name>/providers/Microsoft.AzureStackHCI/storageContainers/UserStorage2-345d968fa1e74e99a9509ab7f3d259fd"
      },
      "vmId": "<guid>"
    },
    "resourceGroup": "<Resource group name>",
    "systemData": {
      "createdAt": "2024-06-24T01:29:06.594266+00:00",
      "createdBy": "<guid>",
      "createdByType": "Application",
      "lastModifiedAt": "2024-06-24T18:29:02.794305+00:00",
      "lastModifiedBy": "<guid>",
      "lastModifiedByType": "Application"
    },
    "type": "microsoft.azurestackhci/virtualmachineinstances"
  }
}

#Start the VM after it was saved

[v-host1]: PS C:\Users\HCIDeploymentUser> az stack-hci-vm start --name $vmName --resource-group $rg
Inside _start_initial/subscriptions/<Subscription ID>/resourceGroups/<Resource group name>/providers/Microsoft.HybridCompute/machines/testvm0012024-02-01-previewhttps://management.azure.com/subscriptions/<Subscription ID>/resourceGroups/<Resource group name>/providers/Microsoft.HybridCompute/machines/testvm001/providers/Microsoft.AzureStackHCI/virtualMachineInstances/default/start?api-version=2024-02-01-preview

#Show the current state of the VM. The VM should be running.

[v-host1]: PS C:\Users\HCIDeploymentUser> az stack-hci-vm show -g $rg --name $vmName
{
  "attestationStatus": null,
  "virtualmachineinstance": {
    "extendedLocation": {
      "name": "/subscriptions/<Subscription ID>/resourcegroups/<Resource group name>/providers/Microsoft.ExtendedLocation/customLocations/s-cluster-customlocation",
      "type": "CustomLocation"
    },
    "id": "/subscriptions/<Subscription ID>/resourceGroups/<Resource group name>/providers/Microsoft.HybridCompute/machines/testvm001/providers/Microsoft.AzureStackHCI/virtualMachineInstances/default",
    "identity": null,
    "name": "default",
    "properties": {
      "guestAgentInstallStatus": null,
      "hardwareProfile": {
        "dynamicMemoryConfig": {
          "maximumMemoryMb": null,
          "minimumMemoryMb": null,
          "targetMemoryBuffer": null
        },
        "memoryMb": 2000,
        "processors": 2,
        "vmSize": "Custom"
      },
      "httpProxyConfig": null,
      "instanceView": {
        "vmAgent": {
          "statuses": [
            {
              "code": "ProvisioningState/succeeded",
              "displayStatus": "Connected",
              "level": "Info",
              "message": "Connection with mocguestagent was successfully reestablished",
              "time": "2024-06-24T18:32:41+00:00"
            }
          ],
          "vmConfigAgentVersion": "v0.18.0-4-gd54376b0"
        }
      },
      "networkProfile": {
        "networkInterfaces": []
      },
      "osProfile": {
        "adminPassword": null,
        "adminUsername": "azureuser",
        "computerName": "testvm001",
        "linuxConfiguration": {
          "disablePasswordAuthentication": false,
          "provisionVmAgent": false,
          "provisionVmConfigAgent": true,
          "ssh": {
            "publicKeys": null
          }
        },
        "windowsConfiguration": {
          "enableAutomaticUpdates": null,
          "provisionVmAgent": false,
          "provisionVmConfigAgent": true,
          "ssh": {
            "publicKeys": null
          },
          "timeZone": null
        }
      },
      "provisioningState": "Succeeded",
      "resourceUid": null,
      "securityProfile": {
        "enableTpm": false,
        "securityType": null,
        "uefiSettings": {
          "secureBootEnabled": true
        }
      },
      "status": {
        "errorCode": "",
        "errorMessage": "",
        "powerState": "Running",
        "provisioningStatus": null
      },
      "storageProfile": {
        "dataDisks": [],
        "imageReference": {
          "id": "/subscriptions/<Subscription ID>/resourceGroups/<Resource group name>/providers/Microsoft.AzureStackHCI/galleryImages/WinImage-26tdJUIS",
          "resourceGroup": "<Resource group name>"
        },
        "osDisk": {
          "id": null,
          "osType": "Windows"
        },
        "vmConfigStoragePathId": "/subscriptions/<Subscription ID>/resourceGroups/<Resource group name>/providers/Microsoft.AzureStackHCI/storageContainers/UserStorage2-guid"
      },
      "vmId": "<guid>"
    },
    "resourceGroup": "<Resource group name>",
    "systemData": {
      "createdAt": "2024-06-24T01:29:06.594266+00:00",
      "createdBy": "<guid>",
      "createdByType": "Application",
      "lastModifiedAt": "2024-06-24T18:35:18.206280+00:00",
      "lastModifiedBy": "<guid>",
      "lastModifiedByType": "Application"
    },
    "type": "microsoft.azurestackhci/virtualmachineinstances"
  }
}
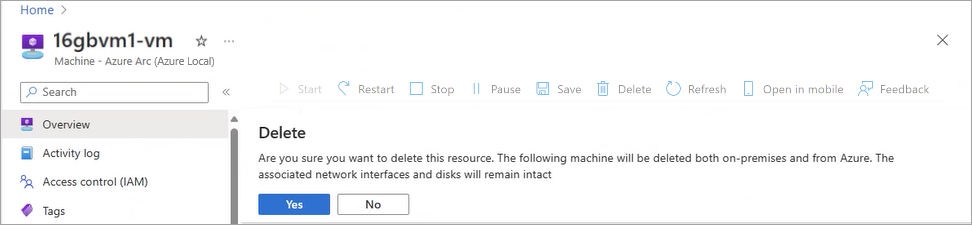
Delete a VM
Deleting a VM doesn't delete all the resources associated with the VM. For example, it doesn't delete the data disks and the network interfaces associated with the VM. You need to locate and delete these resources separately.
To delete a VM, follow these steps in the Azure portal for your Azure Local instance:
Go to the Azure Local resource, and then go to Virtual machines.
In the list of virtual machines, select a VM that you want to remove from your system.
On the Overview page for the VM, on the command bar, select Delete.
On the confirmation dialog, select Yes.
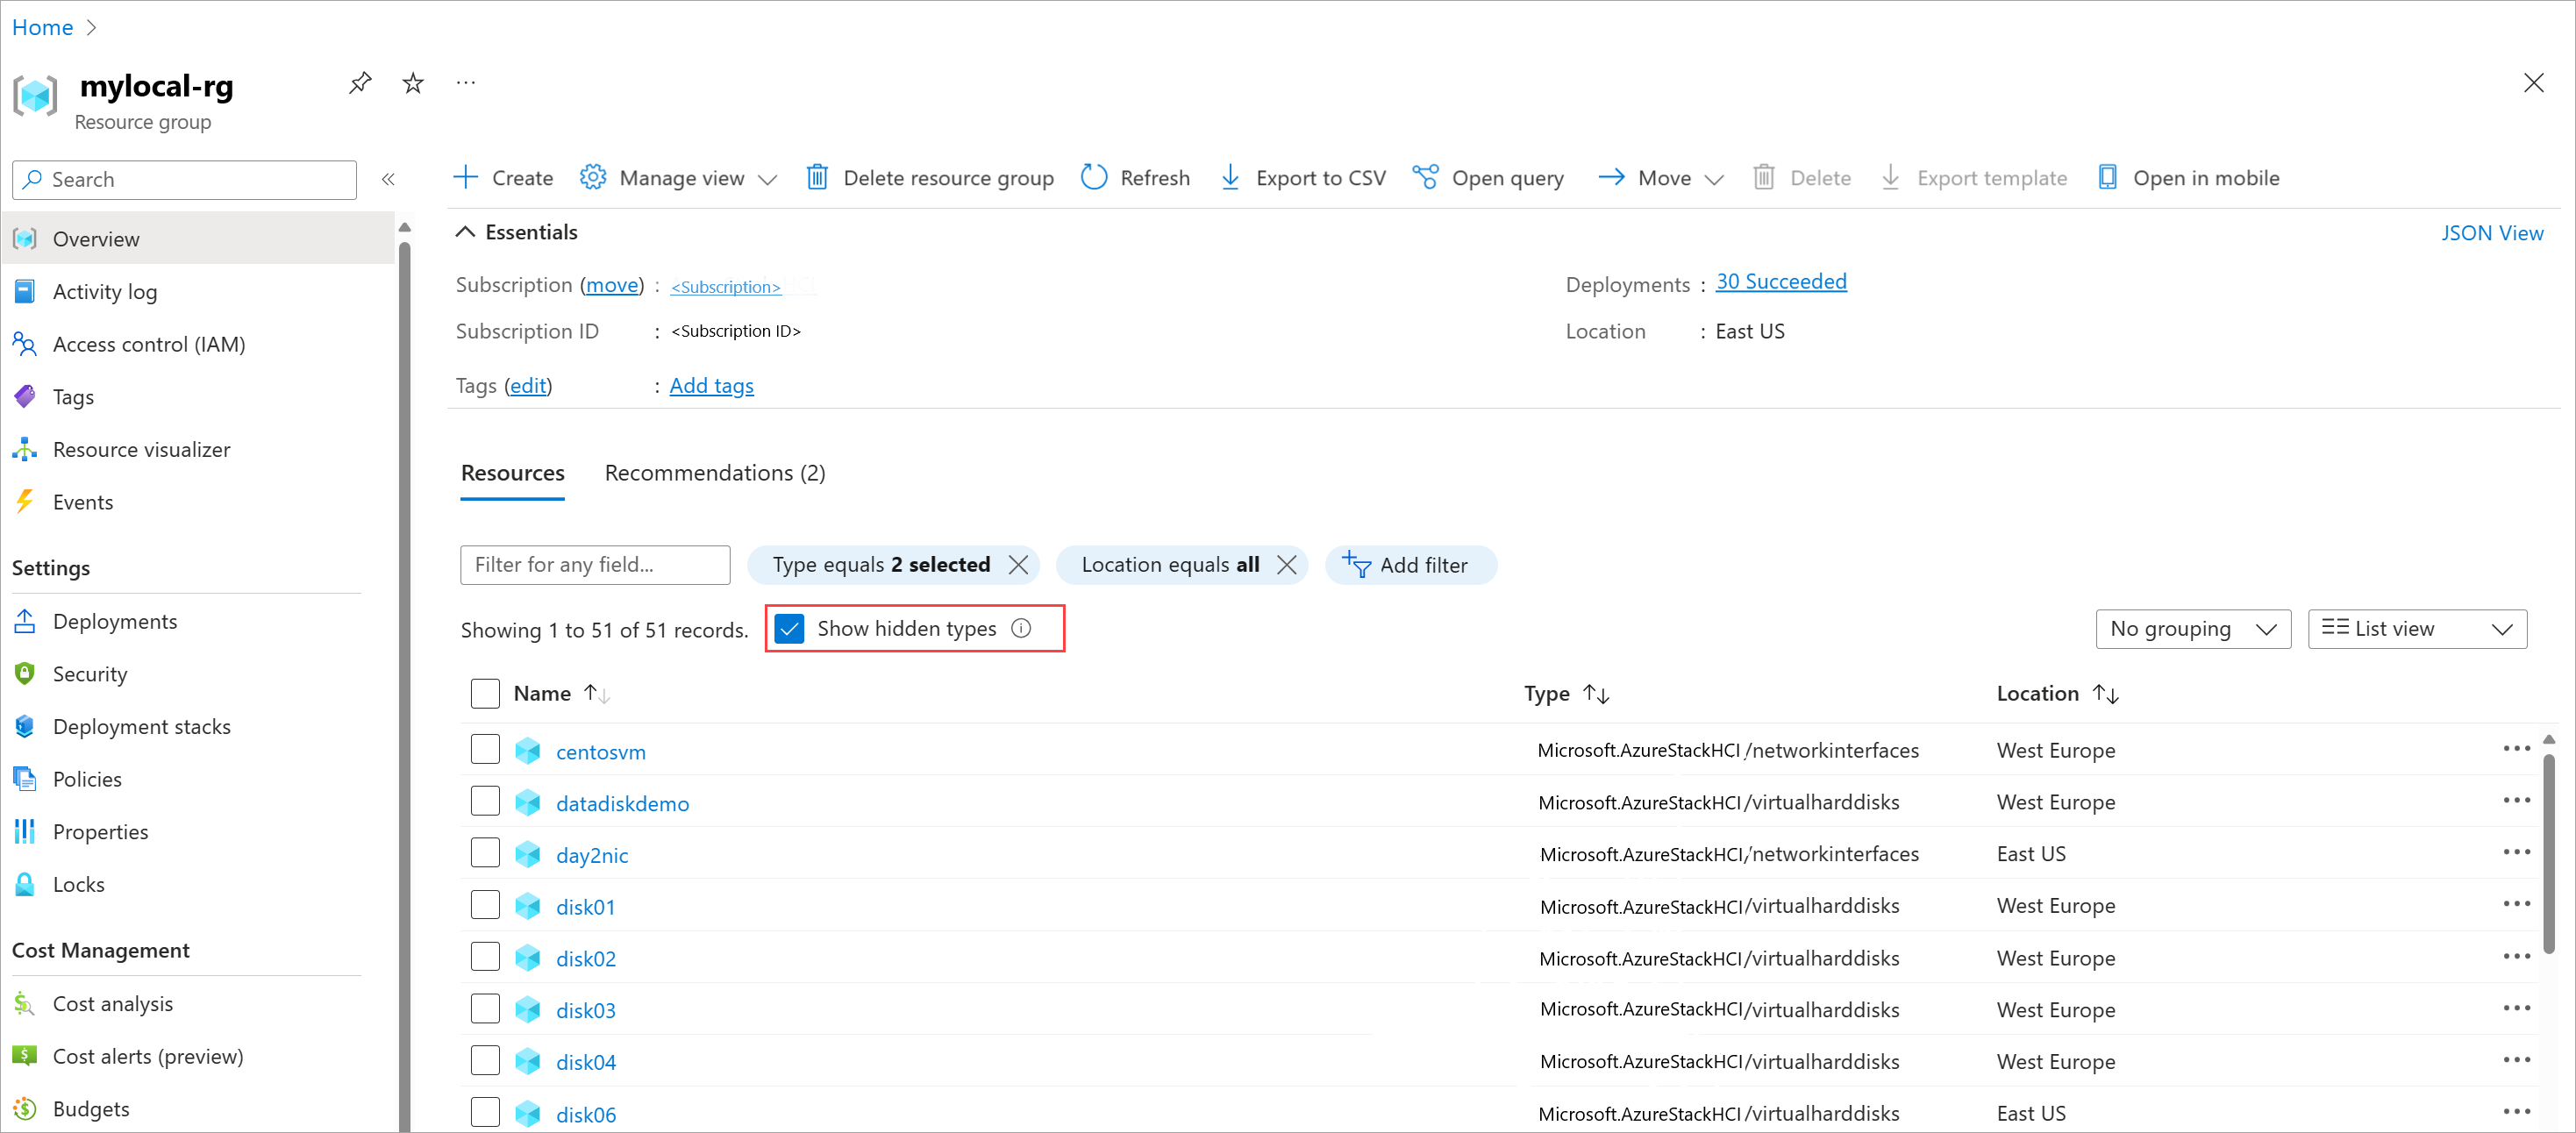
Go to the resource group where this VM was deployed. Verify that the VM is removed from the list of resources in the resource group.
Locate the associated resources, such as the network interfaces and data disks, and delete them. You might need to select Show hidden types to view the resources associated with this VM that weren't deleted.
Change the local account password
Follow these steps to change the local account passwords for an Azure Local VM deployed on your Azure Local instance. The steps are different for Windows and Linux VMs.
Change the local account password for Windows VMs
Sign in to the Azure Local VM.
Run the following Azure PowerShell command:
# Define the username
$username = "AccountName"

# Prompt the user to enter the new password
$newPassword = Read-Host -AsSecureString "Enter the new password for $username"

# Prompt the user to re-enter the new password for verification
$verifyPassword = Read-Host -AsSecureString "Re-enter the new password for verification"

# Convert the secure strings to plain text for comparison
$plainPassword = [Runtime.InteropServices.Marshal]::PtrToStringAuto([Runtime.InteropServices.Marshal]::SecureStringToBSTR($newPassword))
$plainVerifyPassword = [Runtime.InteropServices.Marshal]::PtrToStringAuto([Runtime.InteropServices.Marshal]::SecureStringToBSTR($verifyPassword))

# Check if the passwords match, and change the password if they match. Fail if the passwords don't match.
if ($plainPassword -eq $plainVerifyPassword) {
    $account = [ADSI]"WinNT://./$username,user"
    $account.SetPassword($plainPassword)
    $account.SetInfo()

    Write-Host "Password for user $username has been reset successfully." -ForegroundColor Green
} else {
    Write-Host "The passwords do not match. Please try again." -ForegroundColor Red
}
Change the local account password for Linux VMs
If Bash is in a different directory, be sure to change the #!/bin/bash line accordingly.
Sign in to the Azure Local VM.
Run the following script from where Bash is installed:
#!/bin/bash

# Define the username
username="AccountName"

# Prompt the user to enter the new password
echo -n "Enter the new password for $username: "
read -s newPassword
echo

# Prompt the user to re-enter the new password for verification
echo -n "Re-enter the new password for verification: "
read -s verifyPassword
echo

# Check if the passwords match
if [ "$newPassword" == "$verifyPassword" ]; then
    # Reset the password for the local account
    echo "$username:$newPassword" | sudo chpasswd
    echo -e "\e[32mPassword for user $username has been reset successfully.\e[0m"
else
    echo -e "\e[31mThe passwords do not match. Please try again.\e[0m"
fi
Conduct live migration of Azure Local VMs
Live migration of Azure Local VMs across Azure Local nodes is supported via on-premises tools like Failover Cluster Manager or Windows Admin Center. Live migration of VM storage is not supported.
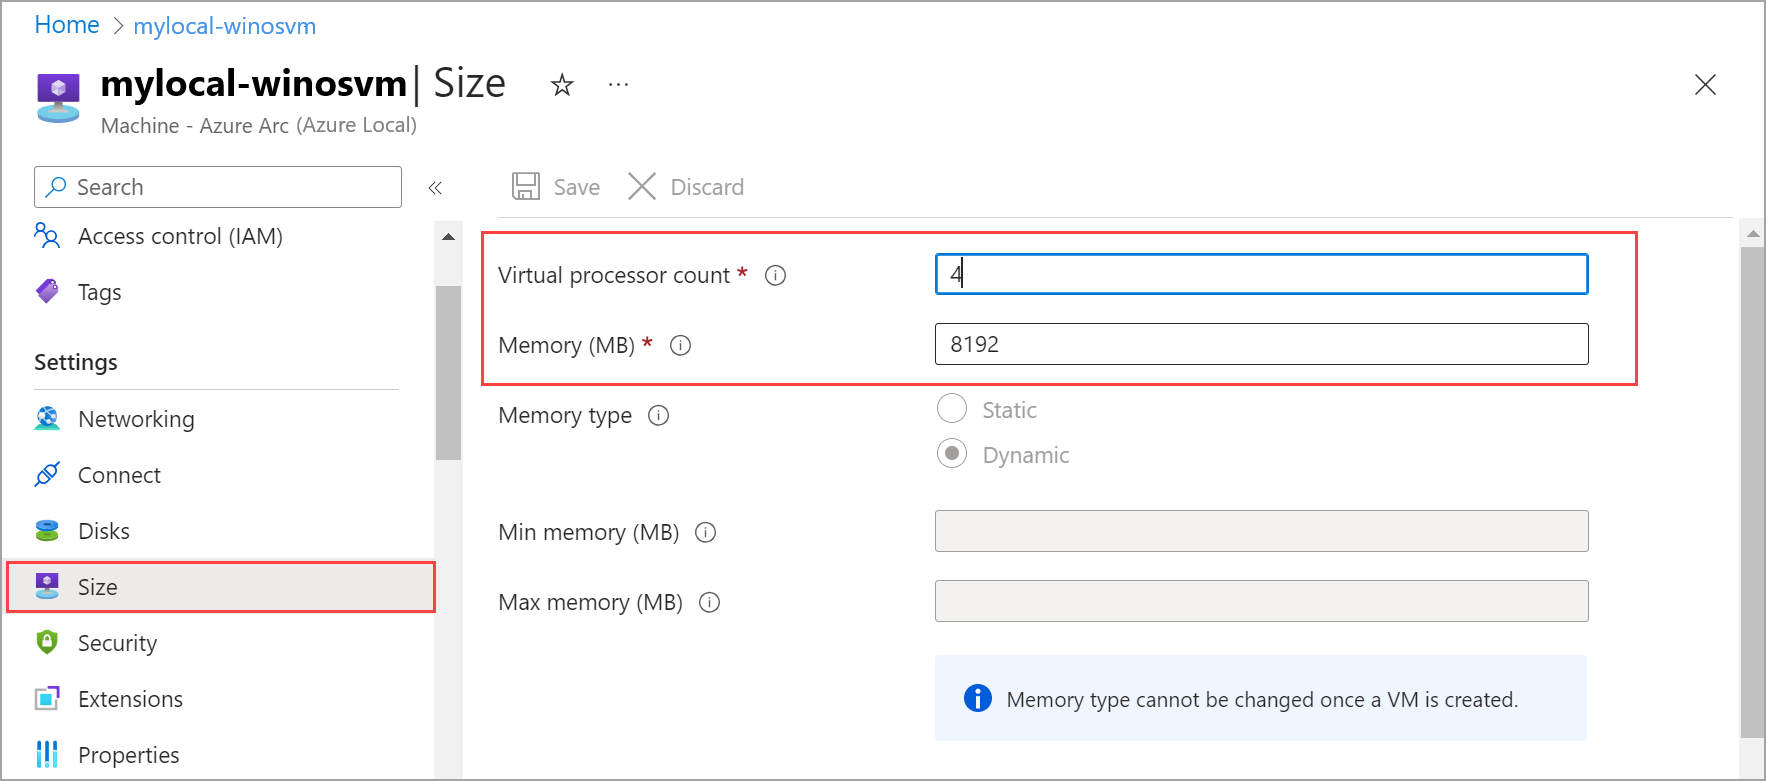
Change cores and memory
To change cores and memory, follow these steps in the Azure portal for your Azure Local instance:
Go to your Azure Local resource, and then go to Virtual machines.
In the list of VMs, select and go to the VM whose cores and memory you want to modify.
Under Settings, select Size. Edit the Virtual processor count or Memory (MB) values to change the cores or the memory size for the VM. For memory, only the size can be changed. You can't change the memory type after a VM is created.
Related content


