Note
Access to this page requires authorization. You can try signing in or changing directories.
Access to this page requires authorization. You can try changing directories.
In this quickstart, you'll create a feature flag in Azure App Configuration and use it to dynamically control the availability of features in a Go console app.
The feature management support extends the dynamic configuration feature in App Configuration. This example demonstrates how to integrate feature flags into a Go console application with real-time monitoring capabilities.
Prerequisites
- An Azure account with an active subscription. Create one for free.
- An App Configuration store. Create a store.
- Go 1.21 or later. For information on installing Go, see the Go downloads page.
- Azure App Configuration Go provider v1.1.0-beta.1 or later.
Create a feature flag
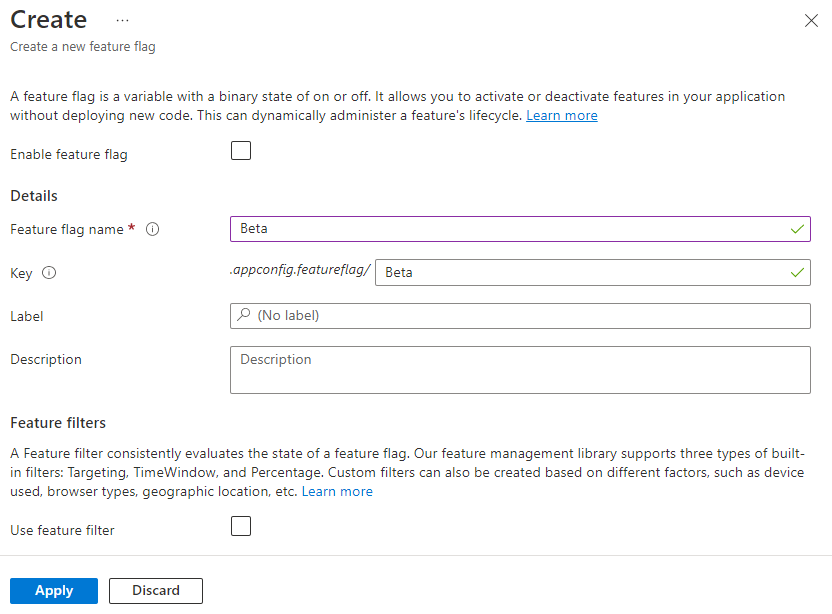
Add a feature flag called Beta to the App Configuration store and leave Label and Description with their default values. For more information about how to add feature flags to a store using the Azure portal or the CLI, go to Create a feature flag.
Use a feature flag
Create a new directory for your Go project and navigate into it:
mkdir go-feature-flag-quickstart
cd go-feature-flag-quickstart
Initialize a new Go module:
go mod init go-feature-flag-quickstartInstall the required Go packages for Azure App Configuration and feature management:
go get github.com/microsoft/Featuremanagement-Go/featuremanagement
go get github.com/microsoft/Featuremanagement-Go/featuremanagement/providers/azappconfig
Update the
optionsto enable feature flags in previous step.options := &azureappconfiguration.Options{ FeatureFlagOptions: azureappconfiguration.FeatureFlagOptions{ Enabled: true, RefreshOptions: azureappconfiguration.RefreshOptions{ Enabled: true, }, }, }Tip
When no selector is specified in
FeatureFlagOptions, it loads all feature flags with no label in your App Configuration store. The default refresh interval of feature flags is 30 seconds. You can customize this behavior via theRefreshOptionsparameter. For example, the following code snippet loads only feature flags that start with TestApp: in their key name and have the label dev. The code also changes the refresh interval time to 5 minutes. Note that this refresh interval time is separate from that for regular key-values.FeatureFlagOptions{ Enabled: true, Selectors: []azureappconfiguration.Selector{ { KeyFilter: "TestApp:*", LabelFilter: "dev", }, }, RefreshOptions: azureappconfiguration.RefreshOptions{ Enabled: true, Interval: 5 * time.Minute, }, }Create the main application file
main.go:package main import ( "context" "fmt" "log" "os" "time" "github.com/microsoft/Featuremanagement-Go/featuremanagement" "github.com/microsoft/Featuremanagement-Go/featuremanagement/providers/azappconfig" ) func main() { ctx := context.Background() // Load Azure App Configuration appConfig, err := loadAzureAppConfiguration(ctx) if err != nil { log.Fatalf("Error loading Azure App Configuration: %v", err) } // Create feature flag provider featureFlagProvider, err := azappconfig.NewFeatureFlagProvider(appConfig) if err != nil { log.Fatalf("Error creating feature flag provider: %v", err) } // Create feature manager featureManager, err := featuremanagement.NewFeatureManager(featureFlagProvider, nil) if err != nil { log.Fatalf("Error creating feature manager: %v", err) } // Monitor the Beta feature flag fmt.Println("Monitoring 'Beta' feature flag (press Ctrl+C to exit):") fmt.Println("Toggle the Beta feature flag in Azure portal to see real-time updates...") fmt.Println() ticker := time.NewTicker(5 * time.Second) defer ticker.Stop() for { select { case <-ticker.C: // Refresh configuration to get latest feature flag settings if err := appConfig.Refresh(ctx); err != nil { log.Printf("Error refreshing configuration: %v", err) continue } // Evaluate the Beta feature flag isEnabled, err := featureManager.IsEnabled("Beta") if err != nil { log.Printf("Error checking if Beta feature is enabled: %v", err) continue } // Print timestamp and feature status timestamp := time.Now().Format("15:04:05") fmt.Printf("[%s] Beta is enabled: %t\n", timestamp, isEnabled) case <-ctx.Done(): fmt.Println("\nShutting down...") return } } }
Run the application
Run the application:
go mod tidy
go run .
The application starts monitoring the Beta feature flag and displays its current state every 5 seconds:
Monitoring 'Beta' feature flag (press Ctrl+C to exit):
Toggle the Beta feature flag in Azure portal to see real-time updates...

[14:30:15] Beta is enabled: false
[14:30:20] Beta is enabled: false
[14:30:25] Beta is enabled: false
Sign in to the Azure portal. Select All resources, and select the App Configuration store that you created previously.
Select Feature manager and locate the Beta feature flag. Enable the flag by selecting the checkbox under Enabled.
Return to your console application. After a few seconds, you should see the feature flag status change:
[14:30:30] Beta is enabled: false
[14:30:35] Beta is enabled: true
[14:30:40] Beta is enabled: true
You can toggle the feature flag on and off in the Azure portal to see real-time updates in your console application without restarting it.
Press Ctrl+C to stop the application.
Clean up resources
If you don't want to continue using the resources created in this article, delete the resource group you created here to avoid charges.
Important
Deleting a resource group is irreversible. The resource group and all the resources in it are permanently deleted. Ensure that you don't accidentally delete the wrong resource group or resources. If you created the resources for this article inside a resource group that contains other resources you want to keep, delete each resource individually from its respective pane instead of deleting the resource group.
- Sign in to the Azure portal, and select Resource groups.
- In the Filter by name box, enter the name of your resource group.
- In the result list, select the resource group name to see an overview.
- Select Delete resource group.
- You're asked to confirm the deletion of the resource group. Enter the name of your resource group to confirm, and select Delete.
After a few moments, the resource group and all its resources are deleted.
Next steps
In this quickstart, you created a feature flag in Azure App Configuration and used it in a Go console application. The Feature Management Go library provides rich feature flag capabilities that integrate seamlessly with Azure App Configuration. For more features, continue to the following document.
While a feature flag allows you to activate or deactivate functionality in your app, you may want to customize a feature flag based on your app's logic. Feature filters allow you to enable a feature flag conditionally. For more information, continue to the following tutorial.
Azure App Configuration offers built-in feature filters that enable you to activate a feature flag only during a specific period or to a particular targeted audience of your app. For more information, continue to the following tutorial.