Note
Access to this page requires authorization. You can try signing in or changing directories.
Access to this page requires authorization. You can try changing directories.
This article describes how to use the Azure portal to configure listener-specific SSL policies on your Azure Application Gateway. Listener-specific SSL policies allow you to configure specific listeners to use different SSL policies from each other. You can still set a default SSL policy that all listeners use unless overridden by the listener-specific SSL policy. This article describes how to use the Azure portal to configure listener-specific SSL policies on your Application Gateway. Listener-specific SSL policies allow you to configure specific listeners to use different SSL policies from each other. You'll still be able to set a default SSL policy that all listeners use unless overwritten by the listener-specific SSL policy.
Important
Starting August 31, 2025, all clients and backend servers interacting with Azure Application Gateway must use Transport Layer Security (TLS) 1.2 or higher, as support for TLS 1.0 and 1.1 will be discontinued.
Note
Only Standard_v2 and WAF_v2 SKUs support listener-specific policies. Listener-specific policies are part of SSL profiles, and SSL profiles are only supported on v2 Application Gateways.
Prerequisites
Before you begin, ensure you have:
- An Azure subscription. If you don't have one, create a free account before you begin.
- An existing Azure Application Gateway (Standard_v2 or WAF_v2 SKU)
- Appropriate permissions to modify Application Gateway configurations
Create a new Application Gateway
First, create a new Application Gateway as you would normally through the portal. There are no more steps needed during creation to configure listener-specific SSL policies. For more information on how to create an Application Gateway in the portal, see the portal quickstart tutorial.
First create a new Application Gateway as you would usually through the portal - there are no extra steps needed in the creation to configure listener-specific SSL policies. For more information on how to create an Application Gateway in portal, check out our portal quickstart tutorial.
Set up a listener-specific SSL policy
Before you proceed, here are some important considerations for listener-specific SSL policies:
SSL-Policies
We recommend using TLS 1.2 or higher
You don't need to configure client authentication on an SSL profile to associate it with a listener. You can configure only client authentication, only listener-specific SSL policy, or both in your SSL profile.
Use a 2022 Predefined or Custom v2 policy, enhances SSL security and performance for the entire Application Gateway (SSL Policy and SSL Profile). Therefore, you can't have different listeners using both legacy and new SSL policies simultaneously.
We recommend using TLS 1.2 as this version will be mandated in the future.
You don't have to configure client authentication on an SSL profile to associate it to a listener. You can have only client authentication or listener-specific SSL policy configured, or both configured in your SSL profile.
Using a 2022 Predefined or Customv2 policy enhances SSL security and performance for the entire gateway (SSL Policy and SSL Profile). Therefore, you cannot have different listeners on both old and new SSL (predefined or custom) policies.
Example scenario: If you're currently using SSL Policy and SSL Profile with "legacy" policies/ciphers, upgrading to a "new" Predefined or Custom v2 policy for any component requires upgrading the other configuration as well. You can use the new predefined policies, Custom v2 policy, or a combination.
SSL-Policies To set up a listener-specific SSL policy, you need to first go to the SSL settings tab in the Azure portal and create a new SSL profile. When you create an SSL profile, you see two tabs: Client Authentication and SSL Policy. The SSL Policy tab is used to configure a listener-specific SSL policy. The Client Authentication tab is where you upload client certificates for mutual authentication. For more information, see Configuring mutual authentication.
To set up a listener-specific SSL policy, you need to first go to the SSL settings tab in the Portal and create a new SSL profile. When you create an SSL profile, you see two tabs: Client Authentication and SSL Policy. The SSL Policy tab is to configure a listener-specific SSL policy. The Client Authentication tab is where to upload a client certificate for mutual authentication - for more information, check out Configuring a mutual authentication.
Search for Application Gateway in the portal, select Application gateways, and select your existing Application Gateway.
Select SSL settings from the left-side menu.
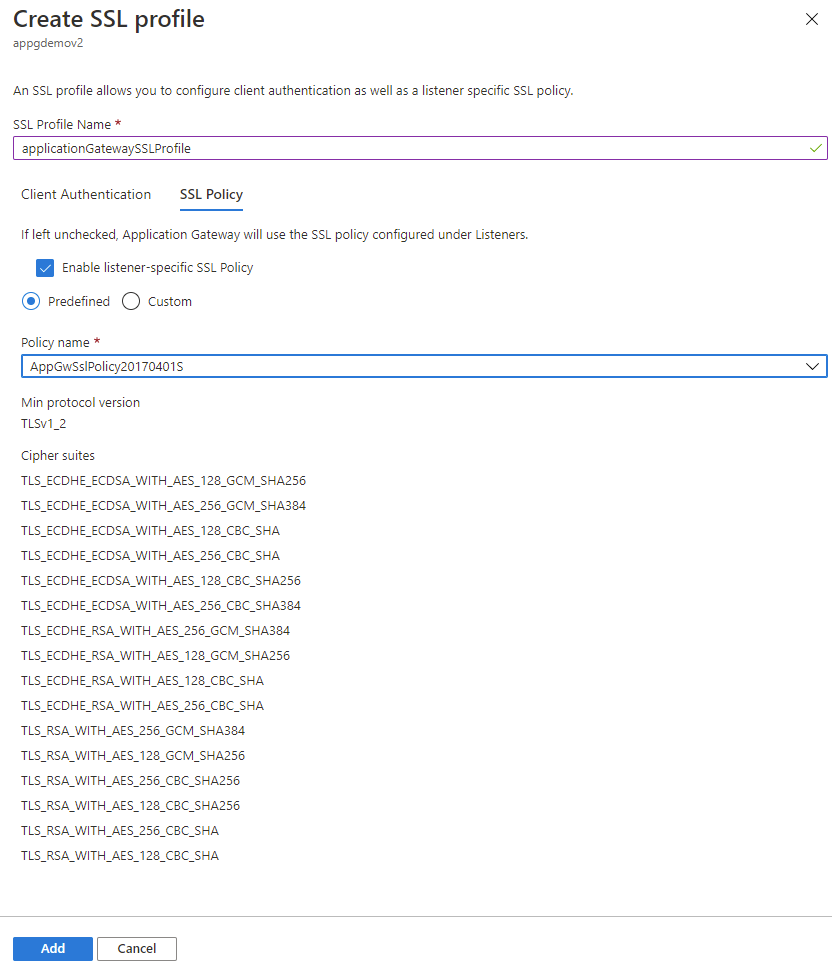
Select the plus sign next to SSL Profiles at the top to create a new SSL profile.
Enter a name under SSL Profile Name. In this example, we name our SSL profile applicationGatewaySSLProfile.
Go to the SSL Policy tab and check the Enable listener-specific SSL Policy checkbox.
Configure your listener-specific SSL policy according to your requirements. You can choose between predefined SSL policies and customizing your own SSL policy. For more information on SSL policies, see SSL policy overview. We recommend using TLS 1.2 or higher.
Note
This policy is the latest version of the SSL policy available, which is recommended to ensure the best SSL security. If your gateway is configured to handle older traffic, you may need to choose an older policy to ensure that all traffic is handled correctly.
Select Add to save.
Associate the SSL profile with a listener
Now you created an SSL profile with a listener-specific SSL policy. You need to associate the SSL profile with the listener to activate the listener-specific policy.
Navigate to your existing Application Gateway.
Select Listeners from the left-side menu.
Select on Add listener if you don't already have an HTTPS listener set up. If you already have an HTTPS listener, Select on it from the list.
Fill out the Listener name, Frontend IP, Port, and other HTTPS Settings to fit your requirements.
Select Add to save your new listener with the SSL profile associated to it.
Check to see SSL Policy is correct or select Change for choose another SSL Policy. The options available include:
- Default
- Predefined
- Custom
- CustomV2 Select the SSL profile you created from the dropdown list. In this example, we choose the SSL profile created in the earlier steps: applicationGatewaySSLProfile.
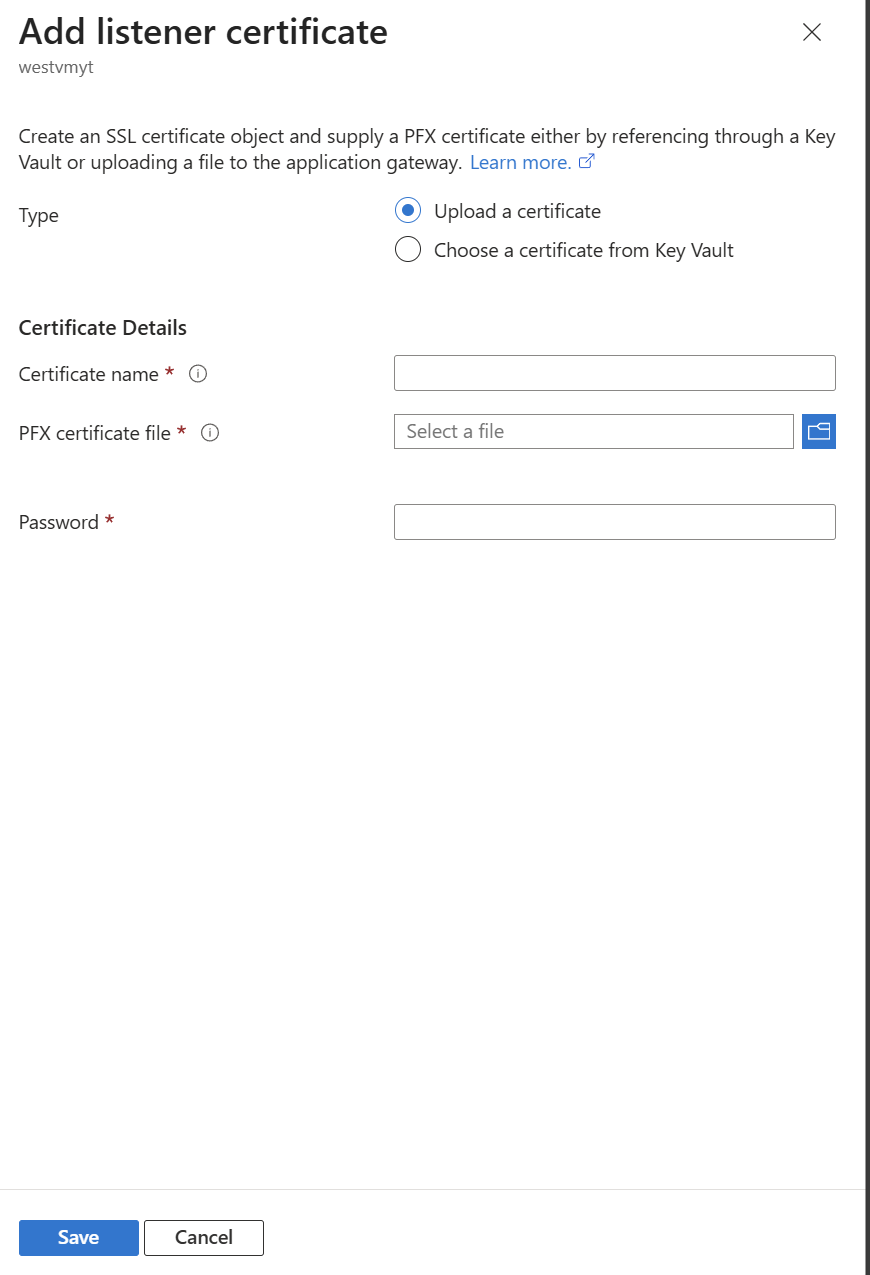
Select on tab Listener TLS Certificates on the second tab.
Select + Add Certificate.
Fill out the Certificate name, PFX Certificate File, Type , and other Password to fit your requirements.
Select Add to save your new listener TLS Certificate with the SSL profile associated to it.
Continue configuring the remainder of the listener according to your requirements.
Limitations
SSL-Policies
There are current limitations with Azure Application Gateway regarding SSL policies:
- Different listeners using the same port can't have SSL policies (predefined or custom) with different TLS protocol versions.
- Configuring the same TLS version for different listeners works for setting cipher suite preferences for each listener.
- To use different TLS protocol versions for separate listeners, you must use distinct ports for each listener. There is a limitation right now on Application Gateway that different listeners using the same port cannot have SSL policies (predefined or custom) with different TLS protocol versions. Choosing the same TLS version for different listeners work for configuring cipher suite preference for each listener. However, to use different TLS protocol versions for separate listeners, you need to use distinct ports for each.