Note
Access to this page requires authorization. You can try signing in or changing directories.
Access to this page requires authorization. You can try changing directories.
In this tutorial, you'll learn how to expose a Spring Boot web app's functionality through Model Context Protocol (MCP), add it as a tool to GitHub Copilot, and interact with your app using natural language in Copilot Chat agent mode.
If your web application already has useful features, like shopping, hotel booking, or data management, it's easy to make those capabilities available for:
- Any application that supports MCP integration, such as GitHub Copilot Chat agent mode in Visual Studio Code or in GitHub Codespaces.
- A custom agent that accesses remote tools by using an MCP client.
By adding an MCP server to your web app, you enable an agent to understand and use your app's capabilities when it responds to user prompts. This means anything your app can do, the agent can do too.
- Add an MCP server to your web app.
- Test the MCP server locally in GitHub Copilot Chat agent mode.
- Deploy the MCP server to Azure App Service and connect to it in GitHub Copilot Chat.
Prerequisites
This tutorial assumes you're working with the sample used in Tutorial: Build a Java Spring Boot web app with Azure App Service on Linux and Azure Cosmos DB.
At a minimum, open the sample application in GitHub Codespaces and deploy the app by running azd up.
Add MCP server to your web app
In the codespace, open pom.xml and add the
spring-ai-starter-mcp-server-webmvcpackage to your project:<dependency> <groupId>org.springframework.ai</groupId> <artifactId>spring-ai-starter-mcp-server-webmvc</artifactId> <version>1.0.0</version> </dependency>Open src/main/java/com/microsoft/azure/appservice/examples/springbootmongodb/TodoApplication.java. For simplicity of the scenario, you'll add all of your MCP server code here.
At the end of TodoApplication.java, add the following class.
@Service
class TodoListToolService {
    private final TodoItemRepository todoItemRepository;

    public TodoListToolService(TodoItemRepository todoItemRepository) {
        this.todoItemRepository = todoItemRepository;
    }

    @Tool(description = "Get a todo item by its id")
    public Optional<TodoItem> getTodoItem(String id) {
        return todoItemRepository.findById(id);
    }

    @Tool(description = "Get all todo items")
    public List<TodoItem> getAllTodoItems() {
        return todoItemRepository.findAll();
    }

    @Tool(description = "Add a new todo item")
    public String addNewTodoItem(String description, String owner) {
        TodoItem item = new TodoItem(UUID.randomUUID().toString(), description, owner);
        todoItemRepository.save(item);
        return "Todo item created";
    }

    @Tool(description = "Update an existing todo item")
    public String updateTodoItem(String id, String description, String owner, boolean finished) {
        if (!todoItemRepository.existsById(id)) {
            return "Todo item not found";
        }
        TodoItem item = new TodoItem(id, description, owner);
        item.setFinish(finished);
        todoItemRepository.save(item);
        return "Todo item updated";
    }

    @Tool(description = "Delete a todo item by its id")
    public String deleteTodoItem(String id) {
        if (!todoItemRepository.existsById(id)) {
            return "Todo item not found";
        }
        todoItemRepository.deleteById(id);
        return "Todo item deleted";
    }
}
The code above makes tools available for Spring AI by using the following specific attributes:
@Service: MarksTodoListToolServiceas a Spring-managed service.@Tool: Marks a method as a callable tool in Spring AI.description: These provide human-readable descriptions for each tool. It helps the calling agent to understand how to use the tool.
This code is duplicating the functionality of the existing src/main/java/com/microsoft/azure/appservice/examples/springbootmongodb/controller/TodoListController.java, which is unnecessary, but you'll keep it for simplicity. A best practice would be to move the app logic to a service class, then call the service methods both from
TodoListControllerand fromTodoListToolService.In TodoApplication.java, add the following method to the
TodoApplicationclass.@Bean public ToolCallbackProvider todoTools(TodoListToolService todoListToolService) { return MethodToolCallbackProvider.builder().toolObjects(todoListToolService).build(); }This method provides the tools in
TodoListToolServiceas callbacks for Spring AI. By default, the MCP Server autoconfiguration in thespring-ai-starter-mcp-server-webmvcpackage automatically wires up these tool callbacks. Also, by default, the MCP Server endpoint is<base-url>/sse.At the top of TodoApplication.java, add the following imports.
import java.util.List;
import java.util.Optional;
import java.util.UUID;

import org.springframework.ai.tool.ToolCallbackProvider;
import org.springframework.ai.tool.annotation.Tool;
import org.springframework.ai.tool.method.MethodToolCallbackProvider;
import org.springframework.context.annotation.Bean;
import org.springframework.stereotype.Service;

import com.microsoft.azure.appservice.examples.springbootmongodb.dao.TodoItemRepository;
import com.microsoft.azure.appservice.examples.springbootmongodb.model.TodoItem;
Test the MCP server locally
In the codespace terminal, run the application with
mvn spring-boot:run.Select Open in Browser, then add a task.
Leave Spring Boot running. Your MCP server endpoint is running at
http://localhost:8080/ssenow.Back in the codespace, open Copilot Chat, then select Agent mode in the prompt box.
Select the Tools button, then select Add More Tools... in the dropdown.

Select Add MCP Server.
Select HTTP (HTTP or Server-Sent Events).
In Enter Server URL, type http://localhost:8080/sse.
In Enter Server ID, type todos-mcp or any name you like.
Select Workspace Settings.
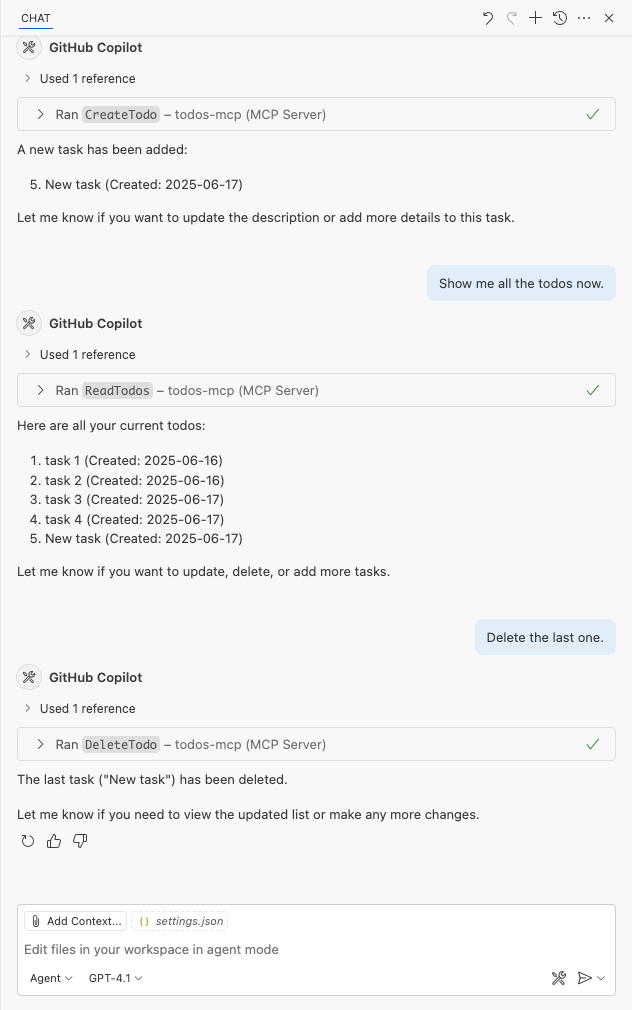
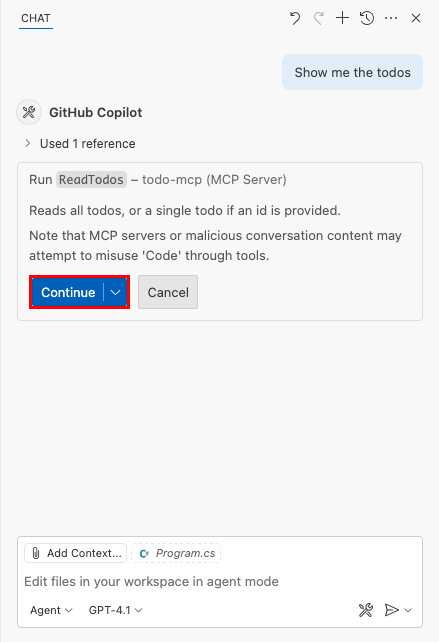
In a new Copilot Chat window, type something like "Show me the todos."
By default, GitHub Copilot shows you a security confirmation when you invoke an MCP server. Select Continue.
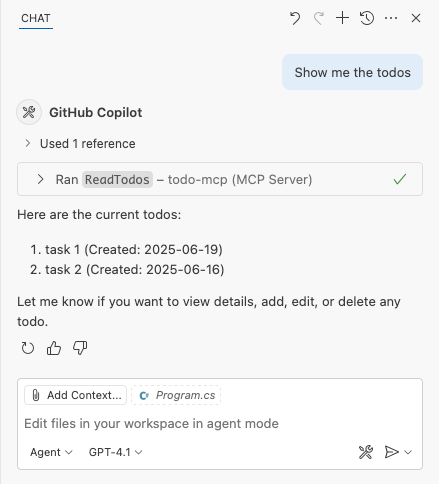
You should now see a response that indicates that the MCP tool call is successful.
Deploy your MCP server to App Service
Back in the codespace terminal, deploy your changes by committing your changes (GitHub Actions method) or run
azd up(Azure Developer CLI method).In the AZD output, find the URL of your app. The URL looks like this in the AZD output:
 Deploying services (azd deploy)

   (✓) Done: Deploying service web
   - Endpoint: <app-url>
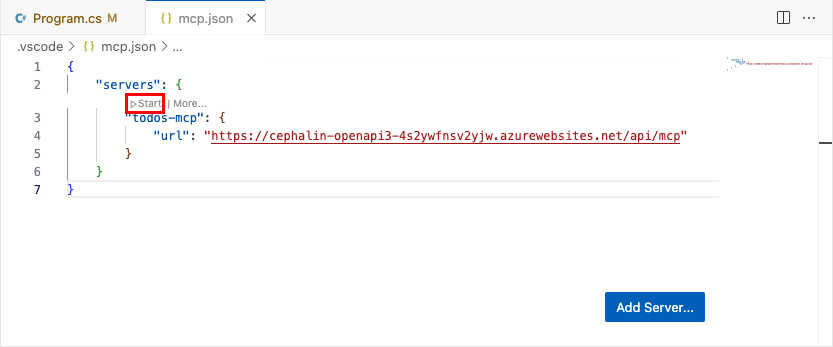
Once
azd upfinishes, open .vscode/mcp.json. Change the URL to<app-url>/sse.Above your modified MCP server configuration, select Start.
Start a new GitHub Copilot Chat window. You should be able to view, create, update, and delete tasks in the Copilot agent.
Security best practices
When your MCP server is called by an agent powered by large language models (LLM), be aware of prompt injection attacks. Consider the following security best practices:
- Authentication and Authorization: Protect your MCP endpoints in App Service behind Azure API Management with Microsoft Entra ID and ensure only authorized users or agents can access the tools.
- Input Validation and Sanitization: The example code in this tutorial omits input validation and sanitization for simplicity and clarity. In production scenarios, always implement proper validation and sanitization to protect your application. For Spring, see Spring: Validating Form Input.
- HTTPS: The sample relies on Azure App Service, which enforces HTTPS by default and provides free TLS/SSL certificates to encrypt data in transit.
- Least Privilege Principle: Expose only the necessary tools and data required for your use case. Avoid exposing sensitive operations unless necessary.
- Rate Limiting and Throttling: Use API Management or custom middleware to prevent abuse and denial-of-service attacks.
- Logging and Monitoring: Log access and usage of MCP endpoints for auditing and anomaly detection. Monitor for suspicious activity.
- CORS Configuration: Restrict cross-origin requests to trusted domains if your MCP server is accessed from browsers. For more information, see Enable CORS.
- Regular Updates: Keep your dependencies up to date to mitigate known vulnerabilities.