Note
Access to this page requires authorization. You can try signing in or changing directories.
Access to this page requires authorization. You can try changing directories.
This tutorial demonstrates how to add agentic capability to an existing data-driven Spring Boot WebFlux CRUD application. It does this using Microsoft Semantic Kernel.
If your web application already has useful features, like shopping, hotel booking, or data management, it's relatively straightforward to add agent functionality to your web application by wrapping those functionalities in a plugin (for Semantic Kernel). In this tutorial, you start with a simple to-do list app. By the end, you'll be able to create, update, and manage tasks with an agent in an App Service app.

Note
Azure AI Foundry Agent Service currently doesn't have a Java SDK, so isn't included in the scope of this article.
In this tutorial, you learn how to:
- Convert existing app functionality into a plugin for Semantic Kernel.
- Add the plugin to a Semantic Kernel agent and use it in a web app.
- Assign the required permissions for managed identity connectivity.
Prerequisites
- An Azure account with an active subscription - Create an account for free.
- GitHub account to use GitHub Codespaces - Learn more about GitHub Codespaces.
Open the sample with Codespaces
The easiest way to get started is by using GitHub Codespaces, which provides a complete development environment with all required tools preinstalled.
![]()
Navigate to the GitHub repository at https://github.com/Azure-Samples/app-service-agentic-semantic-kernel-java.
Select the Code button, select the Codespaces tab, and select Create codespace on main.
Wait a few moments for your Codespace to initialize. When ready, you'll see a fully configured development environment in your browser.
Run the application locally:
mvn spring-boot:runWhen you see Your application running on port 8080 is available, select Open in Browser and add a few tasks.
Review the agent code
The Semantic Kernel agent is initialized in src/main/java/com/example/crudtaskswithagent/controller/AgentController.java, when the user enters the first prompt in a new browser session.
You can find the initialization code in the SemanticKernelAgentService constructor (in src/main/java/com/example/crudtaskswithagent/service/SemanticKernelAgentService.java). The initialization code does the following:
- Creates a kernel with chat completion.
- Adds a kernel plugin that encapsulates the functionality of the CRUD application (in src/main/java/com/example/crudtaskswithagent/plugin/TaskCrudPlugin.java). The interesting parts of the plugin are the
DefineKernelFunctionannotations on the method declarations and thedescriptionandreturnTypeparameters that help the kernel call the plugin intelligently. - Creates a chat completion agent, and configures it to let the AI model automatically invoke functions (
FunctionChoiceBehavior.auto(true)). - Creates an agent thread that automatically manages the chat history.
public SemanticKernelAgentService(
        @Value("${azure.openai.endpoint:}") String endpoint,
        @Value("${azure.openai.deployment:}") String deployment,
        TaskCrudPlugin taskCrudPlugin) {

    ChatCompletionAgent configuredAgent = null;

    if (endpoint != null && !endpoint.trim().isEmpty() &&
        deployment != null && !deployment.trim().isEmpty()) {
        try {
            // Create OpenAI client
            OpenAIAsyncClient openAIClient = new OpenAIClientBuilder()
                    .endpoint(endpoint)
                    .credential(new DefaultAzureCredentialBuilder().build())
                    .buildAsyncClient();

            // Create chat completion service
            OpenAIChatCompletion chatCompletion = OpenAIChatCompletion.builder()
                    .withOpenAIAsyncClient(openAIClient)
                    .withModelId(deployment)
                    .build();

            // Create kernel plugin from the task plugin
            KernelPlugin kernelPlugin = KernelPluginFactory.createFromObject(taskCrudPlugin, "TaskPlugin");

            // Create kernel with TaskCrudPlugin and chat completion service
            Kernel kernel = Kernel.builder()
                    .withAIService(OpenAIChatCompletion.class, chatCompletion)
                    .withPlugin(kernelPlugin)
                    .build();

            // Use automatic function calling
            InvocationContext invocationContext = InvocationContext.builder()
                .withFunctionChoiceBehavior(FunctionChoiceBehavior.auto(true))
                .build();

            // Create ChatCompletionAgent
            configuredAgent = ChatCompletionAgent.builder()
                    .withKernel(kernel)
                    .withName("TaskAgent")
                    .withInvocationContext(invocationContext)
                    .withInstructions(
                        "You are an agent that manages tasks using CRUD operations. " +
                        "Use the TaskCrudPlugin functions to create, read, update, and delete tasks. " +
                        "Always call the appropriate plugin function for any task management request. " +
                        "Don't try to handle any requests that are not related to task management."
                    )
                    .build();

        } catch (Exception e) {
            logger.error("Error initializing SemanticKernelAgentService: {}", e.getMessage(), e);
        }
    }
Each time the prompt is received, the server code uses ChatCompletionAgent.invokeAsync() to invoke the agent with the user prompt and the agent thread. The agent thread keeps track of the chat history.
// Create chat message content for the user message
ChatMessageContent<?> userMessageContent = new ChatMessageContent<>(
        AuthorRole.USER,
        userMessage
);

// Use the agent to process the message with automatic function calling
return agent.invokeAsync(userMessageContent, thread)
        .<String>map(responses -> {

            if (responses != null && !responses.isEmpty()) {
                // Process all responses and concatenate them
                StringBuilder combinedResult = new StringBuilder();

                for (int i = 0; i < responses.size(); i++) {
                    var response = responses.get(i);

                    // Update thread with the last response thread (as per Microsoft docs)
                    if (i == responses.size() - 1) {
                        var responseThread = response.getThread();
                        if (responseThread instanceof ChatHistoryAgentThread) {
                            this.thread = (ChatHistoryAgentThread) responseThread;
                        }
                    }

                    // Get response content
                    ChatMessageContent<?> content = response.getMessage();
                    String responseContent = content != null ? content.getContent() : "";

                    if (!responseContent.isEmpty()) {
                        if (combinedResult.length() > 0) {
                            combinedResult.append("\n\n"); // Separate multiple responses
                        }
                        combinedResult.append(responseContent);
                    }
                }

                String result = combinedResult.toString();
                if (result.isEmpty()) {
                    result = "No content returned from agent.";
                }
                return result;
            } else {
                return "I'm sorry, I couldn't process your request. Please try again.";
            }
        })
        .onErrorResume(throwable -> {
            logger.error("Error in processMessage: {}", throwable.getMessage(), throwable);
            return Mono.just("Error processing message: " + throwable.getMessage());
        });
Deploy the sample application
The sample repository contains an Azure Developer CLI (AZD) template, which creates an App Service app with managed identity and deploys your sample application.
In the terminal, log into Azure using Azure Developer CLI:
azd auth loginFollow the instructions to complete the authentication process.
Deploy the Azure App Service app with the AZD template:
azd upWhen prompted, give the following answers:
Question Answer Enter a new environment name: Type a unique name. Select an Azure Subscription to use: Select the subscription. Pick a resource group to use: Select Create a new resource group. Select a location to create the resource group in: Select any region. The resources will actually be created in East US 2. Enter a name for the new resource group: Type Enter. In the AZD output, find the URL of your app and navigate to it in the browser. The URL looks like this in the AZD output:
 Deploying services (azd deploy)

   (✓) Done: Deploying service web
   - Endpoint: <URL>
After successful deployment, you'll see a URL for your deployed application.
You now have an App Service app with a system-assigned managed identity.
Create and configure the Azure AI Foundry resource
In the Azure AI Foundry portal, deploy a model of your choice (see Quickstart: Get started with Azure AI Foundry). A project and a model deployment are created for you in the process.
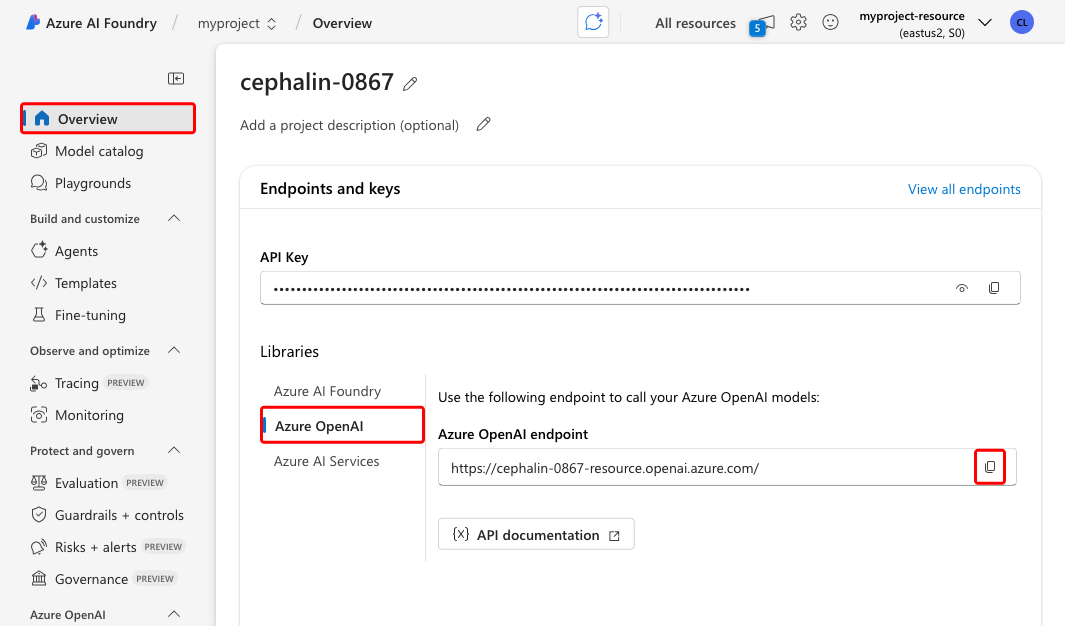
From the left menu, select Overview.
Select Azure OpenAI and copy the URL in Azure OpenAI endpoint for later.
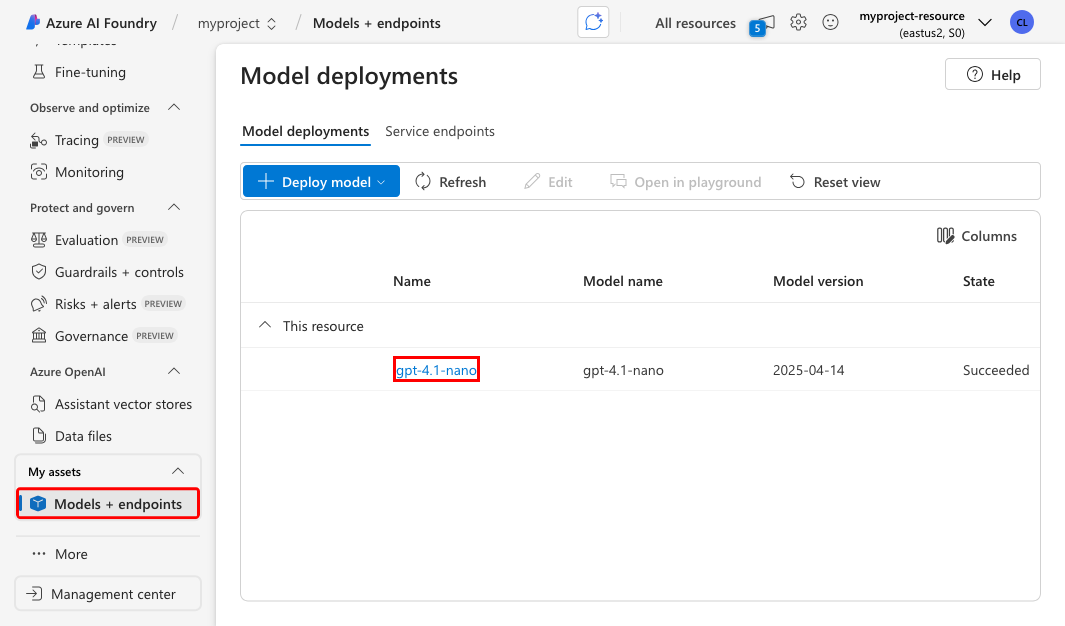
Select Models + endpoints and copy the name of the model deployment for later.
Assign required permissions
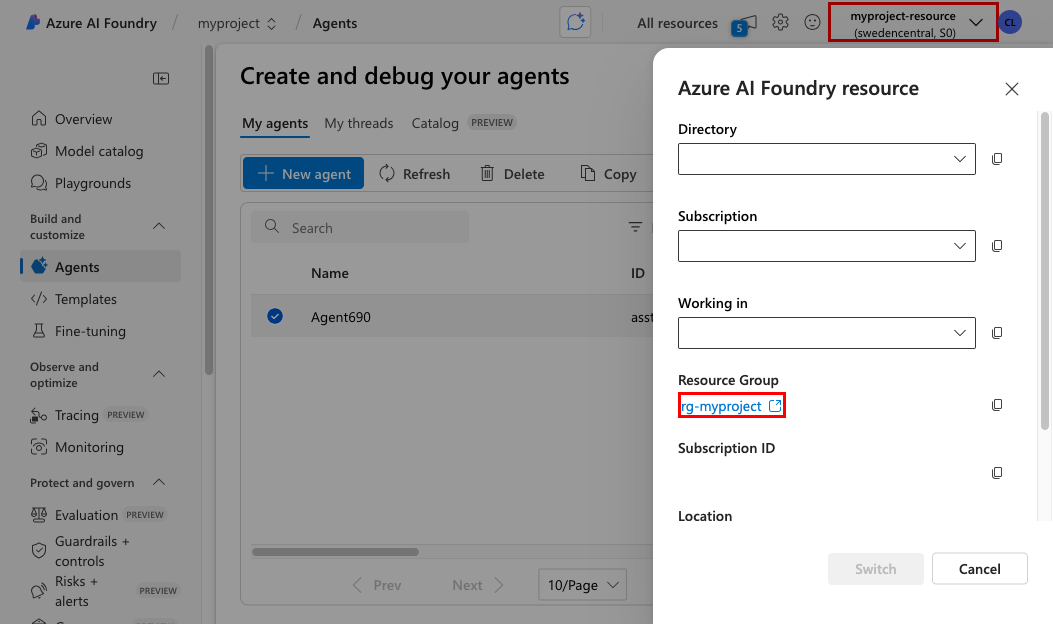
At the upper right corner of the foundry portal, select the name of the resource, then select Resource Group to open it in the Azure portal.
Add a role for each of the two resources for the App Service app's manage identity using the following table:
Target resource Required role Needed for Azure AI Foundry Cognitive Services OpenAI User The chat completion service in the semantic kernel. For instructions, see Assign Azure roles using the Azure portal.
Configure connection variables in your sample application
Open src/main/resources/application.properties. Using the values you copied earlier from the AI Foundry portal, configure the following variables:
Variable Description azure.openai.endpointAzure OpenAI endpoint (copied from the Overview page). This is needed by the Semantic Kernel agent. azure.openai.deploymentModel name in the deployment (copied from the Models + endpoints page). This is needed by the Semantic Kernel agent. Note
To keep the tutorial simple, you'll use these variables in src/main/resources/application.properties instead of overwriting them with app settings in App Service.
Sign in to Azure with the Azure CLI:
az loginThis allows the Azure Identity client library in the sample code to receive an authentication token for the logged in user. Remember that you added the required role for this user earlier.
Run the application locally:
mvn spring-boot:runWhen you see Your application running on port 8080 is available, select Open in Browser.
Try out the chat interface. If you get a response, your application is connecting successfully to the Azure AI Foundry resource.
Back in the GitHub codespace, deploy your app changes.
azd upNavigate to the deployed application again and test the chat agents.
Clean up resources
When you're done with the application, you can delete the App Service resources to avoid incurring further costs:
azd down --purge
Since the AZD template doesn't include the Azure AI Foundry resources, you need to delete them manually if you want.