Note
Access to this page requires authorization. You can try signing in or changing directories.
Access to this page requires authorization. You can try changing directories.
This article provides practical steps for enabling and configuring sidecars in your App Service app.
Create a sidecar in the Azure portal
- Go to your App Service resource in the Azure portal.
- Select Deployment Center and go to the Containers tab.
- Click Add container to add a sidecar.
- Fill in the image name, registry authentication (if needed), and environment variables.
- Save your changes. The sidecar will be deployed alongside your main app container.
Enable sidecar support for Linux custom containers
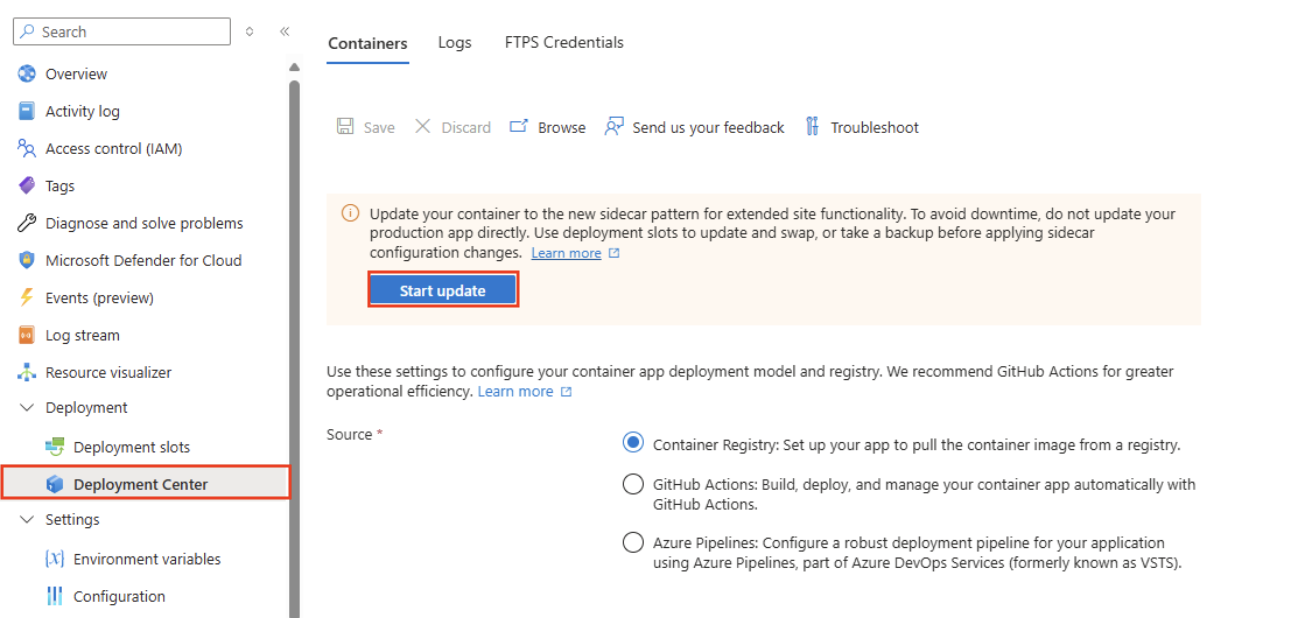
For a custom container, you need to explicitly enable sidecar support. In the portal, you can make the selection in the App Service create wizard. You can also enable it for an existing app in the Deployment Center > Containers page of an existing application, as shown in the following screenshot:
With the Azure CLI, convert your web app to use the sitecontainers configuration. For example:
az webapp sitecontainers convert --mode sitecontainers --name <YourWebAppName> --resource-group <YourResourceGroup>
This updates the LinuxFxVersion to sitecontainers and enables support for the sidecar pattern.
Revert to classic custom container (Docker) mode
If you need to switch back from the sidecar-enabled configuration to the classic Docker-based setup, run the following command:
az webapp sitecontainers convert \
  --mode docker \
  --name <app-name> \
  --resource-group <resource-group>
This command removes all sidecar containers and resets your app to use the classic DOCKER|<image> style configuration. For full details, see the Azure CLI documentation for az webapp sitecontainers convert.
For more information, see What are the differences for sidecar-enabled custom containers?
What are the differences for sidecar-enabled custom containers?
Sidecar-enabled apps are configured differently than apps that aren't sidecar-enabled.
- Sidecar-enabled apps are designated by
LinuxFxVersion=sitecontainersand configured withsitecontainersresources. - Apps that aren't sidecar enabled configure the container name and type directly with
LinuxFxVersion=DOCKER|<image-details>.
For more information, see az webapp config set --linux-fx-version.
Apps that aren't sidecar-enabled configure the main container with app settings such as:
DOCKER_REGISTRY_SERVER_URLDOCKER_REGISTRY_SERVER_USERNAMEDOCKER_REGISTRY_SERVER_PASSWORDWEBSITES_PORT
These settings don't apply for sidecar-enabled apps.
Define a sidecar with an ARM template
Add the Microsoft.Web/sites/sitecontainers resource type to an app. To pull a sidecar image from ACR using a user-assigned managed identity, specify authType as UserAssigned and provide the userManagedIdentityClientId:
{
  "type": "Microsoft.Web/sites/sitecontainers",
  "apiVersion": "2024-04-01",
  "name": "<app-name>/<sidecar-name>",
  "properties": {
    "image": "<acr-name>.azurecr.io/<image-name>:<version>",
    "isMain": false,
    "authType": "UserAssigned",
    "userManagedIdentityClientId": "<client-id>",
    "environmentVariables": [
      { "name": "MY_ENV_VAR", "value": "my-value" }
    ]
  }
}
Important
Only the main container ("isMain": true) receives external traffic. In a Linux custom container app with sidecar support enabled, your main container has isMain set to true. All sidecar containers should have "isMain": false.
For more information, see Microsoft.Web sites/sitecontainers.
Create sidecars with Azure CLI
Create a sidecar-enabled app with az webapp create. For example:
az webapp create --name <app-name> --resource-group <group-name> --sitecontainers-app
Create a sidecar container with az webapp sitecontainers create. For example:
az webapp sitecontainers create --name <app-name> --resource-group <group-name> --container-name <container> --image <image> --target-port <port>
Create a sidecar container with a JSON file:
az webapp sitecontainers create --name <app-name> --resource-group <group-name> --sitecontainers-spec-file <file-path>
For all sidecar commands, see az webapp sitecontainers.
Set environment variables
In a Linux app, all containers (main and sidecars) share environment variables. To override a specific variable for a sidecar, add it in the sidecar's configuration.
- In ARM templates, use the
environmentVariablesarray in the sidecar's properties. - In the Portal, add environment variables in the container configuration UI.
- Environment variables can reference app settings by name; the value will be resolved at runtime.
Add the Redis sidecar extension
From the Azure portal, you can add a Redis sidecar extension to your app for caching. The Redis sidecar is for lightweight caching only, not a replacement for Azure Cache for Redis.
To use the Redis sidecar:
- In your application code, set the Redis connection string to
localhost:6379. - Configure Redis in your app’s startup code.
- Use caching patterns to store and retrieve data.
- Test by accessing your app and checking logs to confirm cache usage.
Add the Datadog sidecar extension
From the Azure portal, you can add a Datadog sidecar extension to collect logs, metrics, and traces for observability without modifying app code. When you add the extension, you specify your Datadog account information so that the sidecar extension can ship telemetry directly to Datadog.
For code-based apps:
Create a
startup.shscript to download and initialize the Datadog tracer. The following script is an example for a .NET app:#!/bin/bash # Create log directory. This should correspond to the "Datadog Trace Log Directory" extension setting mkdir -p /home/LogFiles/dotnet # Download the Datadog tracer tarball wget -O /datadog/tracer/datadog-dotnet-apm-2.49.0.tar.gz https://github.com/DataDog/dd-trace-dotnet/releases/download/v2.49.0/datadog-dotnet-apm-2.49.0.tar.gz # Navigate to the tracer directory, extract the tarball, and return to the original directory mkdir -p /datadog/tracer pushd /datadog/tracer tar -zxf datadog-dotnet-apm-2.49.0.tar.gz popd dotnet /home/site/wwwroot/<yourapp>.dllSet the startup command in App Service to run this script.
Run the application and confirm the telemetry is shipped by signing into your Datadog dashboard.
For container-based apps:
Before you add the Datadog sidecar extension, add the Datadog tracer setup in your Dockerfile, similar to the script example for code-based apps.
Add the Phi-3/Phi-4 sidecar extension
From the Azure portal, you can add a Phi-3 or Phi-4 sidecar extension to your app to provide a local inference model for AI workloads. Your app must be in a pricing tier that supports the inferencing needs. For unsupported tiers, you don't see the options for the Phi-3/Phi-4 sidecar extensions.
- The Phi-3/Phi-4 sidecar exposes a chat completion API at http://localhost:11434/v1/chat/completions.
- After the sidecar is added, initial startup may be slow due to model loading.
- To invoke the API, send POST requests to this endpoint, in the same style of the OpenAPI chat completion API.
For end-to-end walkthroughs, see:
- Tutorial: Run chatbot in App Service with a Phi-4 sidecar extension (ASP.NET Core)
- Tutorial: Run chatbot in App Service with a Phi-4 sidecar extension (Spring Boot)
- Tutorial: Run chatbot in App Service with a Phi-4 sidecar extension (FastAPI)
- Tutorial: Run chatbot in App Service with a Phi-4 sidecar extension (Express.js)
Access a sidecar from the main container or from another sidecar
Sidecar containers share the same network host as the main container. The main container and other sidecars can reach any port on a sidecar using localhost:<port>. For example, if a sidecar listens on port 4318, the main app can access it at localhost:4318.
The Port field in the Portal is metadata only and not used by App Service for routing.
Add volume mounts
By default, the default /home volume is mounted to all containers unless disabled. You can configure additional volume mounts for your sidecars.
Volume mounts enable you to share non-persistent files and directories between containers within your Web App.
- Volume sub path: Logical directory path created by App Service. Containers with the same sub path share files.
- Container mount path: Directory path inside the container mapped to the volume sub path.
Example configuration:
| Sidecar name | Volume sub path | Container mount path | Read-only |
|---|---|---|---|
| Container1 | /directory1/directory2 | /container1Vol | False |
| Container2 | /directory1/directory2 | /container2Vol | True |
| Container3 | /directory1/directory2/directory3 | /container3Vol | False |
| Container4 | /directory4 | /container1Vol | False |
- If Container1 creates
/container1Vol/myfile.txt, Container2 can read it via/container2Vol/myfile.txt. - If Container1 creates
/container1Vol/directory3/myfile.txt, Container2 can read it via/container2Vol/directory3/myfile.txt, and Container3 can read/write via/container3Vol/myfile.txt. - Container4 does not share a volume with the others.
Note
For code-based Linux apps, the built-in Linux container cannot use volume mounts.