Note
Access to this page requires authorization. You can try signing in or changing directories.
Access to this page requires authorization. You can try changing directories.
Important
Effective May 1, 2025, Azure AD B2C will no longer be available to purchase for new customers. Learn more in our FAQ.
With Microsoft Entra multifactor authentication, users can choose to receive an automated voice call at a phone number they register for verification. Malicious users could take advantage of this method by creating multiple accounts and placing phone calls without completing the MFA registration process. These numerous failed sign-ups could exhaust the allowed sign-up attempts, preventing other users from signing up for new accounts in your Azure AD B2C tenant. To help protect against these attacks, you can use Azure Monitor to monitor phone authentication failures and mitigate fraudulent sign-ups.
Important
Authenticator app (TOTP) provides stronger security than SMS/Phone multifactor authentication. To set this up please read our instructions for enabling multifactor authentication in Azure Active Directory B2C.
Prerequisites
Before you begin, create a Log Analytics workspace.
Create a phone-based MFA events workbook
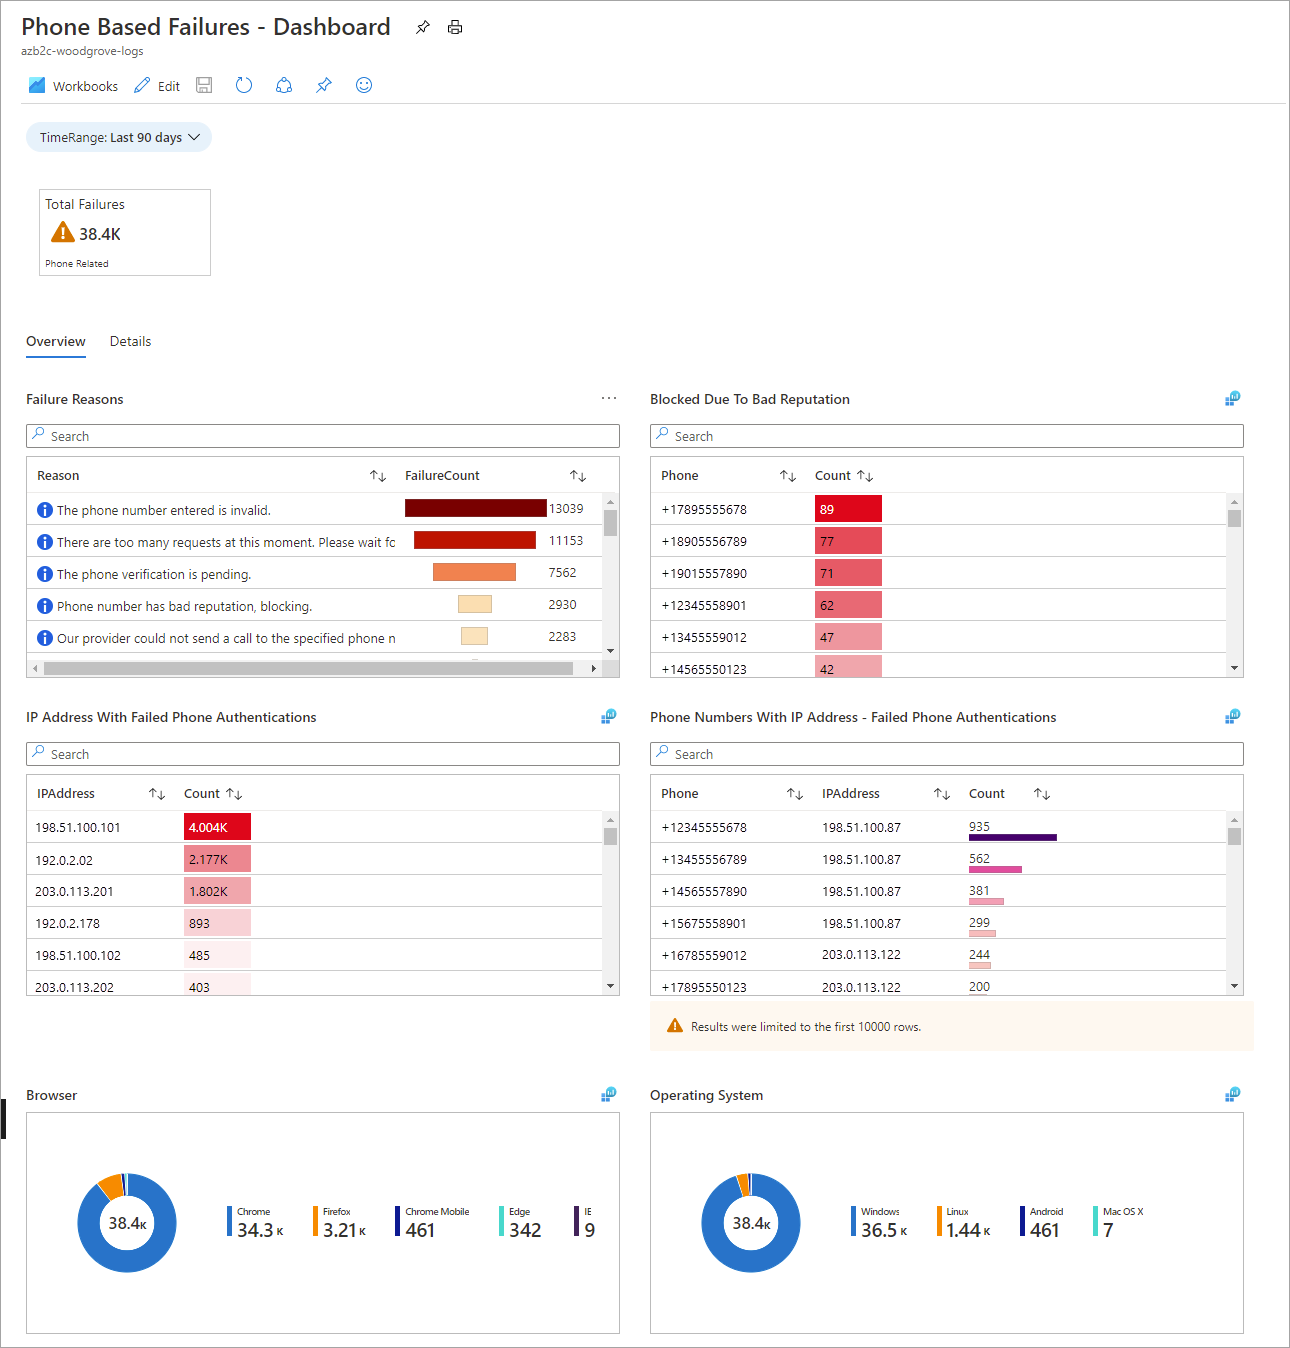
The Azure AD B2C Reports & Alerts repository in GitHub contains artifacts you can use to create and publish reports, alerts, and dashboards based on Azure AD B2C logs. The draft workbook pictured below highlights phone-related failures.
Overview tab
The following information is shown on the Overview tab:
- Failure Reasons (the total number of failed phone authentications for each given reason)
- Blocked Due to Bad Reputation
- IP Address with Failed Phone Authentications (the total count of failed phone authentications for each given IP address)
- Phone Numbers With IP address - Failed Phone Authentications
- Browser (phone authentication failures per client browser)
- Operating System (phone authentication failures per client operating system)
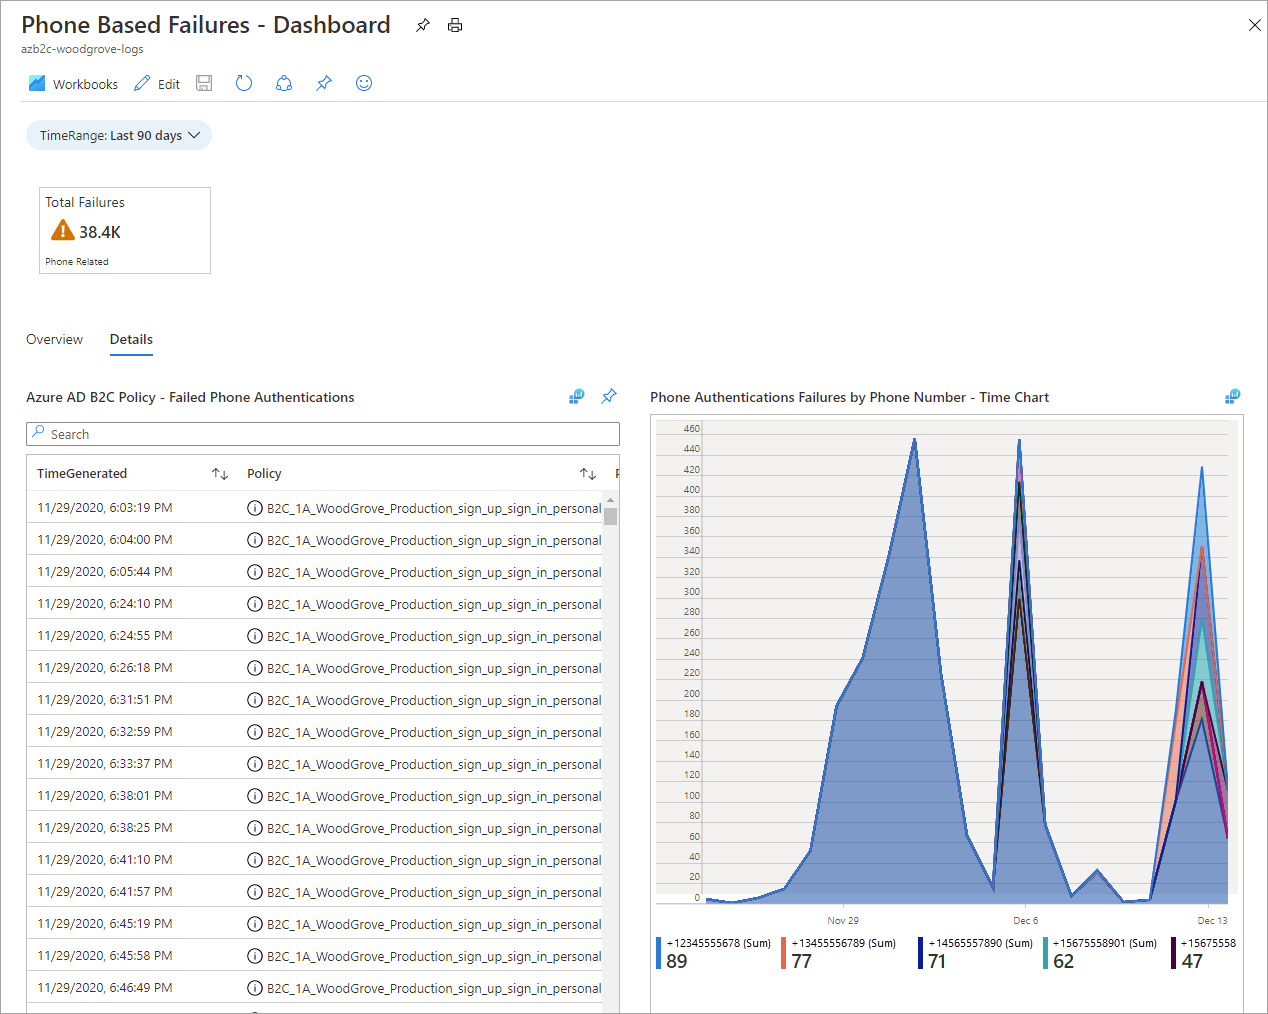
Details tab
The following information is reported on the Details tab:
- Azure AD B2C Policy - Failed Phone Authentications
- Phone Authentication Failures by Phone Number – Time Chart (adjustable timeline)
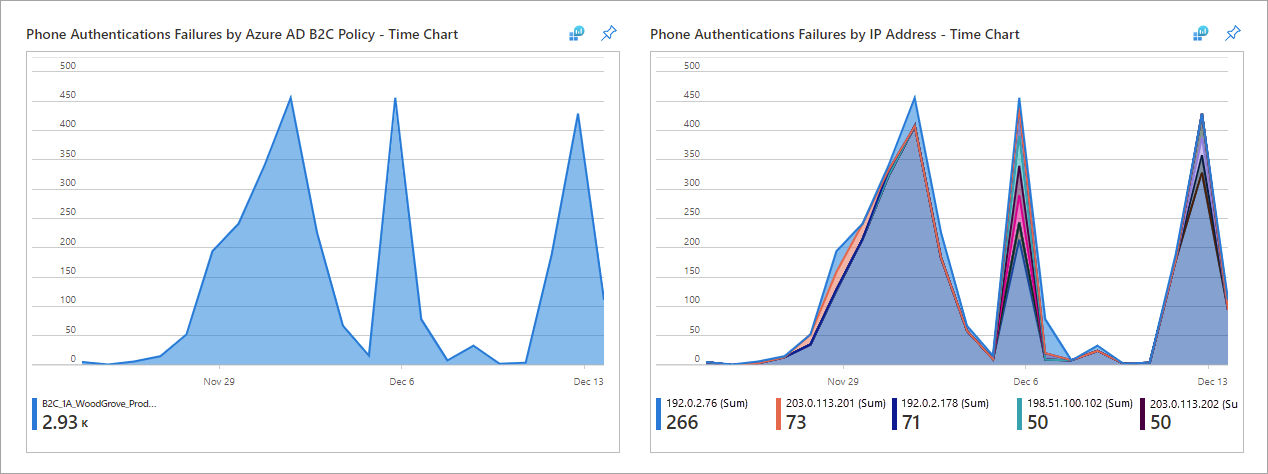
- Phone Authentication Failures by Azure AD B2C Policy – Time Chart (adjustable timeline)
- Phone Authentication Failures by IP Address – Time Chart (adjustable timeline)
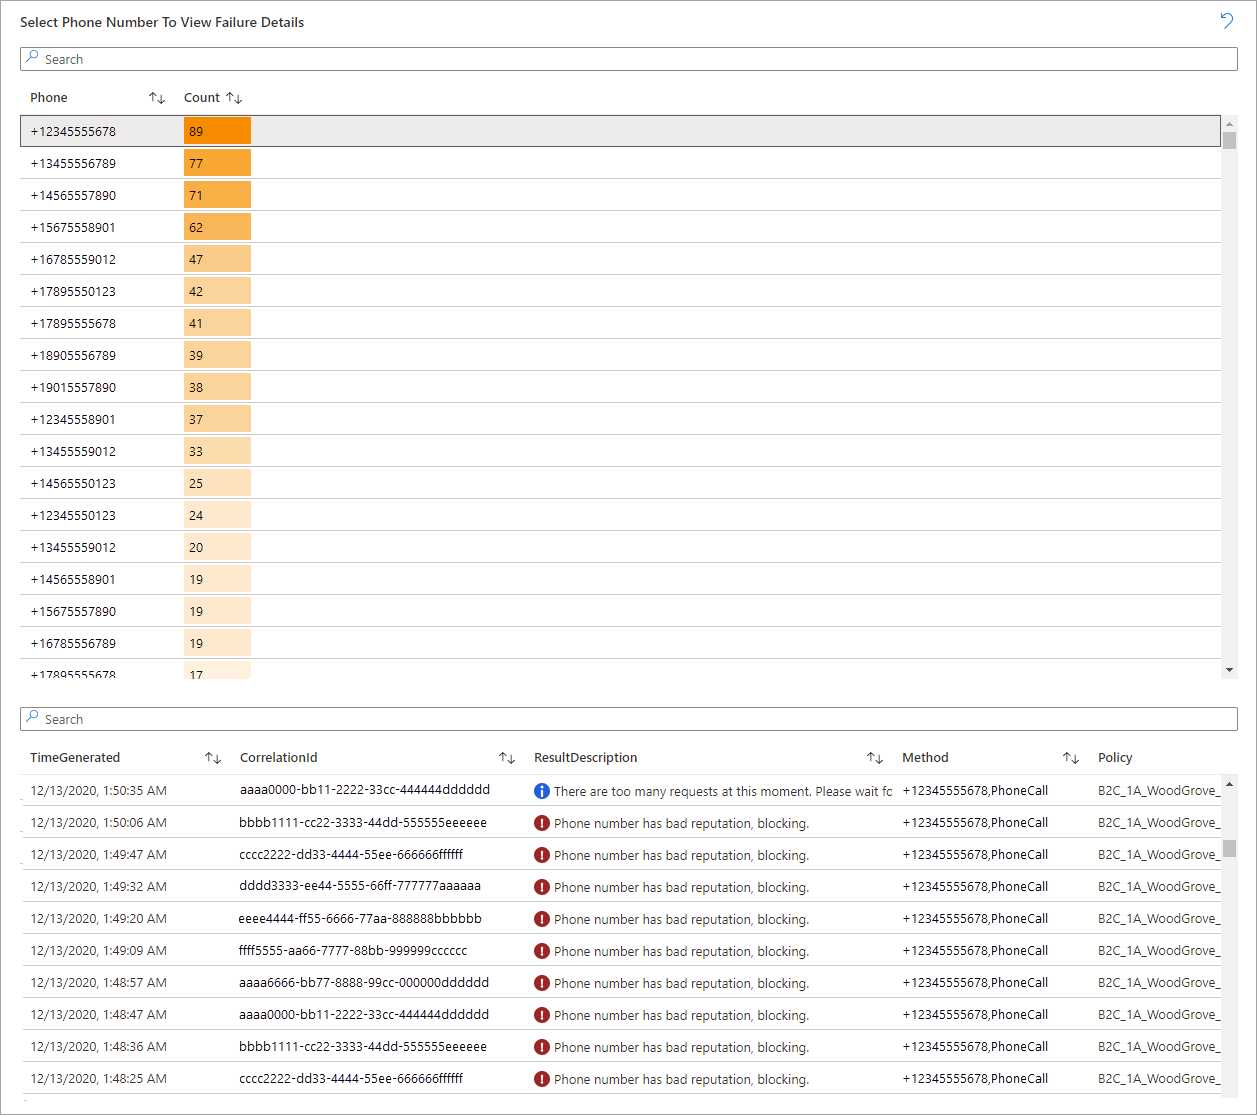
- Select Phone Number to View Failure Details (select a phone number for a detailed list of failures)
Use the workbook to identify fraudulent sign-ups
You can use the workbook to understand phone-based MFA events and identify potentially malicious use of the telephony service.
Understand what’s normal for your tenant by answering these questions:
- Where are the regions from which you expect phone-based MFA?
- Examine the reasons shown for failed phone-based MFA attempts; are they considered normal or expected?
Recognize the characteristics of fraudulent sign-up:
- Location-based: Examine Phone Authentication Failures by IP Address for any accounts that are associated with locations from which you don't expect users to sign up.
Note
The IP Address provided is an approximate region.
- Velocity-based: Look at Failed Phone Authentications Overtime (Per Day), which indicates phone numbers that are making an abnormal number of failed phone authentication attempts per day, ordered from highest (left) to lowest (right).
Mitigate fraudulent sign-ups by following the steps in the next section.
Mitigate fraudulent sign-ups for user flow
Take the following actions to help mitigate fraudulent sign-ups.
Use the Recommended versions of user flows to do the following:
- Enable the email one-time passcode feature (OTP) for MFA (applies to both sign-up and sign-in flows).
- Configure a Conditional Access policy to block sign-ins based on location (applies to sign-in flows only, not sign-up flows).
- To prevent automated attacks on your consumer-facing apps, enable CAPTCHA. Azure AD B2C’s CAPTCHA supports both audio and visual CAPTCHA challenges, and applies to both sign-up and sign-in flows for your local accounts.
Remove country codes that aren't relevant to your organization from the drop-down menu where the user verifies their phone number (this change will apply to future sign-ups):
Sign in to the Azure portal as the External ID User Flow Administrator of your Azure AD B2C tenant.
If you have access to multiple tenants, select the Settings icon in the top menu to switch to your Azure AD B2C tenant from the Directories + subscriptions menu.
Choose All services in the top-left corner of the Azure portal, search for and select Azure AD B2C.
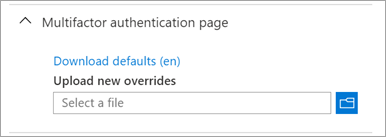
Select the user flow, and then select Languages. Select the language for your organization's primary geographic location to open the language details panel. (For this example, we'll select English en for the United States). Select Multifactor authentication page, and then select Download defaults (en).
Open the JSON file that was downloaded in the previous step. In the file, search for
DEFAULT, and replace the line with"Value": "{\"DEFAULT\":\"Country/Region\",\"US\":\"United States\"}". Be sure to setOverridestotrue.
To implement SMS blocking effectively, make sure the Overrides setting is enabled (set to true) only for your organization’s primary or default language. Do not enable Overrides for any secondary or non-primary languages, as this can cause unexpected SMS blocking. Since the countryList in the JSON file acts as an allow list, be sure to include all countries that should be permitted to send SMS in this list for the primary language configuration when Overrides is true.
Note
You can customize the list of allowed country codes in the countryList element (see the Phone factor authentication page example).
Save the JSON file. In the language details panel, under Upload new overrides, select the modified JSON file to upload it.
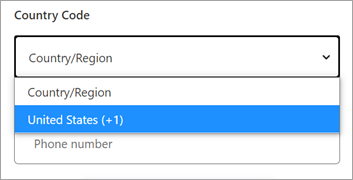
Close the panel and select Run user flow. For this example, confirm that United States is the only country code available in the dropdown:
Mitigate fraudulent sign-ups for custom policy
To help prevent fraudulent sign-ups, remove any country codes that do not apply to your organization by following these steps:
Locate the policy file that defines the
RelyingParty. For example, in the Starter Pack, this is usually the SignUpOrSignin.xml file.In the
BuildingBlockssection of this policy file, add the following code. Make sure to include only the country codes relevant to your organization:<BuildingBlocks> <ContentDefinitions> <ContentDefinition Id="api.phonefactor"> <LoadUri>~/tenant/templates/AzureBlue/multifactor-1.0.0.cshtml</LoadUri> <DataUri>urn:com:microsoft:aad:b2c:elements:contract:multifactor:1.2.20</DataUri> <Metadata> <Item Key="TemplateId">azureBlue</Item> </Metadata> <LocalizedResourcesReferences MergeBehavior="Prepend"> <!-- Add only primary business language here --> <LocalizedResourcesReference Language="en" LocalizedResourcesReferenceId="api.phonefactor.en" /> </LocalizedResourcesReferences> </ContentDefinition> </ContentDefinitions> <Localization Enabled="true"> <SupportedLanguages DefaultLanguage="en" MergeBehavior="ReplaceAll"> <!-- Add only primary business language here --> <SupportedLanguage>en</SupportedLanguage> </SupportedLanguages> <!-- Phone factor for primary business language --> <LocalizedResources Id="api.phonefactor.en"> <LocalizedStrings> <LocalizedString ElementType="UxElement" StringId="countryList">{"DEFAULT":"Country/Region","JP":"Japan","BG":"Bulgaria","US":"United States"}</LocalizedString> </LocalizedStrings> </LocalizedResources> </Localization> </BuildingBlocks>
The countryList acts as an allow list. Only the countries you specify in this list (for example, Japan, Bulgaria, and the United States) are permitted to use MFA. All other countries are blocked.