Note
Access to this page requires authorization. You can try signing in or changing directories.
Access to this page requires authorization. You can try changing directories.
In this article we will discuss the configuration of some of the important List Settings for SharePoint Online Lists. Though I have taken only a handful of operations to showcase in this demo, but remember there are lot more to explore.
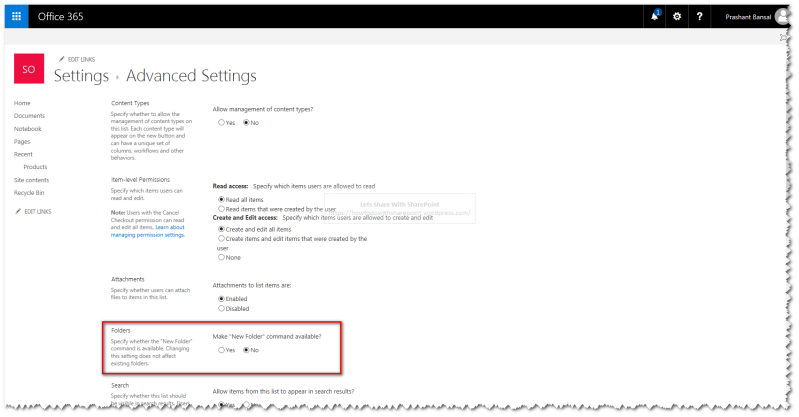
Operation: How to enable “New Folder” Menu Command
We can see this setting available under “Advanced Settings” for the list as shown below-
https://howtodowithsharepoint.files.wordpress.com/2018/02/14.png?w=800
We can play with this setting using PowerShell as described below-
https://howtodowithsharepoint.files.wordpress.com/2018/02/22.png?w=800
In Step 1 we will get the object reference to the respective list by calling “GetByTitle” method
In Step 2 we will set “EnableFolderCreation” to True
In Step 3 we will update the list property by calling “Update” method
In Step 4 we will send the batch request to SharePoint Server for processing by calling “ExecuteQuery” method
In Step 5 we will display success message to the Users if Step 4 executes successfully
In Step 6 we will call function that we have explained in Step 1-5
https://howtodowithsharepoint.files.wordpress.com/2018/02/32.png?w=800
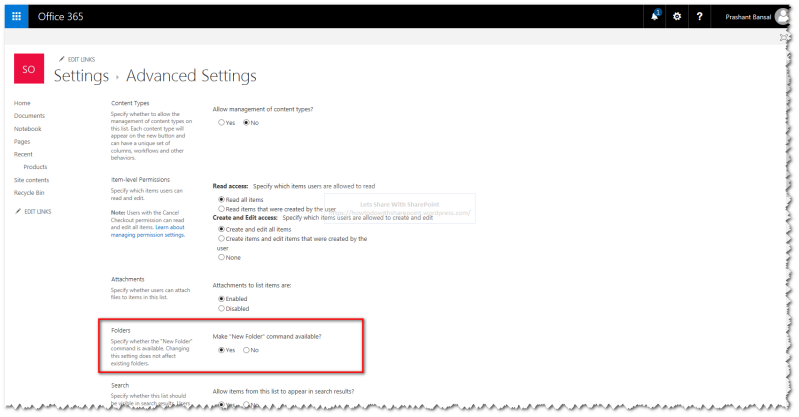
Once this script executes successfully we can see list setting updated by navigating “Advanced Settings” of the list as shown below-
https://howtodowithsharepoint.files.wordpress.com/2018/02/42.png?w=800
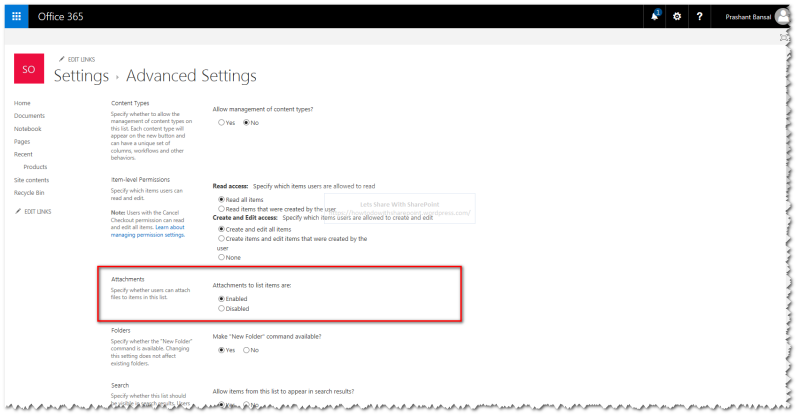
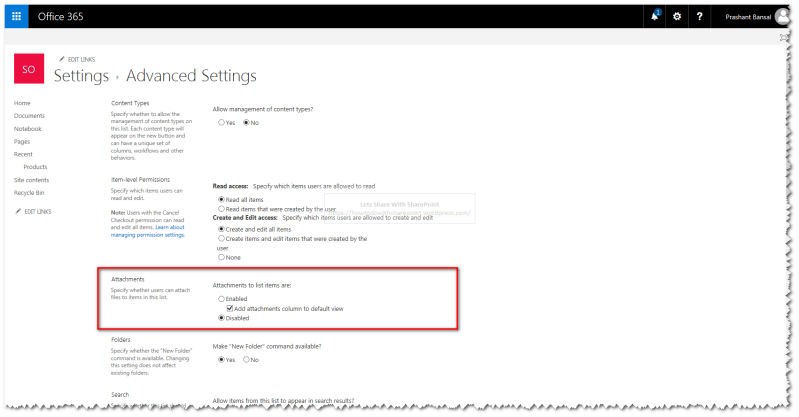
Operation: How to disable “List Item Attachments” Option
We can see this setting available under “Advanced Settings” for the list as shown below-
https://howtodowithsharepoint.files.wordpress.com/2018/02/52.png?w=800
We can play with this setting using PowerShell as described below-
https://howtodowithsharepoint.files.wordpress.com/2018/02/62.png?w=800
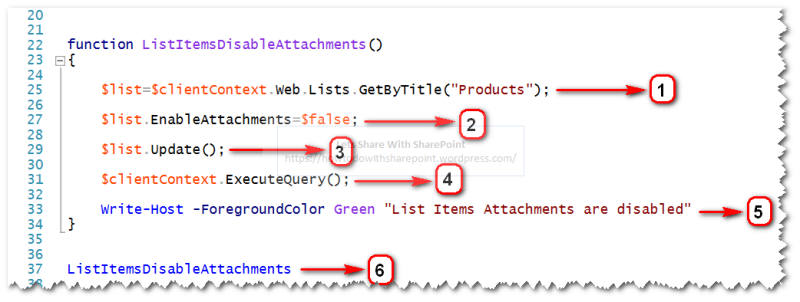
In Step 1 we will get the object reference to the respective list by calling “GetByTitle” method
In Step 2 we will set “EnableAttachments” to False
In Step 3 we will update the list property by calling “Update” method
In Step 4 we will send the batch request to SharePoint Server for processing by calling “ExecuteQuery” method
In Step 5 we will display success message to the Users if Step 4 executes successfully
In Step 6 we will call function that we have explained in Step 1-5
https://howtodowithsharepoint.files.wordpress.com/2018/02/72.png?w=800
Once this script executes successfully we can see list setting updated by navigating “Advanced Settings” of the list as shown below-
https://howtodowithsharepoint.files.wordpress.com/2018/02/82.png?w=800
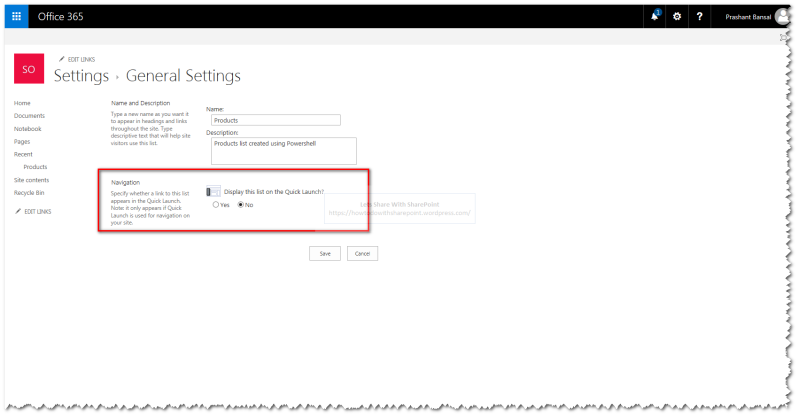
Operation: How to enable “Quick Launch” Option for List
We can see this setting available under “General Settings” for the list as shown below-
https://howtodowithsharepoint.files.wordpress.com/2018/02/92.png?w=800
We can play with this setting using PowerShell as described below-
https://howtodowithsharepoint.files.wordpress.com/2018/02/101.png?w=800
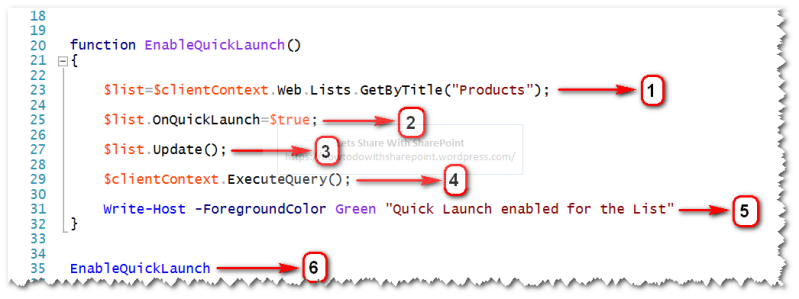
In Step 1 we will get the object reference to the respective list by calling “GetByTitle” method
In Step 2 we will set “OnQuickLaunch” to True
In Step 3 we will update the list property by calling “Update” method
In Step 4 we will send the batch request to SharePoint Server for processing by calling “ExecuteQuery” method
In Step 5 we will display success message to the Users if Step 4 executes successfully
In Step 6 we will call function that we have explained in Step 1-5
https://howtodowithsharepoint.files.wordpress.com/2018/02/112.png?w=800
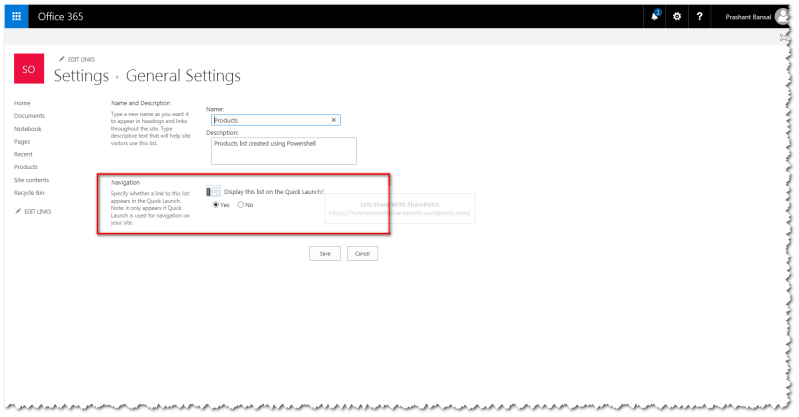
Once this script executes successfully we can see list setting updated by navigating “General Settings” of the list as shown below-
https://howtodowithsharepoint.files.wordpress.com/2018/02/121.png?w=800
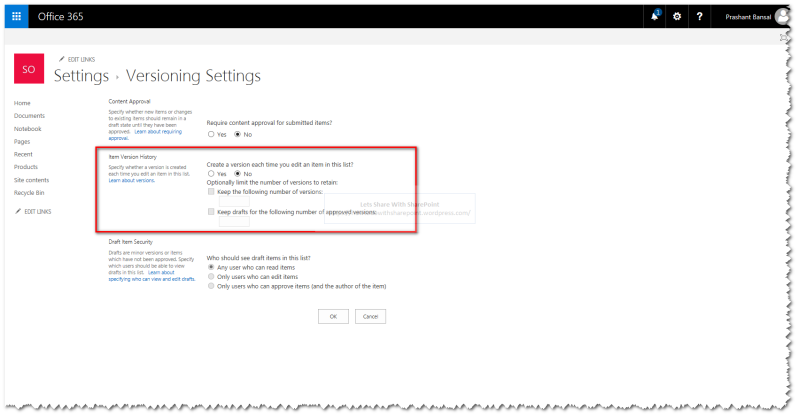
Operation: How to enable “Version History” for List Item Attachments
We can see this setting available under “Versioning Settings” for the list as shown below-
https://howtodowithsharepoint.files.wordpress.com/2018/02/131.png?w=800
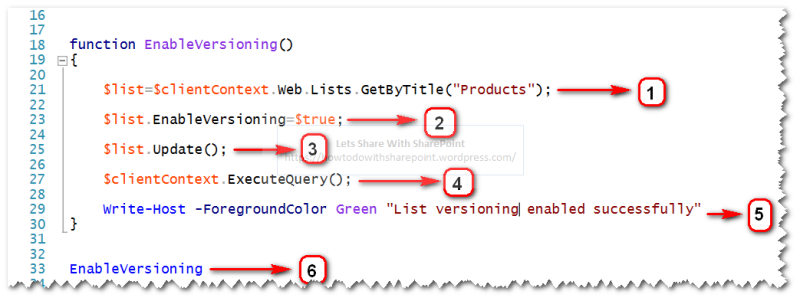
We can play with this setting using PowerShell as described below-
https://howtodowithsharepoint.files.wordpress.com/2018/02/141.png?w=800
In Step 1 we will get the object reference to the respective list by calling “GetByTitle” method
In Step 2 we will set “EnableVersioning” to True
In Step 3 we will update the list property by calling “Update” method
In Step 4 we will send the batch request to SharePoint Server for processing by calling “ExecuteQuery” method
In Step 5 we will display success message to the Users if Step 4 executes successfully
In Step 6 we will call function that we have explained in Step 1-5
https://howtodowithsharepoint.files.wordpress.com/2018/02/15.png?w=800
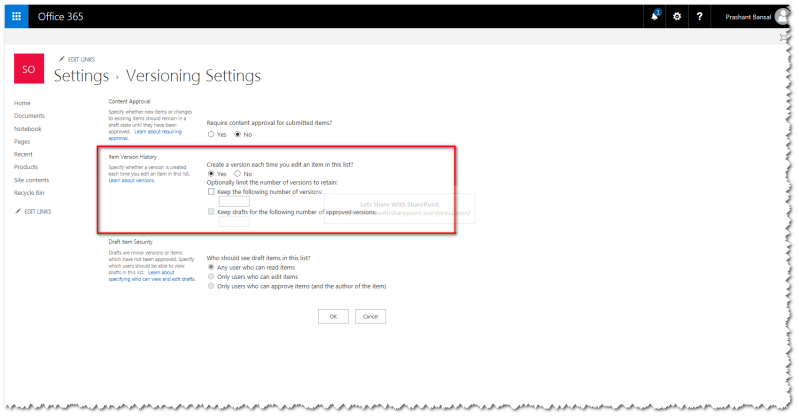
Once this script executes successfully we can see list setting updated by navigating “Versioning Settings” of the list as shown below-
https://howtodowithsharepoint.files.wordpress.com/2018/02/16.png?w=800
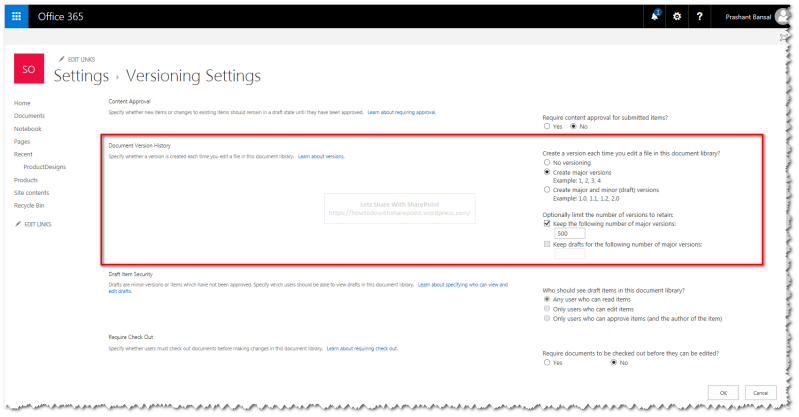
We may work on additional version settings as well as shown below-
https://howtodowithsharepoint.files.wordpress.com/2018/02/17.png?w=800
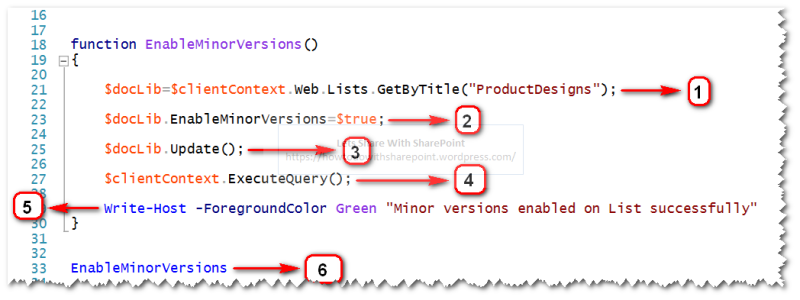
For example let try to enable Minor Versions for a document library “ProductDesigns” by using PowerShell
https://howtodowithsharepoint.files.wordpress.com/2018/02/18.png?w=800
In Step 1 we will get the object reference to the respective list by calling “GetByTitle” method
In Step 2 we will set “EnableMinorVersions” to True
In Step 3 we will update the list property by calling “Update” method
In Step 4 we will send the batch request to SharePoint Server for processing by calling “ExecuteQuery” method
In Step 5 we will display success message to the Users if Step 4 executes successfully
In Step 6 we will call function that we have explained in Step 1-5
https://howtodowithsharepoint.files.wordpress.com/2018/02/19.png?w=800
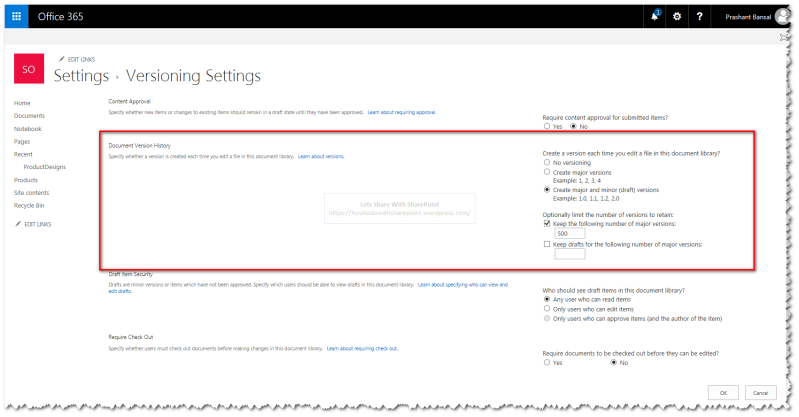
Once this script executes successfully we can see list setting updated by navigating “Versioning Settings” of the list as shown below-
https://howtodowithsharepoint.files.wordpress.com/2018/02/20.png?w=800
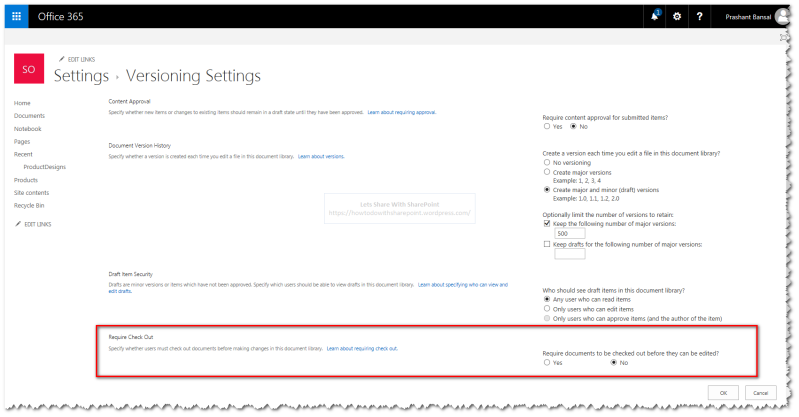
Operation: How to enable “Require Check Out” Option
We can see this setting available under “Versioning Settings” for the list as shown below-
https://howtodowithsharepoint.files.wordpress.com/2018/02/211.png?w=800
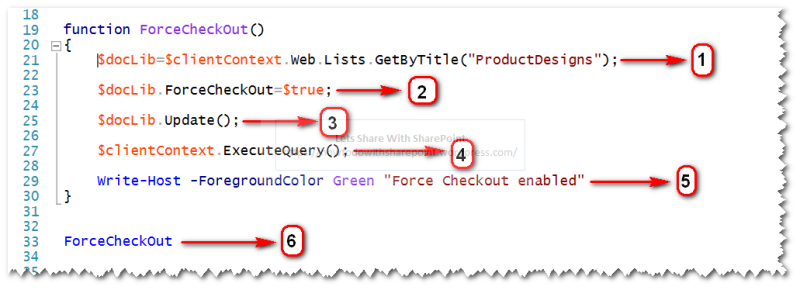
We can play with this setting using PowerShell as described below-
https://howtodowithsharepoint.files.wordpress.com/2018/02/221.png?w=800
In Step 1 we will get the object reference to the respective list by calling “GetByTitle” method
In Step 2 we will set “ForceCheckOut” to True
In Step 3 we will update the list property by calling “Update” method
In Step 4 we will send the batch request to SharePoint Server for processing by calling “ExecuteQuery” method
In Step 5 we will display success message to the Users if Step 4 executes successfully
In Step 6 we will call function that we have explained in Step 1-5
https://howtodowithsharepoint.files.wordpress.com/2018/02/23.png?w=800
Once this script executes successfully we can see list setting updated by navigating “Versioning Settings” of the list as shown below-
https://howtodowithsharepoint.files.wordpress.com/2018/02/24.png?w=800
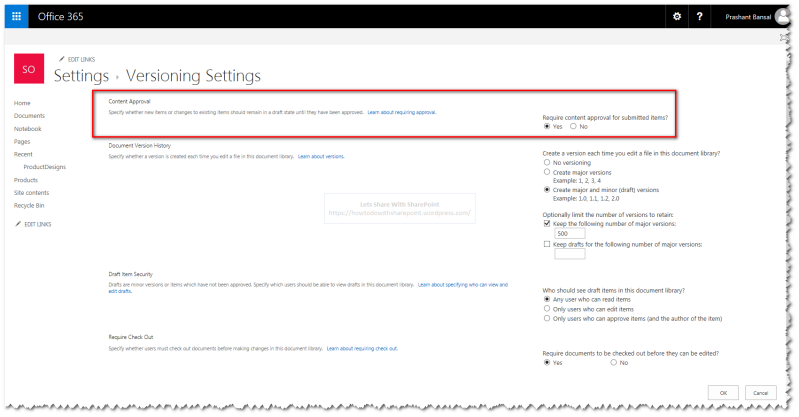
Operation: How to enable “Require Content Approval” Option
We can see this setting available under “Versioning Settings” for the list as shown below-
https://howtodowithsharepoint.files.wordpress.com/2018/02/25.png?w=800
We can play with this setting using PowerShell as described below-
https://howtodowithsharepoint.files.wordpress.com/2018/02/26.png?w=800
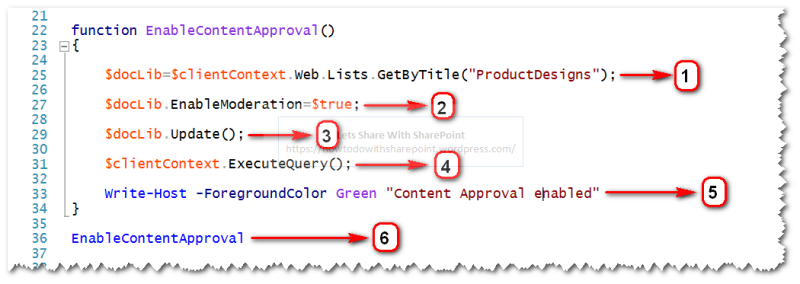
In Step 1 we will get the object reference to the respective list by calling “GetByTitle” method
In Step 2 we will set “EnableModeration” to True
In Step 3 we will update the list property by calling “Update” method
In Step 4 we will send the batch request to SharePoint Server for processing by calling “ExecuteQuery” method
In Step 5 we will display success message to the Users if Step 4 executes successfully
In Step 6 we will call function that we have explained in Step 1-5
https://howtodowithsharepoint.files.wordpress.com/2018/02/27.png?w=800
Once this script executes successfully we can see list setting updated by navigating “Versioning Settings” of the list as shown below-
https://howtodowithsharepoint.files.wordpress.com/2018/02/28.png?w=800
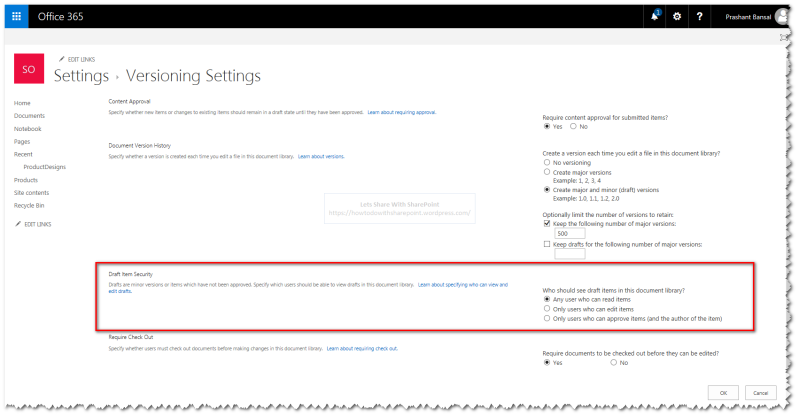
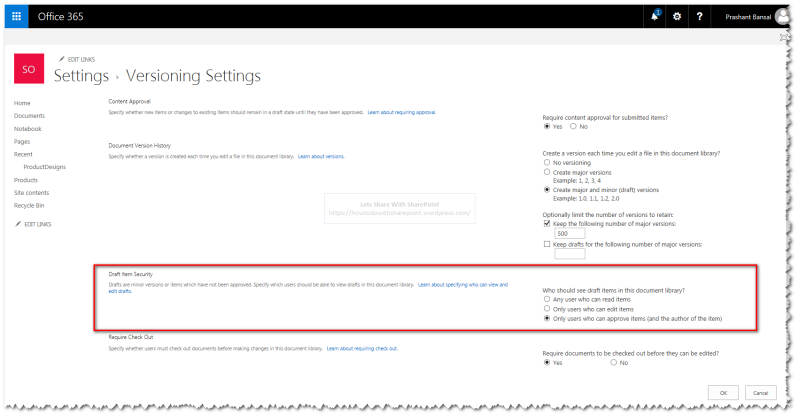
Operation: How to configure “Draft Item Security” Option
We can see this setting available under “Versioning Settings” for the list as shown below-
https://howtodowithsharepoint.files.wordpress.com/2018/02/29.png?w=800
We can play with this setting using PowerShell as described below-
https://howtodowithsharepoint.files.wordpress.com/2018/02/30.png?w=800
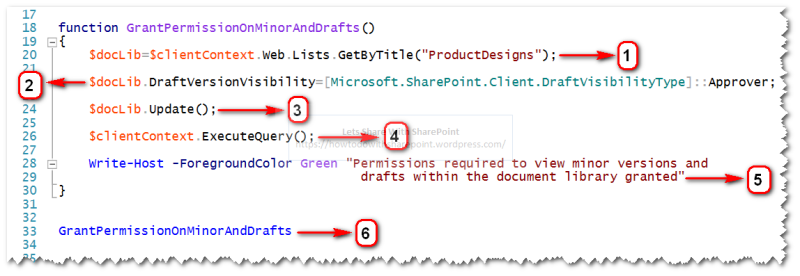
In Step 1 we will get the object reference to the respective list by calling “GetByTitle” method
In Step 2 we will set “DraftVersionVisibility” to “Approver”. This setting will limit access to the draft items for the Approvers only.
In Step 3 we will update the list property by calling “Update” method
In Step 4 we will send the batch request to SharePoint Server for processing by calling “ExecuteQuery” method
In Step 5 we will display success message to the Users if Step 4 executes successfully
In Step 6 we will call function that we have explained in Step 1-5
https://howtodowithsharepoint.files.wordpress.com/2018/02/311.png?w=800
Once this script executes successfully we can see list setting updated by navigating “Versioning Settings” of the list as shown below-
https://howtodowithsharepoint.files.wordpress.com/2018/02/321.png?w=800
That is all for this demo.