Note
Access to this page requires authorization. You can try signing in or changing directories.
Access to this page requires authorization. You can try changing directories.
This article is the second in a series intended to introduce the reader to the practicalities of the MVVM pattern.
Introduction
In the previous article ( here ) we saw how to instantiate a ViewModel from a View, Bind the text of a textbox and the Command of a Button. This article introduces binding to a collection of data and the MVVM Light framework. This framework is used to make it easier for the developer to support common functionality.
Sample
The idea of this article is to help you learn and the best way for someone to learn varies. Some prefer doing, some reading, some a mix.
This article talks you through the process of building a solution from scratch. The completed sample is available from the Technet Gallery here. You may therefore prefer to complete your own solution before referring to the sample or you may want to download the sample now and just go through that.
Let's Do it
Create your new wpf solution using Visual Studio. In case you want your namespace to match the sample then you should call your solution wpf_MVVM_Step02. If you want both in the same folder structure then make sure you call yours something else.
Once you've done that then the next thing to do is to use Nuget to add MVVM Light to the project.
MVVM Light
There are several frameworks available which make MVVM development in WPF rather easier. MVVM LIght is one of the most popular - it's well supported, offers very useful content and lives up the the "light" in that it has a small footprint requiring very little adaptation in the way you work. As such it's an excellent choice.
You can use a MVVM LIght template to create a new project or you can add it to an existing ordinary WPF project. Here we're going to choose the latter. Adding MVVM Light to an existing project is the least invasive option, maximising the content of this article which would still be useful if you choose a different framework.
Detailed instructions on how to add MVVM Light are here.
ViewModel
As mentioned in the step 1) it's an idea to add at least a stub ViewModel before working on the View so right click your project, roll over Add and select Class from the menu that pops out.
Overtype the name with MainWIndowViewModel.
Once the default empty class is presented to you in the editor you can start trying MVVMLight out.
Add a using statement, start by typing Using Gala and when you get that far Intellisense will let you pick GalaSoft. Type a full stop after that and since this is a new project you won't have anything else by GalaSoft referenced. Intellisense will offer you MvvmLight. Choose that and add a semi colon giving:
using GalaSoft.MvvmLight;
That will then allow you to inherit MainWIndowViewModel from a class called ViewModelBase.
Change the class definition to read:
public class MainWindowViewModel : ViewModelBase
If you select that ViewModelBase and peek the defition using Alt+f12 or the context menu you will see that ViewModelBase adds a fair bit.
The thing we're going to use it for here is implementing INotifyPropertychanged by using the RaisePropertyChanged() method. That uses CallerMemberName like our explicit implementation in step 1 but you don't have to paste it into each of your viewmodels.
Add a string property in by cutting and pasting the below code or use the propfull snippet to generate a property with a backing field and add in the rest.
However you prefer, make your class match:
public class  MainWindowViewModel : ViewModelBase
{
    private string  myString = "Overtype this text";
    public string  MyString
    {
        get { return myString; }
        set
        {
            myString = value;
            RaisePropertyChanged();  // implementation of INotifyPropertyChanged is from ViewModelBase
        }
    }
    public MainWindowViewModel()
    {

    }
}
The private backing variable is given a default value "Overtype this text". An empty constructor is there ready to use later. As explained RaisePropertyChanged() will be used to tell the view to re-read the property value when it is set ( changes ).
MainWindow Initial Setup
One of the nice little things that's changed in VS2015 is it will automatically add in the xmlns local reference. Your MainWindow will already have:
xmlns:local="clr-namespace:wpf_MVVM_Step02"
If you're working with an earlier version of Visual Studio then you will want to add that - matching whichever namespace you are using.
Paste or type in a Grid with some rowdefinitions, a ListBox, TextBox and Button so your markup is like:
<Window x:Class="wpf_MVVM_Step02.MainWindow"
        xmlns="http://schemas.microsoft.com/winfx/2006/xaml/presentation"
        xmlns:x="http://schemas.microsoft.com/winfx/2006/xaml"
        xmlns:d="http://schemas.microsoft.com/expression/blend/2008"
        xmlns:mc="http://schemas.openxmlformats.org/markup-compatibility/2006"
        xmlns:local="clr-namespace:wpf_MVVM_Step02"
        mc:Ignorable="d"
        Title="MainWindow" Height="350" Width="525">
    <Window.DataContext>
        <local:MainWindowViewModel/>
    </Window.DataContext>
    <Grid>
        <Grid.RowDefinitions>
            <RowDefinition Height="Auto"/>
            <RowDefinition Height="30"/>
            <RowDefinition Height="30"/>
            <RowDefinition Height="*"/>
        </Grid.RowDefinitions>
        <ListBox Name="lb"/>
        <TextBox Text="{Binding MyString}" Grid.Row="1"/>
        <Button Content="Add Text" Grid.Row="2"/>
    </Grid>
</Window>
As mentioned in step 1, your first choice for the "main" layout of a view should be a Grid. You can put controls straight into a Grid and in fact the designer allows you to drag them around and use Margin to control absolute layout. Absolute layout is not a good way to work even if it might initially seem convenient.
Instead, you should use rows and or columns. Controls are associated with a row and column in a bit of an odd way in WPF because attached properties are used to define which they go in. Since the default is zero, the first ListBox will go in the first row of the Grid ( row and column are zero based ).
Hence the markup for the listbox above is effectively the same as:
<ListBox Name="lb" Grid.Row="0"/>
Only the text of the TextBox is bound at the moment.
Run that using f5 and confirm it compiles and "works" as it is.
You will see:
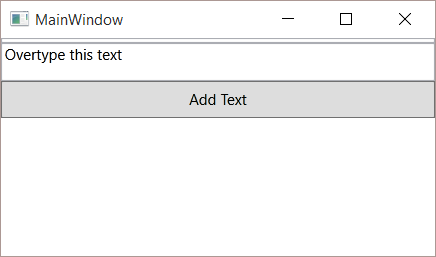
The ListBox has nothing in it and it's in a row whose height is set to Auto so that takes up no height at all.
You can see the TextBox shows the initial string via binding and the Button is filling it's Row and gets Height 30 from that.
We have no command so if you click on the button it doesn't do anything yet.
Let's add a command. In order to make a point we'll do this in the XAML before adding it in the ViewModel.
Change the button so it reads:
<Button Command="{Binding AddListCommand}"
        Content="Add Text"
        Grid.Row="2"/>
Notice here how the various properties are moved onto separate lines. This is a common approach to improve readability of XAML.
We haven't added that command to the ViewModel yet - so that Binding isn't going to work, but there are no errors. If you spin it up with an f5 you will find it runs OK. This is because Bindings fail gracefully. A fact that can be useful sometimes but can easily catch out the unwary.
If you look in the Output window you'll find a line:
System.Windows.Data Error: 40 : BindingExpression path error: 'AddListCommand' property not found on 'object' ''MainWindowViewModel' (HashCode=40327891)'. BindingExpression:Path=AddListCommand; DataItem='MainWindowViewModel' (HashCode=40327891); target element is 'Button' (Name=''); target property is 'Command' (type 'ICommand')
It's looking at MainWindowViewModel for a public property which is an ICommand called AddTextCommand and not finding it. Unlike if you connected up an event handler in markup the binding fails gracefully and the app just carries on going.
When anything involving a binding doesn't seem to be working as you're expecting that Output window is the place to look.
As an aside, you can see "spurious" errors in the Output window occasionally. If no errors are actually thrown and your code is working then that's an indicator those sort of things can be ignored.
Binding a Collection
A ListBox is an ItemsControl and to show data in one via binding you bind the ItemsSource. That means we need some sort of a collection as a public property exposed from our ViewModel.
Let's try that with a List<string>. Add the following to ListViewModel:
private List<string> stringList = new List<string> { "An initial entry", "Another string" };

public List<string> StringList
{
    get { return stringList; }
    set { stringList = value; }
}
Compile your solution and you should be able to find that using Intellisense to add to the Listbox in markup:
<ListBox Name="lb"
         Grid.Row="0"
         ItemsSource="{Binding StringList}"
         />
Spin that up with an f5 and you will see:
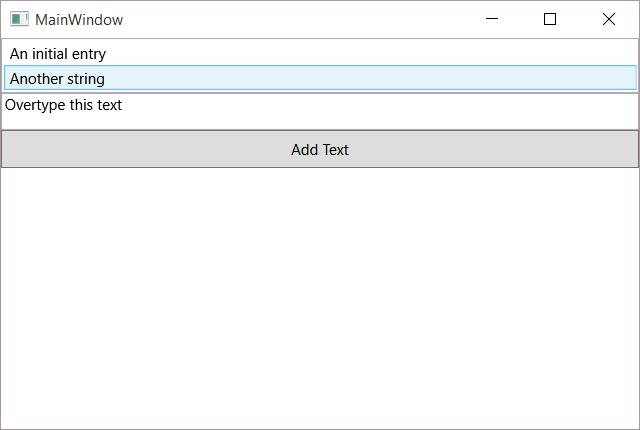
The two entries are now displayed in the ListBox. The default template has some styling and in the screen shot the cursor is over that second item and the mouseover effect is making it's background blue. You will notice the two strings are also slightly indented compared to the TextBox. Let's gloss over these aspects rather than get distracted though.
RelayCommand
Now we have the ListBox bound to a collection we have something we can add to. You may recall from step 1 that ICommand is not very developer friendly. The good news is that MVVM Light offers a RelayCommand which is far easier to work with. We'll go with a very simple implementation of one here.
Open up MainWindowViewModel and ( up towards the top ) add a using:
using GalaSoft.MvvmLight.CommandWpf;
Then add change the MainWindowViewModel:
public RelayCommand AddListCommand { get; set; }

public MainWindowViewModel()
{
    AddListCommand = new  RelayCommand(AddList);
}
private void  AddList()
{
    stringList.Add(myString));
}
Here you can see that a public RelayCommand property is defined with a default get set pair. It is then initialised in the constructor and basically pointing to that private AddList method which will Add the string the TextBox is bound to onto the end of stringList.
If you select RelayCommand there and hit Alt+f12 or f12 you can take a quick look at RelayCommand:
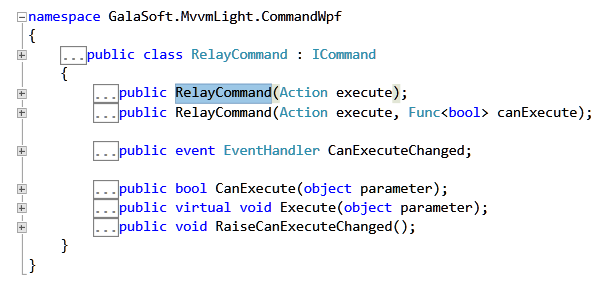
The constructor we're using is that first one with the darker background and it says it accepts an Action, you will notice this causes complications if you change the signature of AddList() to Action and just using a void is the simplest approach with this technique.
There are several other ways you can set up a RelayCommand. The approach here requires the least technical undestanding and is chosen for clarity.
Spin her up with an f5 to try it out.
When you click on the button, nothing happens.
Uh oh.
What's going on there then?
Let's explore the issue.
Put a break point into that AddList() method and you will see it fires OK when you click.
Something else is the problem.
List Change Notification
The view doesn't know that the list has changed so although we're appending to that List<t> the view is not changing.
StringList is a property so we know from step 1 that we can perhaps use some property change notification here.
We're not really setting the list to a new instance but we can still raise change notification.
Change AddList() so it reads:
private void  AddList()
{
    stringList.Add(myString);
    RaisePropertyChanged("StringList");
}
Give it a go again and you find ( oh dear ) no difference.
That's rather strange.
Maybe it's not reading that property value again?
Change that property so the return is on a separate line and add a break point:
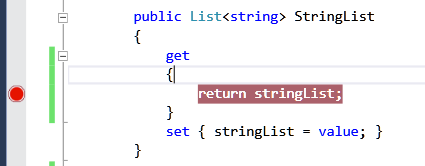
Spin it up again with an f5 and click the button.
You will find the break point is hit.
So raising property changed tells the view to re-read the property. It does. But somehow it then doesn't notice there's a new entry to present.
List Conclusion
The moral of this particular tale?
Don't use a List<t> unless your data is static.
What do you use then?
ObservableCollection
The ObservableCollection implements the INotifyCollectionChanged interface, which lives up to it's name and notifies on addition and removal from the collection.
Let's give that a go then.
Change your MainWindowViewModel again:
public ObservableCollection<string> StringCollection { get; set; }

public RelayCommand AddCollectionCommand { get; set; }

public MainWindowViewModel()
{
    StringCollection = new  ObservableCollection<string> { "Line One",  "Line Two" };
    AddCollectionCommand = new  RelayCommand(AddCollection);
}

private void  AddCollection()
{
    StringCollection.Add(myString);
}
Here you can see there's an ObservableCollection<string> which is initialised in the constructor along with a RelayCommand which uses .Add() to add the string the TextBox is bound to onto the end of the collection.
The view isn't using either that collection or the command so change it:
<ListBox Name="lb"
         Grid.Row="0"
         ItemsSource="{Binding StringCollection}"
         />
<TextBox Text="{Binding MyString}" Grid.Row="1"/>
<Button Command="{Binding AddCollectionCommand}"
        Content="Add Text"
        Grid.Row="2"/>
Spin her up with an f5.
You will find that when you click the button, a new line appears on the end of that listbox.
There are other good reasons for using ObservableCollection<t> which is why this is the collection binding source type preferred by most WPF developers.
ObservableCollection Alternatives
If you're used to Windows Forms development you might be more familiar with BindingList. This is a viable alternative in WPF. It's an idea to go with ObservableCollection anyway though.
Most WPF developers use ObservableCollection - so anyone else working on your code will be more familiar with ObservableCollection.
WPF is very different from Windows Forms and it's a good idea to have a reminder you're working on a different platform.
Summary
Like the previous step, this is aimed at beginners so it's pretty simple stuff.
You've seen how:
- ViewModelBase offers a good base class to inherit viewmodels from.
- The MVVM Light RelayCommand makes it far easier to bind an ICommand.
- List<t> is not a good way to bind a dynamic collection.
- Property change notification is not always enough for collection changes.
- ObservableCollection<t> is the usual way to bind a dynamic collection.