Note
Access to this page requires authorization. You can try signing in or changing directories.
Access to this page requires authorization. You can try changing directories.
This article is the first in a series intended to introduce the reader to the practicalities of the MVVM pattern.
Introduction
There are lots of samples claiming to be the best or easiest ( or whatever ) MVVM sample on the planet. They're usually one sample and all in one. That means they either bewilder the beginner because they have loads too much in them OR there isn't much to them and the reader is left wanting more.
The plan here is to break the subject down into a series of bite sized chunks. Each article ought to be rather more digestible whilst the series as a whole will offer depth on the subject.
Sample
The idea of this article is to help you learn and the best way for someone to learn varies. Some prefer doing, some reading, some a mix.
This article offers step by step cut and paste instructions so you can build your own solution. Since this is aimed at beginners you might of course find things go sideways for whatever reason and the the completed working sample is available from here.
Alternatively, you may prefer to download the code, look at that and refer to this article for an explanation.
Choose whichever approach best suits you.
Let's Do It
Since this is aimed at beginners, apologies in advance to more experienced developers who will find the bar is set (deliberately) quite low here.
Create a WPF Solution
Open up Visual Studio and create a new WPF solution somewhere you're going to be able to find it. By default visual studio will create solutions in the last folder you chose or in wherever is specified under Tools > Options > Projects and Solutions > General > Visual Studio projects location.
For VS2013 That will start off as C:\Users\you>\Documents\Visual Studio 2013\Projects
The name of the sample is wpf_MVVM_Step01. Depending on how you want to work you could choose the same name for yours so the namespaces match OR remember to change the namespace wherever it is referred to in the following instructions.
If you look over at Solution Explorer ( default is the right hand side of the IDE ) you should see MainWindow in your project.
Overview of a Window
In order to get a Window (View) working you'd usually want some sort of Model for the data, a ViewModel then acts as an adapter between the view and that Model. The VM fetches, manipulates and presents that data to the View via Binding. Since this is beginners stuff, we're going to gloss over the model aspect for now and data will be provided directly from the ViewModel.
That leaves a View ( Window ) and a ViewModel ( class ) we'll need.
Add A ViewModel
You need to compile the app with the ViewModel in it before you will be able to work with it properly so it's best to start with at least a stub for the ViewModel. A common convention is that the ViewModel for a View is named after the View with "ViewModel" appended.
Let's follow that convention, which means our new ViewModel for the MainWindow will be called MainWindowViewModel.
The finished View is going to show a piece of text via binding. Eventually you'll be changing that using a button but let's start with just a fixed value.
In order to Bind we need a public property, which means you also need the access of the class to be public.
You can add a property using the propfull snipppet so type "propfull" without the quotes then tab and again tab,
You should see:
public class  MainWindowViewModel
{
      private int  myVar;

      public int  MyProperty
      {
          get { return myVar; }
          set { myVar = value; }
      }
}
Change that int to string, myVar to myString and MyProperty to MyString and set myString to an initial value of some sort.
If you're already familiar enough with creating properties and feel you don't need the practice, you could just paste in:
private string  myString = "Some text from MainWindowViewModel";
public string  MyString
{
  get { return myString; }
  set
  {
  MyString = value;
  }
}
The keyboard chord for build has changed, if you have an old version of visual studio then it'll be f6. On newer versions of Visual Studio Press Ctrl+Shift+B to compile the solution and check there are no errors.
As something of an aside, you can check and change the key chord under Tools > Options > Environment > Keyboard > Build.BuildSolution
Show the Text in the View
We need to instantiate the ViewModel and present that to the View somehow. The first thing to be aware of is that Using statements are not shared from the code behind to XAML and it will not have a reference to the compiled exe by default. In order for the XAML to know anything about our MainWindowViewModel class we need to add the XAML equivalent to a using - an xmlns reference up at the top in the window tag.
In VS2015 when you create a Window, it automatically adds a reference to your project namespace so you can just check it already has a "local" reference like the below code.
In earlier versions of Visual Studio you will need to add it manually:
Find the right angle bracket ">" of the opening Window tag. Position your cursor just in front of it and hit return twice so you push it down a couple of lines.
On the line above type xmlns:local=
Then start typing the name of your namespace.
Intellisense should bring it up and you can choose the entry to complete adding it.
You should have the equivalent to:
<Window x:Class="wpf_MVVM_Step01.MainWindow"
        xmlns="http://schemas.microsoft.com/winfx/2006/xaml/presentation"
        xmlns:x="http://schemas.microsoft.com/winfx/2006/xaml"
        Title="MainWindow" Height="350" Width="525"
        xmlns:local="clr-namespace:wpf_MVVM_Step01"
        >
That tells xaml the namespace the MainWindowViewModel is in. We still need to connect up an instance of it to the View somehow.
We do that by setting the DataContext of the WIndow. This is a dependency property which inherits down the Visual Tree. This means when you set the DataContext of the Window then you're setting the DataContext of everything in that window as well.
( This is a bit of a simplification because some things generated in a window are not quite in the visual tree, but that's for a later step to cover. )
Beneath the Window tag (above), paste in:
<Window.DataContext>
    <local:MainWindowViewModel/>
</Window.DataContext>
If you forgot to compile the application ( or it failed ) earlier then you'll be looking at a blue squiggly line under that local:MainWindowViewModel so fix either/both if that happens.
Having done that we're ready to do some actual binding and show our string.
You should have a pair of Grid opening and closing tags there.
This particular lesson isn't about teaching layout so just throw to the back of your mind that you're going to be using Grid as your main layout panel in any real application. Next, for convenience let's break the usual layout rules.
Overtype the opening Grid tag with "StackPanel". Notice how Visual Studio helpfully changes that closing tag to match.
Paste into the StackPanel:
<TextBlock Text="{Binding MyString}"/>
Notice the syntax for a Binding. Binding is a markup extension so it goes in curly braces.
The property you're binding to is MyString so that is binding the Text dependency property of TextBlock to your MyString property of the DataContext it's inherited from the parent WIndow. That's a sort of shortcut used there, the full syntax would be {Binding Path=MyString}. The Path= is optional unless you're using some complicated options on the Binding. Let's gloss over them for now and stick to the easy stuff.
For a moment, remove the "MyString" from that binding and type a space after "Binding". Intellisense will pop up a set of options for you. Type "M" and you should see it scrolls up MyString. This is a handy aspect of the way we instantiated the ViewModel in XAML. The designer can see that class there and it's going to be able to find and check the properties. That's pretty useful.
Since it has a value set there where you declare the variable, you should see the result in the designer:
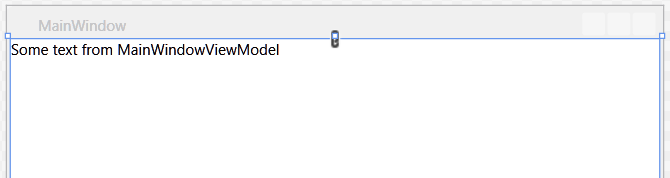
That's pretty handy as well. This is very simple what we're doing here but if you constructed a complex type in the parameterless constructor of your ViewModel then that could also be presented. That means you could get say a whole datagrid's worth of data up there in your designer and show you how the thing will look whilst running. That can save you a fair bit of time in your day.
Spin it up for a ride with an f5, just to check it looks the same but there should be no surprises there when you run it.
Add a Button
OK that code was largely pretty easy stuff. Things are about to liven up and get a bit more complicated though.
All very interesting showing static data but we're going to want buttons to make our apps do stuff. The button itself is pretty easy.
Beneath your TextBlock, paste in:
<Button
    Content="Change String"
    />
This is MVVM and events are out, Binding is in.
What we're going to do here is bind the Command dependency property on that Button to an ICommand.
Almost all commands you use will be custom commands and these are not your friend. That's one of the reasons why you're going to want to use one of the free frameworks to help out.
But we're getting a bit ahead of lesson 1.
The idea here is to show you how ICommand works straight out the box and in the process show you why this will probably be your first and last time implementing one of these things in this way.
Add an ICommand
What we're going to do is change the value of that text property. Add a class to your project and call it ChangeTextCommand. Yes, that's right, adding another class isn't very nice really and you could make this a bit nicer by using delegates.
Paste in the following:
public class  ChangeTextCommand : ICommand
{
    public MainWindowViewModel mwv;
    private int  i = 0;
    public bool  CanExecute(object  parameter)
    {
        return true;
    }
    public event  EventHandler CanExecuteChanged
    {
        add { CommandManager.RequerySuggested += value; }
        remove { CommandManager.RequerySuggested -= value; }
    }
    public void  Execute(object  parameter)
    {
        i++;
        mwv.MyString = "Hey, you Clicked me "  + i.ToString();
    }
}
You'll also need to resolve or add a using:
using System.Windows.Input;
Hit Shift+Ctrl+B/f6 to compile this because we're going to be using this thing in the ViewModel.
You can read up more on the ICommand from that link above. There are three things to this though.
Execute
The Execute method is the thing which does stuff. This is the click event equivalent.
As you can see, that uses a reference to the MainWindowViewModel to set the string.
CanExecute
This property says whether the command can be executed or not. If this returns false then a bound button will be IsEnabled=false and greyed. You can therefore use this to handle functionality like stopping a user starting the Execute process running whilst it's already running.
CanExecuteChanged
Firing this event will tell the View that the state of CanExecute has changed and it should re-read the property. You would therefore want to raise this on changing CanExecute.
Use The Command
Having defined a command we need a public ICommand added to MainWindowViewModel to expose it for binding. Paste the following in:
#region iCommand example
        private ICommand changeText;
        public ICommand ChangeText
        {
            get
            {
                return changeText;
            }
            set
            {
                changeText = value;
            }
        }

        public MainWindowViewModel()
        {
            changeText = new  ChangeTextCommand { mwv = this};
        }
#endregion
That adds the public property with it's private variable backer. The constructor sets that to an instance of ChangeTextCommand and passes in a reference to itself so the command can set MyText. You'll need to add/resolve that same using mentioned above.
That aspect is particularly clunky and a good reason of itself to look for a neater way to do this. Changing variables in some other class is pretty nasty stuff and would make it very difficult to follow code of any substance.
We still need to add the binding so hit f6 to compile the change.
Assuming that compiles OK then change the button in MainWindow:
<Button
    Command="{Binding ChangeText}"
    Content="Change String"
    />
If you prefer typing, Intellisense should find ChangeText as described for MyString.
Try it
Press f5 and spin her up. Click the button.
Nothing happens.
If you put a break point in ChangeTextCommand.Execute you will find it's hit and so the property is changed. You just don't see any difference in the View.
What's going on there then?
INotifyPropertyChanged
The View isn't showing any change in the property because it has to be told there's a change and it should go re-read the value of a property. This property changed notification is done by implementing the INotifyPropertyChanged interface. Property change notification works by raising an event which notifies the View that a property with a particular name (string) has changed it's value.
This goes into MainWindowViewModel, paste the following over the top of that:
public class  MainWindowViewModel : INotifyPropertyChanged
{
    private string  myString = "Some text from MainWindowViewModel";
    public string  MyString
    {
        get { return myString; }
        set
        {
            myString = value;
            NotifyPropertyChanged();
        }
    }
    public event  PropertyChangedEventHandler PropertyChanged;
    private void  NotifyPropertyChanged([CallerMemberName] String propertyName = "")
    {
        if (PropertyChanged != null)
        {
            PropertyChanged(this, new  PropertyChangedEventArgs(propertyName));
        }
    }
You will then have to add/resolve usings for System.Runtime.CompilerServices and System.ComponentModel.
As explained in ( more detail in ) the above msdn link that uses CallerMemberName to work out which property setter calls NotifyPropertyChanged and passes that string as an argument. The View will then read the value out the ViewModel.
Spin her up and this time when you click the button the text changes to "Hey, you clicked me " followed by a number which increments for each click of the button.
That's it, done.
Summary
This is intentionally mostly pretty simple stuff.
You've seen:
- Connect a ViewModel to the View.
- Bind simple data to the view.
- Notify of changes to data from ViewModel to View so it reads that data again.
- Implement an ICommand
- How ICommands are rather a nuisance "straight out the box".