Note
Access to this page requires authorization. You can try signing in or changing directories.
Access to this page requires authorization. You can try changing directories.
Intel AMT Profile Creation
For details about creating an Intel AMT profile, please refer to Intel(R)_SCS_Addon_SCCM_2012.pdf document included in the Intel SCS Add-on for Microsoft System Center Configuration Manager package.
1. Run [Intel SCS Console] and click on [Profiles].
2. Click on the “+” button.

3. Type as the following and click [OK].
[Profile Type] = “Intel AMT”
[Profile Name] = “Contoso_RCS_AMT_Profile”
Important Note: Don’t use spaces in the profile name.
4. Select [Configuration/Recofiguration and click [Next].
5. Check the next 3 options and click [Next].
- Active Directory Integration
- Access Control List (ACL)
- Transport Layer Security (TLS)

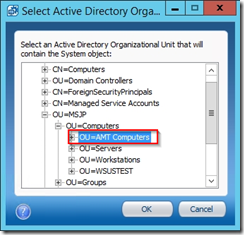
6. Select [Active Directory OU] by clicking on […] button.
7. Select the OU create in AD Configuration of Part 1 called [AMT Computers] then click [OK].

8. Click [Next].
9. Click [Add].
10. Click on [Browse]
11. Type the AMT admin group(SC2012CM R2 AMT Administrators) and click [OK].
12. Select [Both] for “Access type” and select [PT Administration] for “Realms”

13. Click [Next]
14. In the [Select the method for creating the certificate], select ”Request certificate from Microsoft CA”, as [Certificate Authority], select the CA server.
In the [Server Certificate Template], select “AMTClientConfigurationCertificate”. Click on [Next].

15. In the [Intel MEBX Password] field, type the password like ”P@ssw0rd”.
Select [Using the following password for all systems] and type the password ”P@ssw0rd”.
Check [Enable Intel AMT to respond to ping requests] and click [Next].
