Note
Access to this page requires authorization. You can try signing in or changing directories.
Access to this page requires authorization. You can try changing directories.
Your organization can implement phishing-resistant, modern, and passwordless authentication via user X.509 certificates by using Microsoft Entra certificate-based authentication (CBA).
In this article, learn how to set up your Microsoft Entra tenant to either allow or require tenant users to authenticate by using X.509 certificates. A user creates an X.509 certificate by using an enterprise public key infrastructure (PKI) for application and browser sign-in.
When Microsoft Entra CBA is set up, during sign-in, a user sees an option to authenticate by using a certificate instead of by entering a password. If multiple matching certificates are located on the device, the user selects the relevant certificate, and the certificate is validated against the user account. If validation succeeds, the user signs in.
Complete the steps described in this article to configure and use Microsoft Entra CBA for tenants in Office 365 Enterprise and US Government plans. You must already have a PKI configured.
Prerequisites
Make sure that the following prerequisites are in place:
- At least one certificate authority (CA) and any intermediate CAs are configured in Microsoft Entra ID.
- The user has access to a user certificate issued from a trusted PKI configured on the tenant intended for client authentication in Microsoft Entra ID.
- Each CA has a certificate revocation list (CRL) that can be referenced from internet-facing URLs. If the trusted CA doesn't have a CRL configured, Microsoft Entra ID doesn't perform any CRL checking, revocation of user certificates doesn't work, and authentication isn't blocked.
Considerations
Make sure that the PKI is secure and can't be easily compromised. If a breach occurs, the attacker can create and sign client certificates and compromise any user in the tenant, including users who are synchronized from on-premises. A strong key protection strategy and other physical and logical controls can provide defense-in-depth to prevent external attackers or insider threats from compromising the integrity of the PKI. For more information, see Securing PKI.
For best practices for Microsoft Cryptography, including choice of algorithm, key length, and data protection, see Microsoft recommendations. Be sure to use one of the recommended algorithms, a recommended key length, and NIST-approved curves.
As part of ongoing security improvements, Azure and Microsoft 365 endpoints added support for TLS 1.3. The process is expected to take a few months to cover the thousands of service endpoints across Azure and Microsoft 365. The Microsoft Entra endpoint that Microsoft Entra CBA uses are included in the update:
*.certauth.login.microsoftonline.comand*.certauth.login.microsoftonline.us.TLS 1.3 is the most recent version of the internet’s most commonly deployed security protocol. TLS 1.3 encrypts data to provide a secure communication channel between two endpoints. It eliminates obsolete cryptographic algorithms, enhances security over earlier versions, and encrypts as much of the handshake as possible. We highly recommend that you start testing TLS 1.3 in your applications and services.
When you evaluate a PKI, it's important to review certificate issuance policies and enforcement. As described earlier, adding CAs to a Microsoft Entra configuration allows certificates issued by those CAs to authenticate any user in Microsoft Entra ID.
It's important to consider how and when CAs are allowed to issue certificates and how they implement reusable identifiers. Administrators need only ensure that a specific certificate can be used to authenticate a user, but they should exclusively use high-affinity bindings to achieve a higher level of assurance that only a specific certificate can authenticate the user. For more information, see High-affinity bindings.
Configure and test Microsoft Entra CBA
You must complete some configuration steps before you turn on Microsoft Entra CBA.
An admin must configure the trusted CAs that issue user certificates. As shown in the following diagram, Azure uses role-based access control (RBAC) to ensure that only least-privileged administrators are required to make changes.
Important
Microsoft recommends that you use roles with the fewest permissions. This practice helps improve security for your organization. Global Administrator is a highly privileged role that should be limited to emergency scenarios or when you can't use an existing role.
Optionally, you can configure authentication bindings to map certificates to single-factor authentication or to multifactor authentication (MFA). Configure username bindings to map the certificate field to an attribute of the user object. An Authentication Policy Administrator can configure user-related settings.
When all configurations are finished, turn on Microsoft Entra CBA on the tenant.
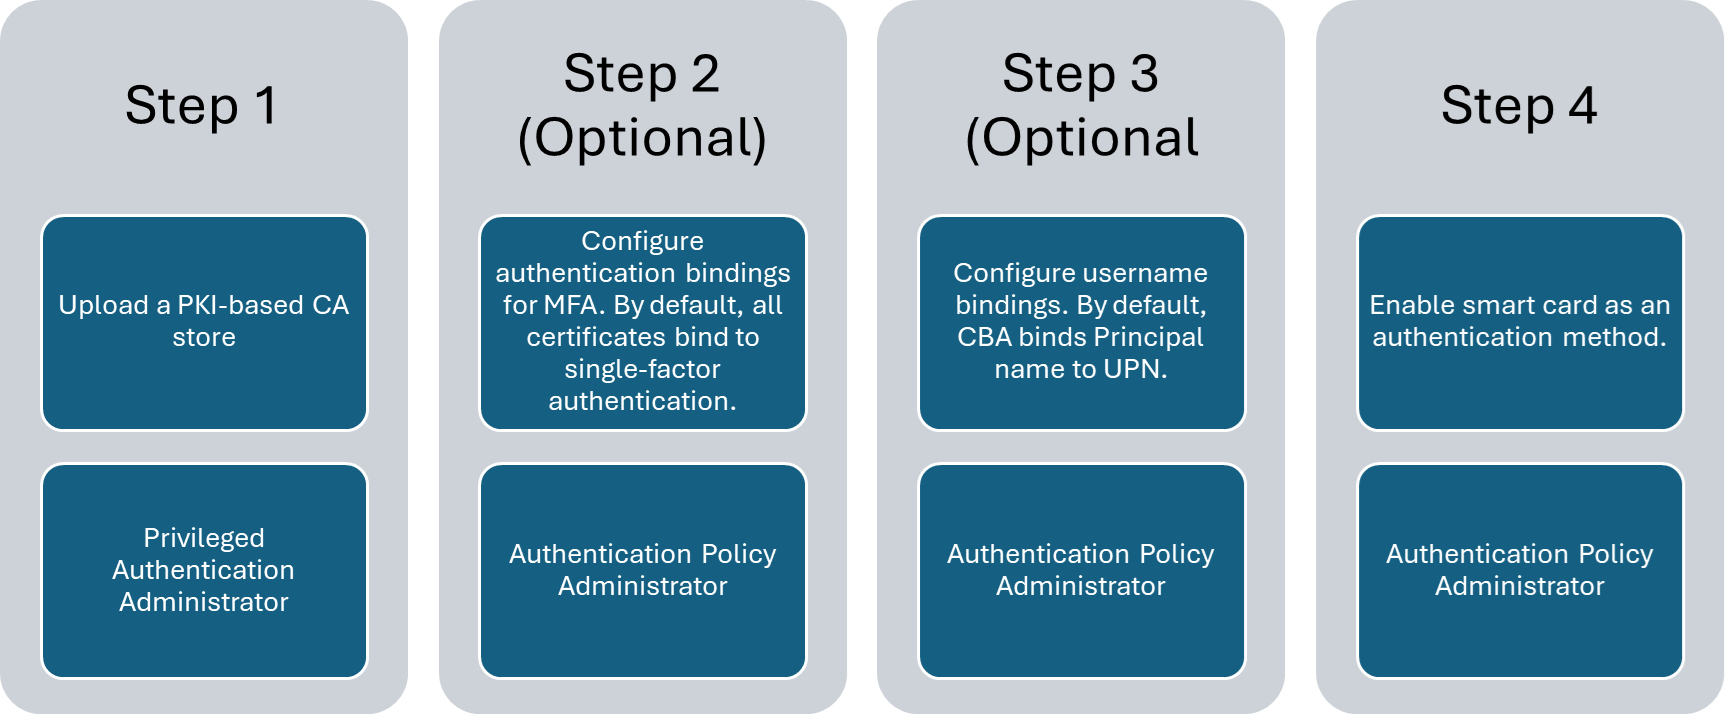
Step 1: Configure the CAs with a PKI-based trust store
Microsoft Entra has a new PKI-based CA trust store. The trust store keeps CAs inside a container object for each PKI. Admins can manage CAs in a container based on PKI more easily than they can manage a flat list of CAs.
The PKI-based trust store has higher limits than the classic trust store for the number of CAs and the size of each CA file. A PKI-based trust store supports up to 250 CAs and 8 KB for each CA object.
If you use the classic trust store to configure CAs, we highly recommend that you set up a PKI-based trust store. The PKI-based trust store is scalable and supports new functionality, like issuer hints.
An admin must configure the trusted CAs that issue user certificates. Only least-privileged administrators are required to make changes. A PKI-based trust store is assigned the Privileged Authentication Administrator role.
The PKI upload feature of the PKI-based trust store is available only with a Microsoft Entra ID P1 or P2 license. However, with the Microsoft Entra free license, an admin can upload all the CAs individually instead of by uploading a PKI file. Then, they can configure the PKI-based trust store and add their uploaded CA files.
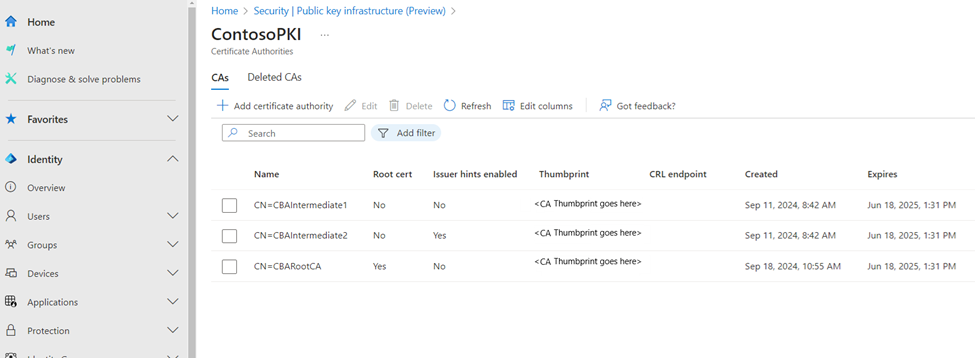
Configure CAs by using the Microsoft Entra admin center
Create a PKI container object (Microsoft Entra admin center)
To create a PKI container object:
Sign in to the Microsoft Entra admin center with an account that is assigned the Privileged Authentication Administrator role.
Go to Entra ID > Identity Secure Score > Public key infrastructure.
Select Create PKI.
For Display Name, enter a name.
Select Create.
To add or delete columns, select Edit columns.
To refresh the list of PKIs, select Refresh.

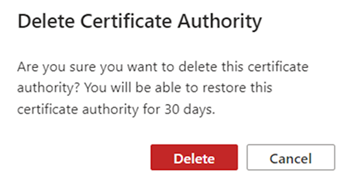
Delete a PKI container object
To delete a PKI, select the PKI and select Delete. If the PKI contains CAs, enter the name of the PKI to acknowledge the deletion of all CAs in the PKI. Then select Delete.

Upload individual CAs to a PKI container object
To upload a CA to a PKI container:
Select Add certificate authority.
Select the CA file.
If the CA is a root certificate, select Yes. Otherwise, select No.
For Certificate Revocation List URL, enter the internet-facing URL for the CA base CRL that contains all revoked certificates. If the URL isn't set, an attempt to authenticate by using a revoked certificate doesn't fail.
For Delta Certificate Revocation List URL, enter the internet-facing URL for the CRL that contains all revoked certificates since the last base CRL was published.
If the CA shouldn't be included in issuer hints, turn off issuer hints. The Issuer hints flag is off by default.
Select Save.
To delete a CA, select the CA and select Delete.
To add or delete columns, select Edit columns.
To refresh the list of PKIs, select Refresh.
Initially, 100 CA certificates are shown. More appear as you scroll down the pane.
Upload all CAs to a PKI container object
To bulk-upload all CAs to a PKI container:
Create a PKI container object or open an existing container.
Select Upload PKI.
Enter the HTTP internet-facing URL of the
.p7bfile.Enter the SHA-256 checksum of the file.
Select the upload.
The PKI upload process is asynchronous. As each CA is uploaded, it's available in the PKI. The entire PKI upload can take up to 30 minutes.
Select Refresh to refresh the list of CAs.
Each uploaded CA CRL endpoint attribute is updated with the CA certificate's first available HTTP URL listed as the CRL distribution points attribute. You must manually update any leaf certificates.
To generate the SHA-256 checksum of the PKI .p7b file, run:
Get-FileHash .\CBARootPKI.p7b -Algorithm SHA256
Edit a PKI
- On the PKI row, select ... and select Edit.
- Enter a new PKI name.
- Select Save.
Edit a CA
- On the CA row, select ... and select Edit.
- Enter new values for the CA type (root or intermediate), the CRL URL, the delta CRL URL, or the issuer hints-enabled flag per your requirements.
- Select Save.
Bulk-edit the issuer hints attribute
- To edit multiple CAs and turn on or turn off the Issuer hints enabled attribute, select multiple CAs.
- Select Edit, and then select Edit issuer hints.
- Select the Issuer hints enabled checkbox for all selected CAs or clear the selection to turn off the Issuer hints enabled flag for all selected CAs. The default value is Indeterminate.
- Select Save.
Restore a PKI
- Select the Deleted PKIs tab.
- Select the PKI and select Restore PKI.
Restore a CA
- Select the Deleted CAs tab.
- Select the CA file, and then select Restore certificate authority.
Configure the isIssuerHintEnabled attribute for a CA
Issuer hints send back a trusted CA indicator as part of the Transport Layer Security (TLS) handshake. The trusted CA list is set to the subject of the CAs that the tenant uploads to the Microsoft Entra trust store. For more information, see Understanding issuer hints.
By default, the subject names of all CAs in the Microsoft Entra trust store are sent as hints. If you want to send back a hint only for specific CAs, set the issuer hint attribute isIssuerHintEnabled to true.
The server can send back to the TLS client a maximum 16-KB response for the issuer hints (the subject name of the CA). We recommend that you set the isIssuerHintEnabled attribute to true only for the CAs that issue user certificates.
If multiple intermediate CAs from the same root certificate issue user certificates, by default, all certificates appear in the certificate picker. If you set isIssuerHintEnabled to true for specific CAs, only the relevant user certificates appear in the certificate picker.
Configure CAs by using Microsoft Graph APIs
The following examples show how to use Microsoft Graph to run Create, Read, Update, and Delete (CRUD) operations via HTTP methods for a PKI or CA.
Create a PKI container object (Microsoft Graph)
PATCH https://graph.microsoft.com/beta/directory/publicKeyInfrastructure/certificateBasedAuthConfigurations/
Content-Type: application/json
{
   "displayName": "ContosoPKI"
}
Get all PKI objects
GET https://graph.microsoft.com/beta/directory/publicKeyInfrastructure/certificateBasedAuthConfigurations
ConsistencyLevel: eventual
Get a PKI object by PKI ID
GET https://graph.microsoft.com/beta/directory/publicKeyInfrastructure/certificateBasedAuthConfigurations/<PKI-ID>/
ConsistencyLevel: eventual
Upload CAs by using a .p7b file
PATCH https://graph.microsoft.com/beta/directory/publicKeyInfrastructure/certificateBasedAuthConfigurations/<PKI-id>/certificateAuthorities/<CA-ID>
Content-Type: application/json
{
     "uploadUrl":"https://CBA/demo/CBARootPKI.p7b,
     "sha256FileHash": "AAAAAAD7F909EC2688567DE4B4B0C404443140D128FE14C577C5E0873F68C0FE861E6F"
}
Get all CAs in a PKI
GET https://graph.microsoft.com/beta/directory/publicKeyInfrastructure/certificateBasedAuthConfigurations/<PKI-ID>/certificateAuthorities
ConsistencyLevel: eventual
Get a specific CA in a PKI by CA ID
GET https://graph.microsoft.com/beta/directory/publicKeyInfrastructure/certificateBasedAuthConfigurations/<PKI-ID>/certificateAuthorities/<CA-ID>
ConsistencyLevel: eventual
Update a specific CA issuer hints flag
PATCH https://graph.microsoft.com/beta/directory/publicKeyInfrastructure/certificateBasedAuthConfigurations/<PKI-ID>/certificateAuthorities/<CA-ID>
Content-Type: application/json
{
   "isIssuerHintEnabled": true
}
Configure CAs by using PowerShell
For these steps, use Microsoft Graph PowerShell.
Start PowerShell by using the Run as administrator option.
Install and import the Microsoft Graph PowerShell SDK:
Install-Module Microsoft.Graph -Scope AllUsers
Import-Module Microsoft.Graph.Authentication
Set-ExecutionPolicy -ExecutionPolicy RemoteSigned -Scope CurrentUser
Connect to the tenant and accept all:
Connect-MGGraph -Scopes "Directory.ReadWrite.All", "User.ReadWrite.All" -TenantId <tenantId>
Prioritization between a PKI-based trust store and a classic CA store
If a CA exists in both a PKI-based CA store and a classic CA store, the PKI-based trust store is prioritized.
A classic CA store is prioritized in these scenarios:
- A CA exists on both stores, the PKI-based store has no CRL, but the classic store CA has a valid CRL.
- A CA exists on both stores, and the PKI-based store CA CRL is different from the classic store CA CRL.
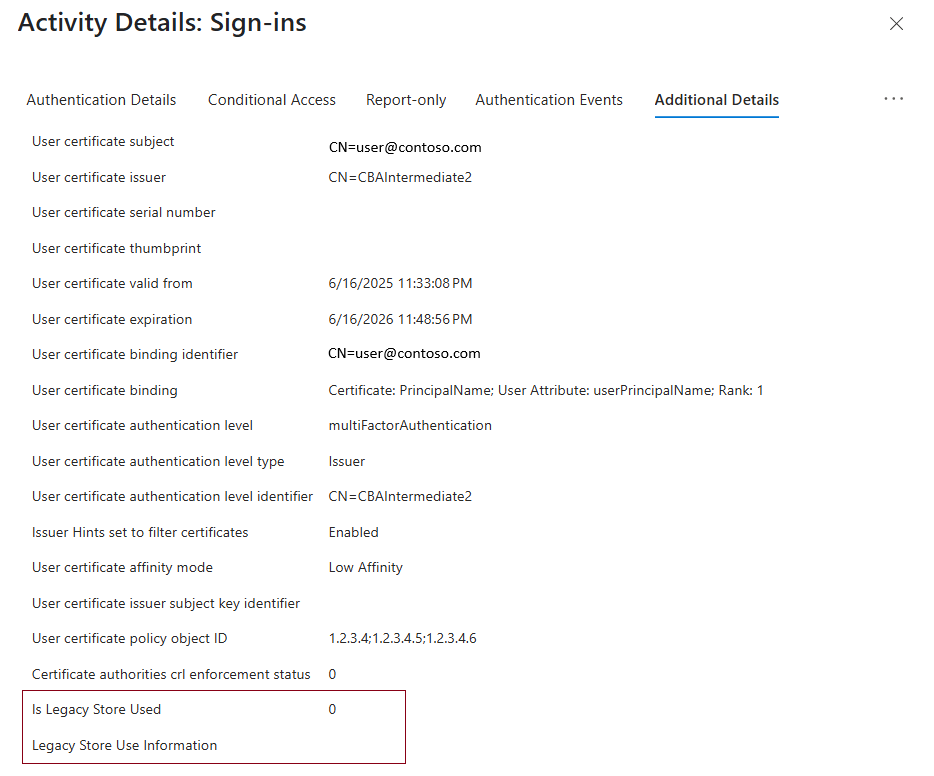
Sign-in log
A Microsoft Entra sign-in log interrupted entry has two attributes under Additional Details to indicate whether the classic or legacy trust store was used at all during authentication.
- Is Legacy Store Used has a value of 0 to indicate that a PKI-based store is used. A value of 1 indicates that a classic or legacy store is used.
- Legacy Store Use Information displays the reason the classic or legacy store is used.
Audit log
Any CRUD operations that you run on a PKI or CA inside the trust store appear in the Microsoft Entra audit logs.

Migrate from a classic CA store to a PKI-based store
A tenant admin can upload all CAs to the PKI-based store. The PKI CA store then has priority over a classic store, and all CBA authentication occurs via the PKI-based store. A tenant admin can remove the CAs from a classic or legacy store after they confirm no indication in the sign-in logs that the classic or legacy store was used.
FAQs
Why does PKI upload fail?
Verify that the PKI file is valid and that it can be accessed without any issues. The maximum size of the PKI file is 2 MB (250 CAs and 8 KB for each CA object).
What is the service level agreement for PKI upload?
PKI upload is an asynchronous operation and can take up to 30 minutes to finish.
How do I generate an SHA-256 checksum for a PKI file?
To generate the SHA-256 checksum of the PKI .p7b file, run this command:
Get-FileHash .\CBARootPKI.p7b -Algorithm SHA256
Step 2: Turn on CBA for the tenant
Important
A user is considered capable of completing MFA when the user is designated as in scope for CBA in the authentication methods policy. This policy requirement means that a user can't use identity proof as part of their authentication to register other available methods. If the user doesn't have access to certificates, they're locked out and can't register other methods for MFA. Admins who are assigned the Authentication Policy Administrator role must turn on CBA only for users who have valid certificates. Don't include All users for CBA. Use only groups of users who have valid certificates available. For more information, see Microsoft Entra multifactor authentication.
To turn on CBA via the Microsoft Entra admin center:
Sign in to the Microsoft Entra admin center with an account that is assigned at least the Authentication Policy Administrator role.
Go to Groups > All groups.
Select New group and create a group for CBA users.
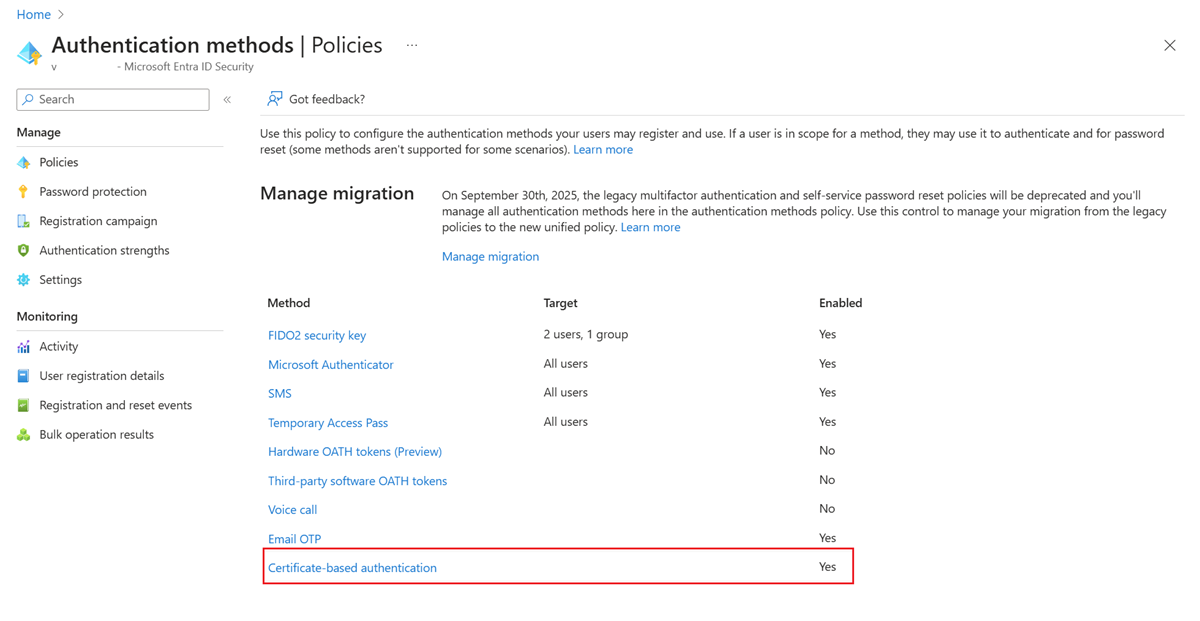
Go to Entra ID > Authentication methods > Certificate-based authentication.
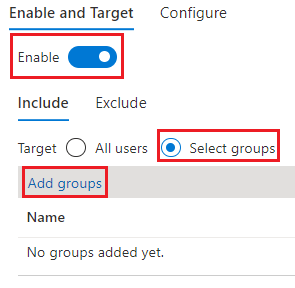
Under Enable and Target, select Enable, and then select the I Acknowledge checkbox.
Choose Select groups > Add groups.
Choose specific groups, like the one you created, and then choose Select. Use specific groups instead of All users.
Select Save.
After CBA is turned on for the tenant, all users in the tenant see the option to sign in by using a certificate. Only users who are capable of using CBA can authenticate by using an X.509 certificate.
Note
The network administrator should allow access to the certificate authentication endpoint for the organization's cloud environment in addition to the login.microsoftonline.com endpoint. Turn off TLS inspection on the certificate authentication endpoint to make sure that the client certificate request succeeds as part of the TLS handshake.
Step 3: Configure an authentication binding policy
An authentication binding policy helps set the strength of authentication to either a single factor or to MFA. The default protection level for all certificates on the tenant is single-factor authentication.
The default affinity binding at the tenant level is low affinity. An Authentication Policy Administrator can change the default value from single-factor authentication to MFA. If the protection level changes, all certificates on the tenant are set to MFA. Similarly, the affinity binding at the tenant level can be set to high affinity. All the certificates are then validated by using only high-affinity attributes.
Important
An admin must set the tenant default to a value that is applicable for most certificates. Create custom rules only for specific certificates that need a different protection level or affinity binding than the tenant default. All authentication method configurations are in the same policy file. Creating multiple redundant rules might exceed the policy file size limit.
Authentication binding rules map certificate attributes like Issuer, Policy Object ID (OID), and Issuer and Policy OID to a specified value. The rules set the default protection level and affinity binding for that rule.
To modify default tenant settings and create custom rules via the Microsoft Entra admin center:
Sign in to the Microsoft Entra admin center with an account that is assigned at least the Authentication Policy Administrator role.
Go to Entra ID > Authentication methods > Policies.
Under Manage migrations, select Authentication methods > Certificate-based authentication.
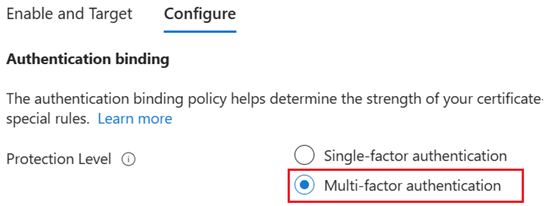
To set up authentication binding and username binding, select Configure.
To change the default value to MFA, select Multifactor authentication. The protection level attribute has a default value of Single-factor authentication.
Note
The default protection level is in effect if no custom rules are added. If you add a custom rule, the protection level defined at the rule level is honored instead of the default protection level.
You can also set up custom authentication binding rules to help determine the protection level for client certificates that need different values for protection level or affinity binding than tenant default. You can configure the rules by using either the issuer subject or the policy OID, or both fields, in the certificate.
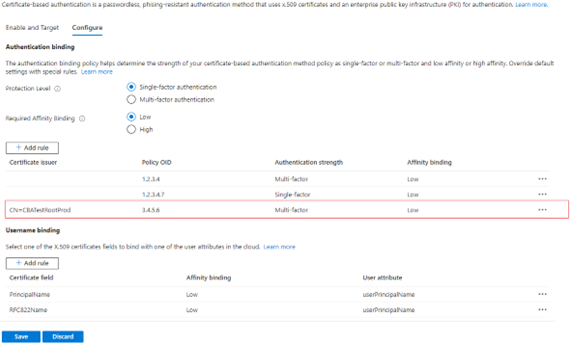
Authentication binding rules map the certificate attributes (issuer or policy OID) to a value. The value sets the default protection level for that rule. Multiple rules can be created. In the following example, assume that the tenant default is Multifactor authentication and Low for affinity binding.
To add custom rules, select Add rule.

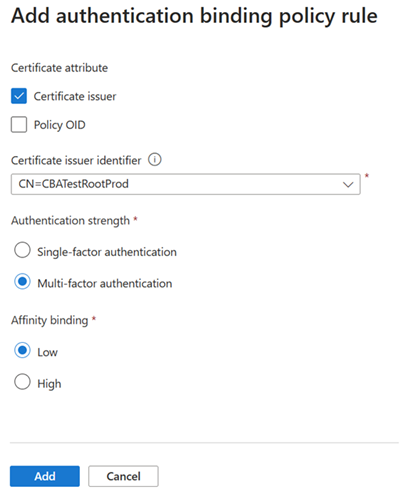
To create a rule by certificate issuer:
Select Certificate issuer.
For Certificate issuer identifier, select a relevant value.
For Authentication strength, select Multifactor authentication.
For Affinity binding, select Low.
Select Add.
When prompted, select the I Acknowledge checkbox to add the rule.
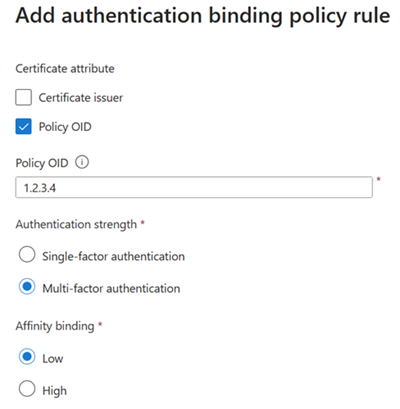
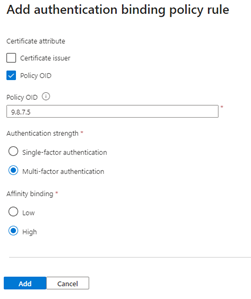
To create a rule by policy OID:
Select Policy OID.
For Policy OID, enter a value.
For Authentication strength, select Single-factor authentication.
For Affinity binding, select Low for affinity binding.
Select Add.
When prompted, select the I Acknowledge checkbox to add the rule.
To create a rule by issuer and policy OID:
Select Certificate issuer and Policy OID.
Select an issuer and enter the policy OID.
For Authentication strength, select Multifactor authentication.
For Affinity binding, select Low.
Select Add.
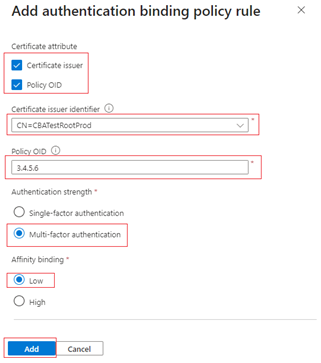
Authenticate with a certificate that has a policy OID of
3.4.5.6and is issued byCN=CBATestRootProd. Verify that authentication passes for a multifactor claim.
To create a rule by issuer and serial number:
Add an authentication binding policy. The policy requires that any certificate issued by
CN=CBATestRootProdwith a policy OID of1.2.3.4.6needs only high-affinity binding. The issuer and serial number are used.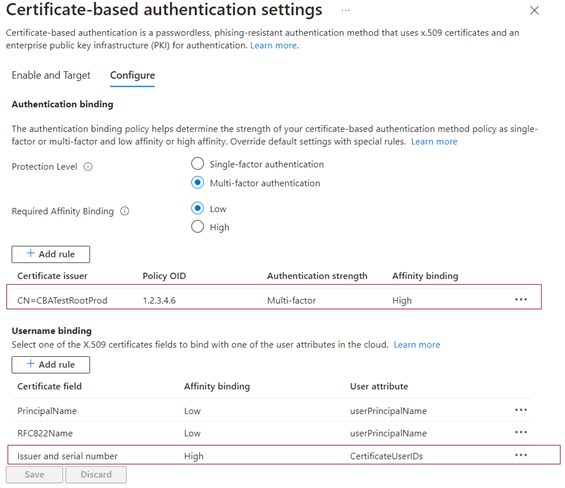
Select the certificate field. For this example, select Issuer and serial number.
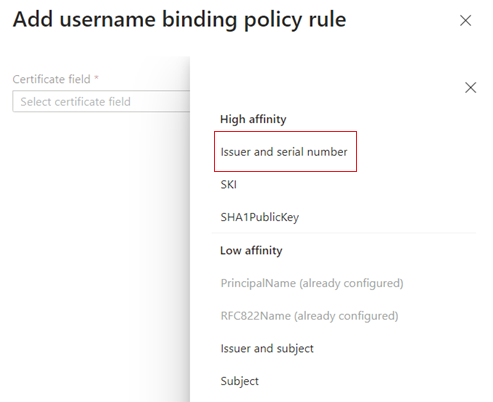
The only user attribute supported is
certificateUserIds. SelectcertificateUserIdsand select Add.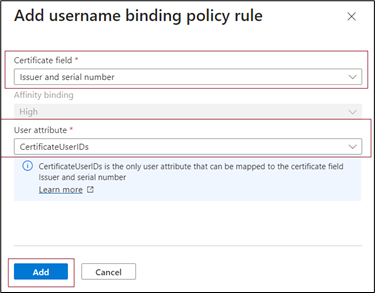
Select Save.
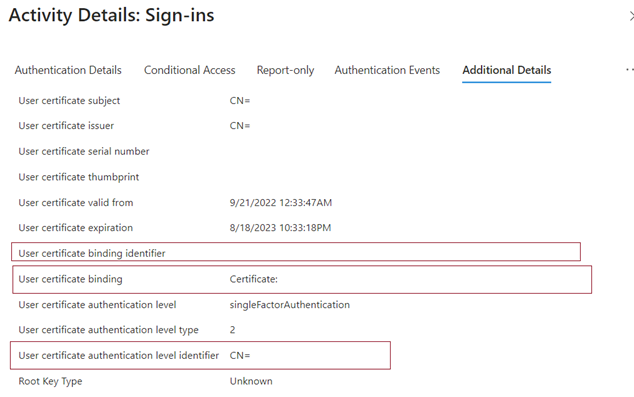
The sign-in log shows which binding was used for sign-in and the details from the certificate.
Select OK to save any custom rules.
Important
Enter the policy OID by using the object identifier format. For example, if the certificate policy says All Issuance Policies, enter the policy OID as 2.5.29.32.0 when you add the rule. The string All Issuance Policies is invalid for the rules editor and doesn't take effect.
Step 4: Configure the username binding policy
The username binding policy helps validate a user's certificate. By default, to determine the user, you map Principal Name in the certificate to userPrincipalName in the user object.
An Authentication Policy Administrator can override the default and create a custom mapping. For more information, see How username binding works.
For other scenarios that use the certificateUserIds attribute, see Certificate user IDs.
Important
If a username binding policy uses synchronized attributes like certificateUserIds, onPremisesUserPrincipalName, and the userPrincipalName attribute of the user object, accounts that have administrative permissions in on-premises Windows Server Active Directory can make changes that affect these attributes in Microsoft Entra ID. For example, accounts that have delegated rights on user objects or an administrator role on Microsoft Entra Connect Server can make these types of changes.
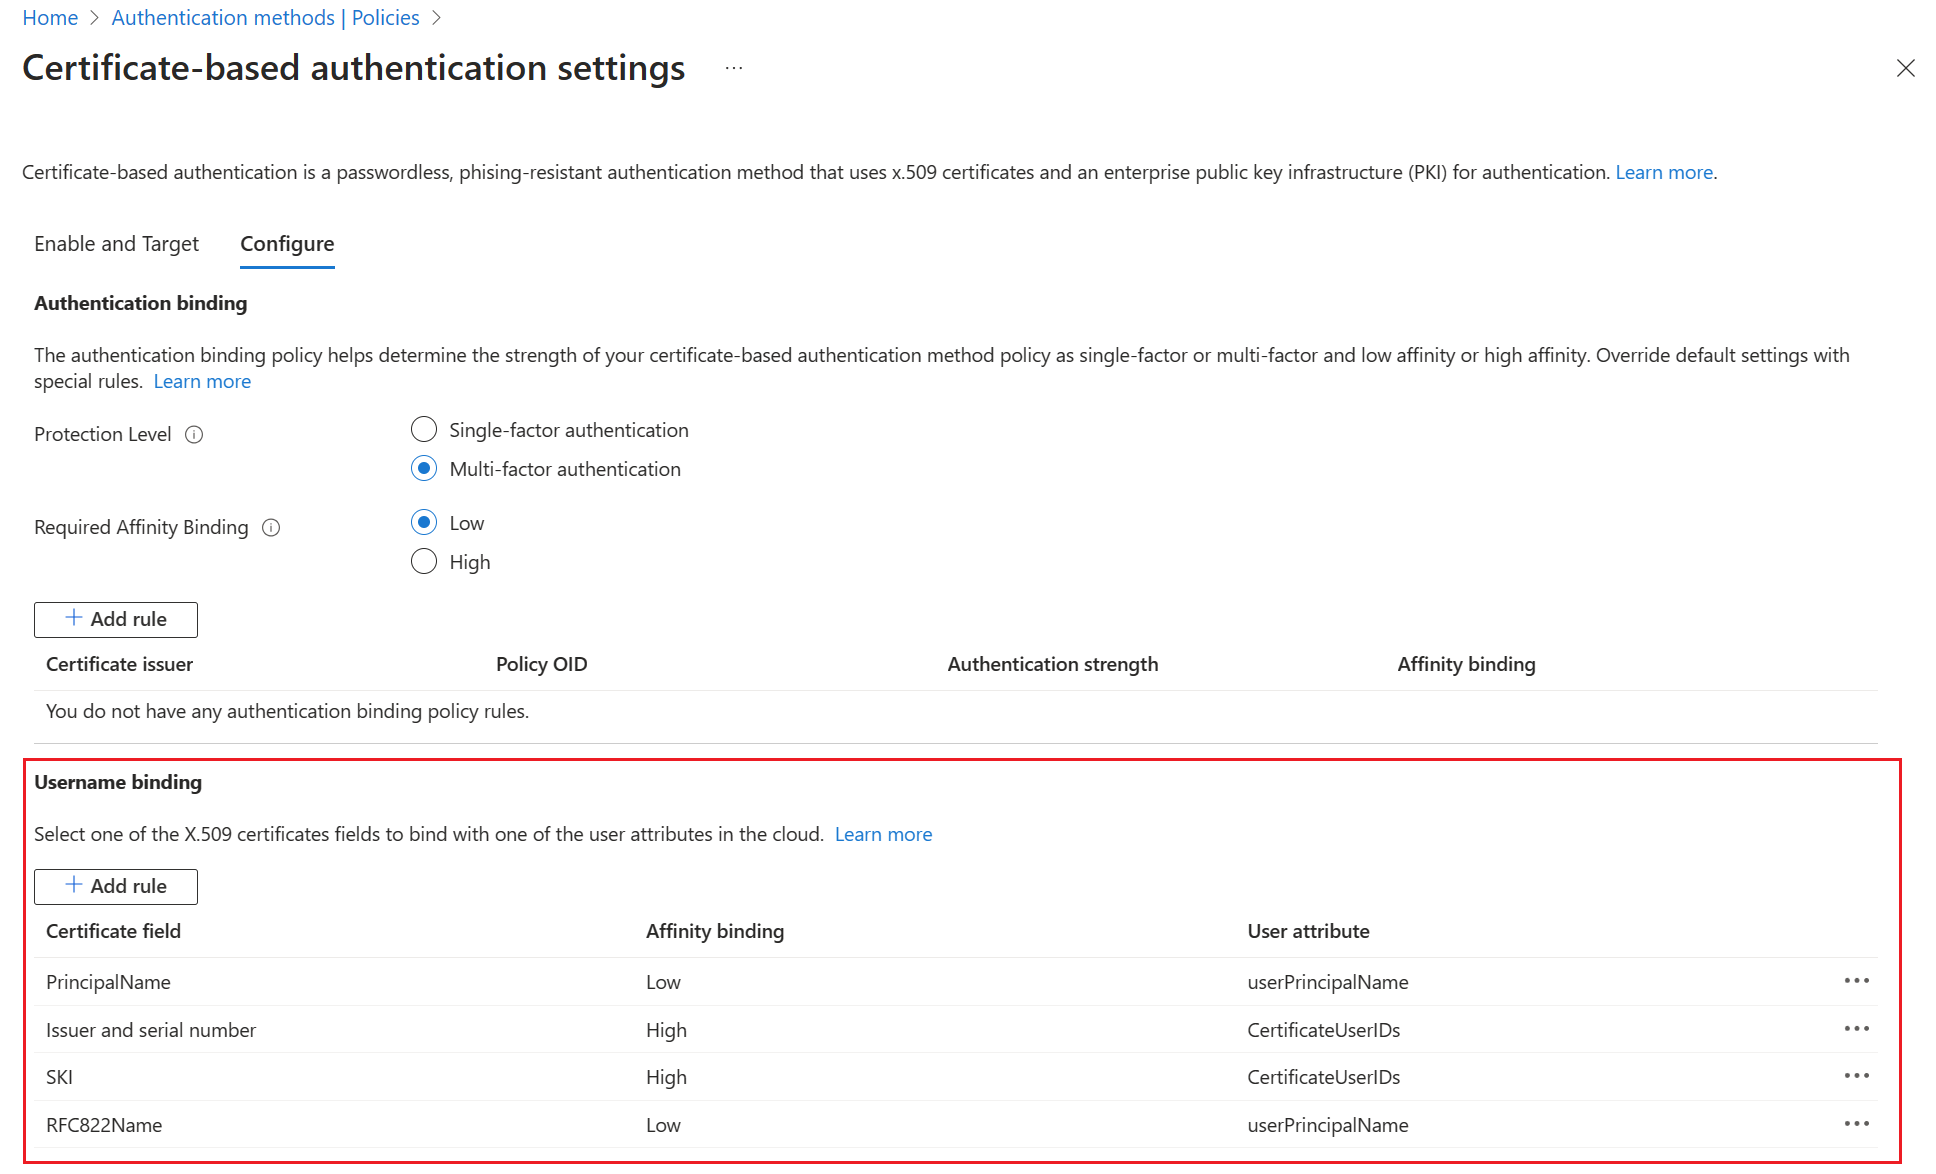
Create the username binding by selecting one of the X.509 certificate fields to bind with one of the user attributes. The username binding order represents the priority level of the binding. The first username binding has the highest priority, and so on.
If the specified X.509 certificate field is found on the certificate but Microsoft Entra ID doesn't find a user object that has a corresponding value, authentication fails. Then, Microsoft Entra ID tries the next binding in the list.
Select Save.

Your final configuration looks similar to this example:

Step 5: Test your configuration
This section describes how to test your certificate and custom authentication binding rules.
Test your certificate
In the first configuration test, attempt to sign in to the MyApps portal by using your device browser.
Enter your user principal name (UPN).

Select Next.

If you made other authentication methods available, like phone sign-in or FIDO2, your users might see a different sign-in dialog.
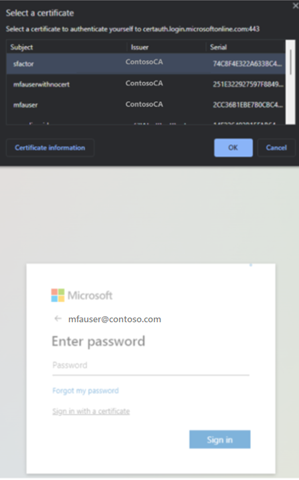
Select Sign in with a certificate.
Select the correct user certificate in the client certificate picker UI and select OK.
Verify that you're signed in to the MyApps portal.
If your sign-in is successful, then you know that:
- The user certificate is provisioned in your test device.
- Microsoft Entra ID is configured correctly to use trusted CAs.
- Username binding is configured correctly. The user is found and authenticated.
Test custom authentication binding rules
Next, complete a scenario in which you validate strong authentication. You create two authentication policy rules: one by using an issuer subject to satisfy single-factor authentication, and another by using the policy OID to satisfy multifactor authentication.
Create an issuer subject rule with a protection level of single-factor authentication. Set the value to your CA subject value.
For example:
CN=WoodgroveCACreate a policy OID rule that has a protection level of multifactor authentication. Set the value to one of the policy OIDs in your certificate. An example is
1.2.3.4.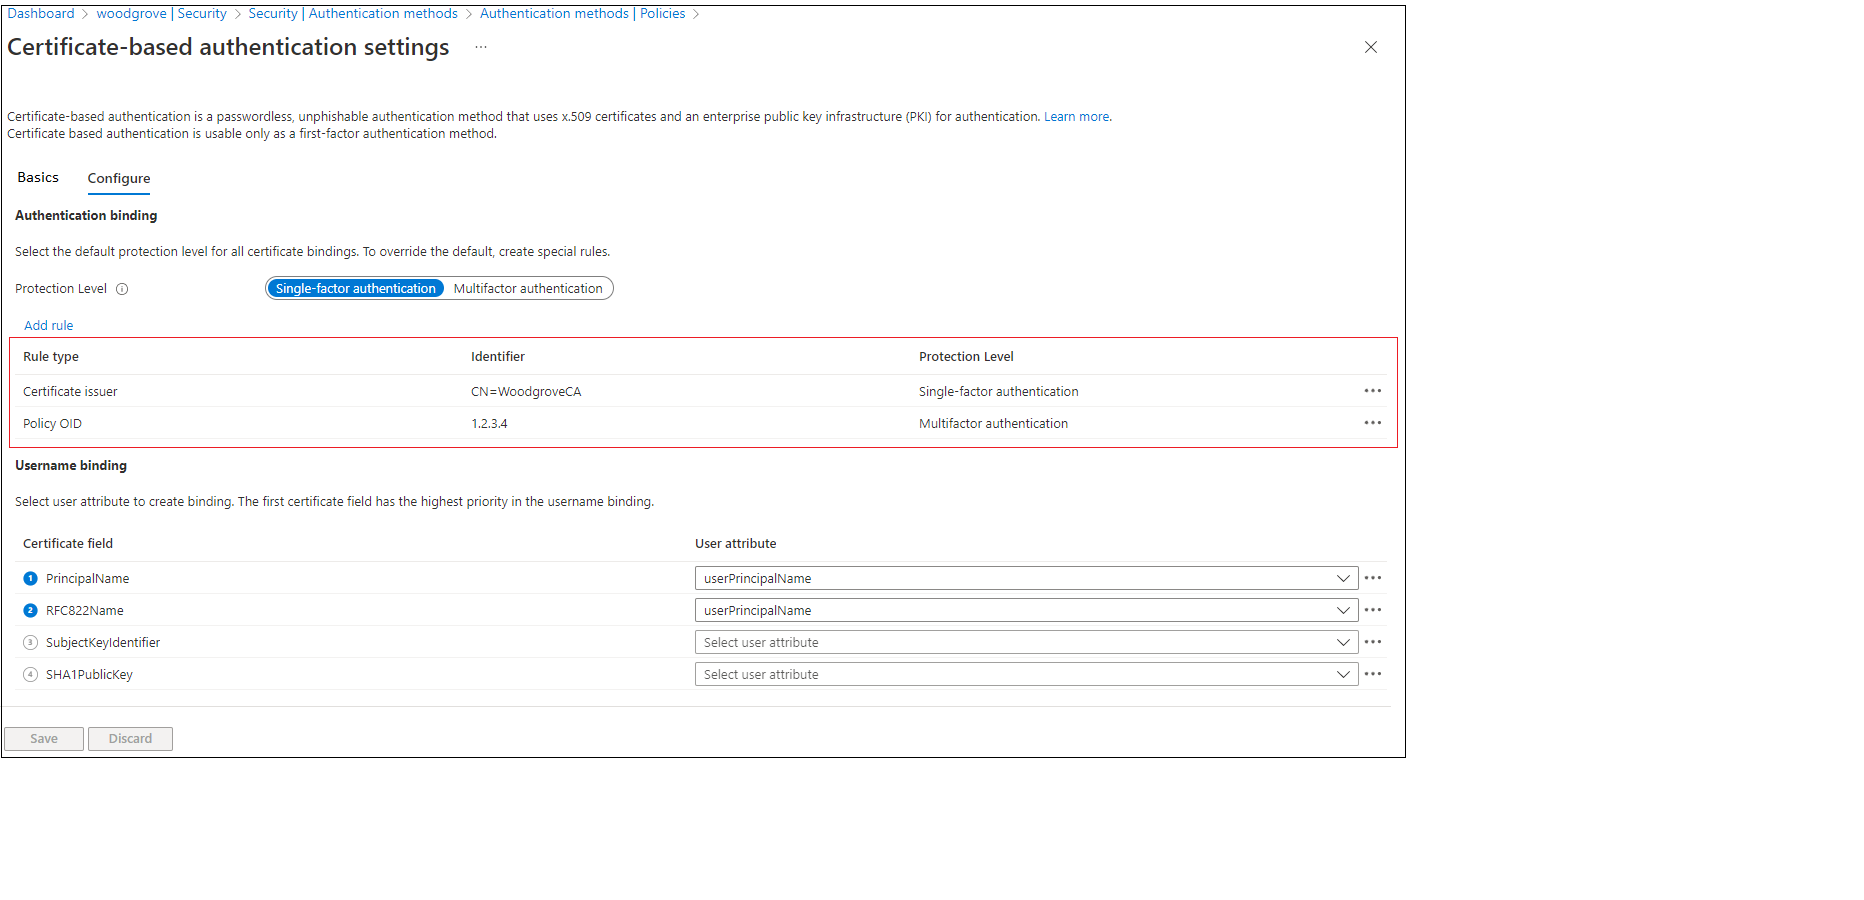
Create a Microsoft Entra Conditional Access policy for the user to require MFA. Complete the steps described in Conditional Access - Require MFA.
Go to the MyApps portal. Enter your UPN and select Next.
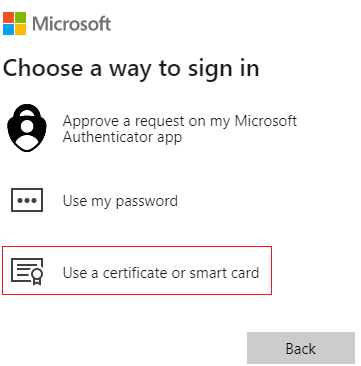
Select Use a certificate or smart card.
If you made other authentication methods available, like phone sign-in or security keys, your users might see a different sign-in dialog.
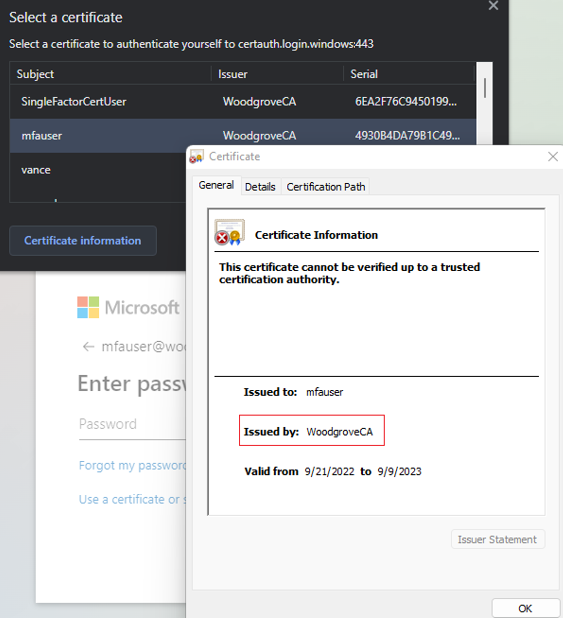
Select the client certificate, and then select Certificate Information.
The certificate appears, and you can verify the issuer and policy OID values.
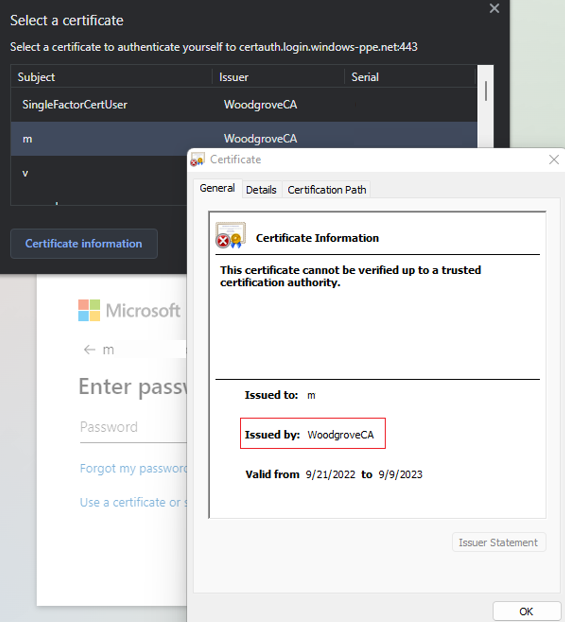
To see policy OID values, select Details.
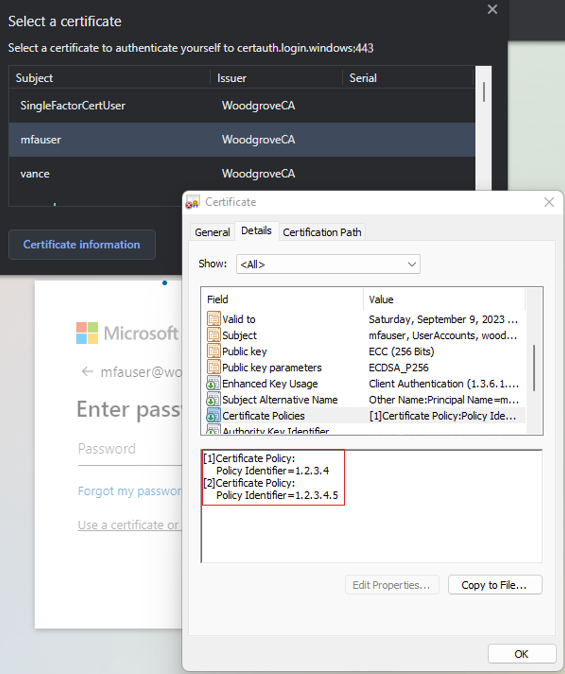
Select the client certificate and select OK.
The policy OID in the certificate matches the configured value of 1.2.3.4 and satisfies MFA. The issuer in the certificate matches the configured value of CN=WoodgroveCA and satisfies single-factor authentication.
Because the policy OID rule takes precedence over the issuer rule, the certificate satisfies MFA.
The Conditional Access policy for the user requires MFA and the certificate satisfies MFA, so the user can sign in to the application.
Test the username binding policy
The username binding policy helps validate the certificate of the user. Three bindings are supported for the username binding policy:
IssuerAndSerialNumber>certificateUserIdsIssuerAndSubject>certificateUserIdsSubject>certificateUserIds
By default, Microsoft Entra ID maps Principal Name in the certificate to userPrincipalName in the user object to determine the user. An Authentication Policy Administrator can override the default and create a custom mapping as described earlier.
An Authentication Policy Administrator must set up the new bindings. To prepare, they must make sure that the correct values for the corresponding username bindings are updated in the certificateUserIds attribute of the user object:
- For cloud-only users, use the Microsoft Entra admin center or Microsoft Graph APIs to update the value in
certificateUserIds. - For on-premises synced users, use Microsoft Entra Connect to sync the values from on-premises by following Microsoft Entra Connect Rules or by syncing the
AltSecIdvalue.
Important
The format of the values of Issuer, Subject, and Serial number must be in the reverse order of their format in the certificate. Don't add any spaces in the Issuer or Subject values.
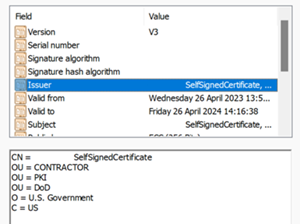
Issuer and serial number manual mapping
The following example demonstrates issuer and serial number manual mapping.
The Issuer value to add is:
C=US,O=U.SGovernment,OU=DoD,OU=PKI,OU=CONTRACTOR,CN=CRL.BALA.SelfSignedCertificate
To get the correct value for the serial number, run the following command. Store the value shown in certificateUserIds.
The command syntax is:
certutil –dump –v [~certificate path~] >> [~dumpFile path~]
For example:
certutil -dump -v firstusercert.cer >> firstCertDump.txt
Here's an example for the certutil command:
certutil -dump -v C:\save\CBA\certs\CBATestRootProd\mfausercer.cer

X509 Certificate:
Version: 3
Serial Number: 48efa06ba8127299499b069f133441b2

   b2 41 34 13 9f 06 9b 49 99 72 12 a8 6b a0 ef 48
The Serial number value to add in certificateUserId is:
b24134139f069b49997212a86ba0ef48
The certificateUserIds value is:
X509:<I>C=US,O=U.SGovernment,OU=DoD,OU=PKI,OU=CONTRACTOR,CN=CRL.BALA.SelfSignedCertificate<SR> b24134139f069b49997212a86ba0ef48
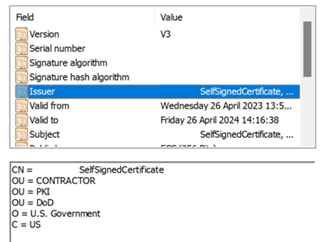
Issuer and subject manual mapping
The following example demonstrates issuer and subject manual mapping.
The Issuer value is:
The Subject value is:

The certificateUserId value is:
X509:<I>C=US,O=U.SGovernment,OU=DoD,OU=PKI,OU=CONTRACTOR,CN=CRL.BALA.SelfSignedCertificate<S> DC=com,DC=contoso,DC=corp,OU=UserAccounts,CN=FirstUserATCSession
Subject manual mapping
The following example demonstrates subject manual mapping.
The Subject value is:
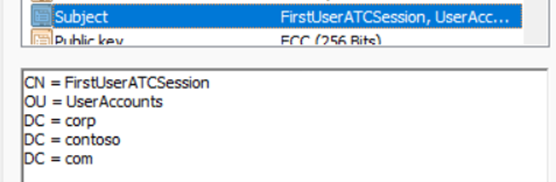
The certificateUserIds value is:
X509:<S>DC=com,DC=contoso,DC=corp,OU=UserAccounts,CN=FirstUserATCSession
Test the affinity binding
Sign in to the Microsoft Entra admin center with an account that is assigned at least the Authentication Policy Administrator role.
Go to Entra ID > Authentication methods > Policies.
Under Manage, select Authentication methods > Certificate-based authentication.
Select Configure.
Set Required Affinity Binding at the tenant level.
Important
Be careful with the tenant-wide affinity setting. You might lock out the entire tenant if you change the Required Affinity Binding value for the tenant and you don't have correct values in the user object. Similarly, if you create a custom rule that applies to all users and requires high-affinity binding, users in the tenant might be locked out.
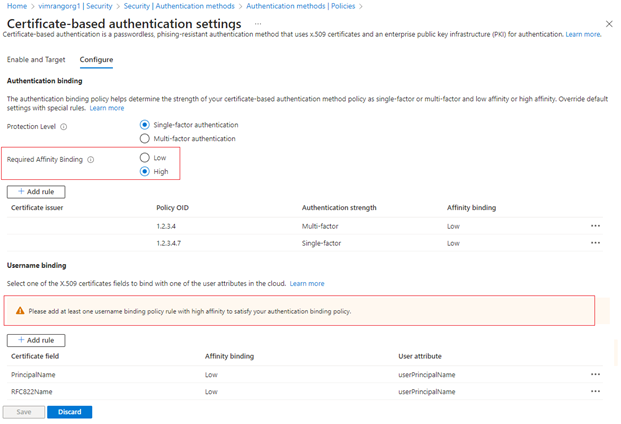
To test, for Required Affinity Binding, select Low.
Add a high-affinity binding, like subject key identifier (SKI). Under Username binding, select Add rule.
Select SKI and select Add.
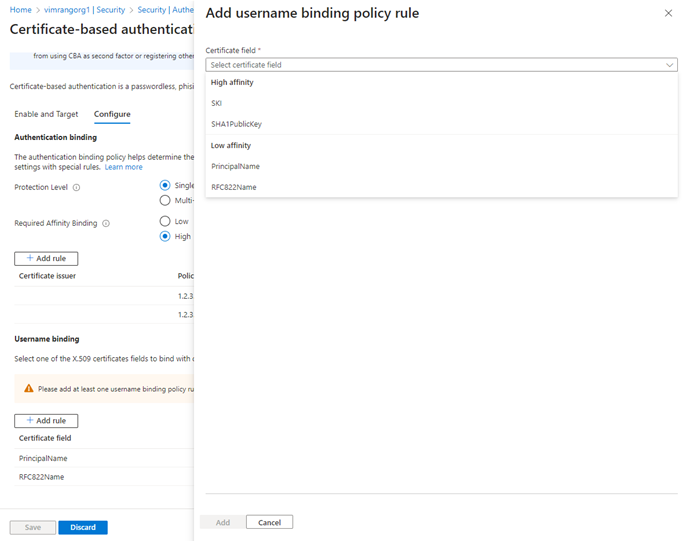
When finished, the rule looks similar to this example:
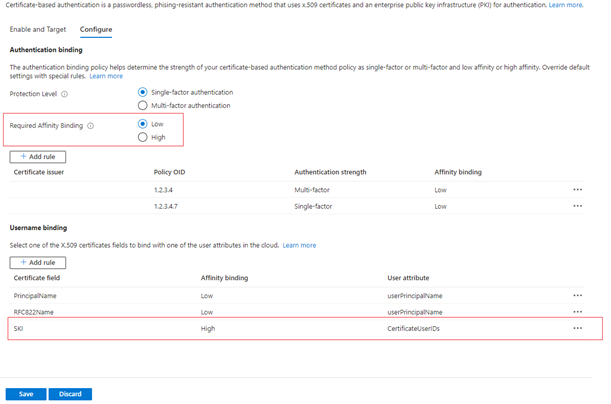
For all user objects, update the
certificateUserIdsattribute with the correct SKI value from the user certificate.For more information, see Supported patterns for CertificateUserIDs.
Create a custom rule for authentication binding.
Select Add.
Check that the completed rule looks similar to this example:

Update the user
certificateUserIdsvalue with the correct SKI value from the certificate and policy OID of9.8.7.5.Test by using a certificate with policy OID of
9.8.7.5. Verify that the user is authenticated with the SKI binding and that they're prompted to sign in with MFA and only the certificate.
Set up CBA by using Microsoft Graph APIs
To set up CBA and configure username bindings by using Microsoft Graph APIs:
Go to Microsoft Graph Explorer.
Select Sign in to Graph Explorer and sign in to your tenant.
Follow the steps to consent to the
Policy.ReadWrite.AuthenticationMethoddelegated permission.Get all authentication methods:
GET https://graph.microsoft.com/v1.0/policies/authenticationmethodspolicyGet the configuration for the X.509 certificate authentication method:
GET https://graph.microsoft.com/v1.0/policies/authenticationmethodspolicy/authenticationMethodConfigurations/X509CertificateBy default, the X.509 certificate authentication method is turned off. To allow users to sign in by using a certificate, you must turn on the authentication method and configure the authentication and username binding policies through an update operation. To update policy, run a
PATCHrequest.Request body
PATCH https://graph.microsoft.com/v1.0/policies/authenticationMethodsPolicy/authenticationMethodConfigurations/x509Certificate
Content-Type: application/json

{
    "@odata.type": "#microsoft.graph.x509CertificateAuthenticationMethodConfiguration",
    "id": "X509Certificate",
    "state": "enabled",
    "certificateUserBindings": [
        {
            "x509CertificateField": "PrincipalName",
            "userProperty": "onPremisesUserPrincipalName",
            "priority": 1
        },
        {
            "x509CertificateField": "RFC822Name",
            "userProperty": "userPrincipalName",
            "priority": 2
        },
        {
            "x509CertificateField": "PrincipalName",
            "userProperty": "certificateUserIds",
            "priority": 3
        }
    ],
    "authenticationModeConfiguration": {
        "x509CertificateAuthenticationDefaultMode": "x509CertificateSingleFactor",
        "rules": [
            {
                "x509CertificateRuleType": "issuerSubject",
                "identifier": "CN=WoodgroveCA ",
                "x509CertificateAuthenticationMode": "x509CertificateMultiFactor"
            },
            {
                "x509CertificateRuleType": "policyOID",
                "identifier": "1.2.3.4",
                "x509CertificateAuthenticationMode": "x509CertificateMultiFactor"
            }
        ]
    },
    "includeTargets": [
        {
            "targetType": "group",
            "id": "all_users",
            "isRegistrationRequired": false
        }
    ]
}
Verify that a
204 No contentresponse code returns. Rerun theGETrequest to make sure that the policies are updated correctly.Test the configuration by signing in with a certificate that satisfies the policy.
Set up CBA by using Microsoft PowerShell
Open PowerShell.
Connect to Microsoft Graph:
Connect-MgGraph -Scopes "Policy.ReadWrite.AuthenticationMethod"Create a variable to use to define a group for CBA users:
$group = Get-MgGroup -Filter "displayName eq 'CBATestGroup'"Define the request body:
$body = @{
"@odata.type" = "#microsoft.graph.x509CertificateAuthenticationMethodConfiguration"
"id" = "X509Certificate"
"state" = "enabled"
"certificateUserBindings" = @(
    @{
        "@odata.type" = "#microsoft.graph.x509CertificateUserBinding"
        "x509CertificateField" = "SubjectKeyIdentifier"
        "userProperty" = "certificateUserIds"
        "priority" = 1
    },
    @{
        "@odata.type" = "#microsoft.graph.x509CertificateUserBinding"
        "x509CertificateField" = "PrincipalName"
        "userProperty" = "UserPrincipalName"
        "priority" = 2
    },
    @{
        "@odata.type" = "#microsoft.graph.x509CertificateUserBinding"
        "x509CertificateField" = "RFC822Name"
        "userProperty" = "userPrincipalName"
        "priority" = 3
    }
)
"authenticationModeConfiguration" = @{
    "@odata.type" = "#microsoft.graph.x509CertificateAuthenticationModeConfiguration"
    "x509CertificateAuthenticationDefaultMode" = "x509CertificateMultiFactor"
    "rules" = @(
        @{
            "@odata.type" = "#microsoft.graph.x509CertificateRule"
            "x509CertificateRuleType" = "policyOID"
            "identifier" = "1.3.6.1.4.1.311.21.1"
            "x509CertificateAuthenticationMode" = "x509CertificateMultiFactor"
        }
    )
}
"includeTargets" = @(
    @{
        "targetType" = "group"
        "id" = $group.Id
        "isRegistrationRequired" = $false
    }
) } | ConvertTo-Json -Depth 5
Run the
PATCHrequest:Invoke-MgGraphRequest -Method PATCH -Uri "https://graph.microsoft.com/v1.0/policies/authenticationMethodsPolicy/authenticationMethodConfigurations/x509Certificate" -Body $body -ContentType "application/json"